
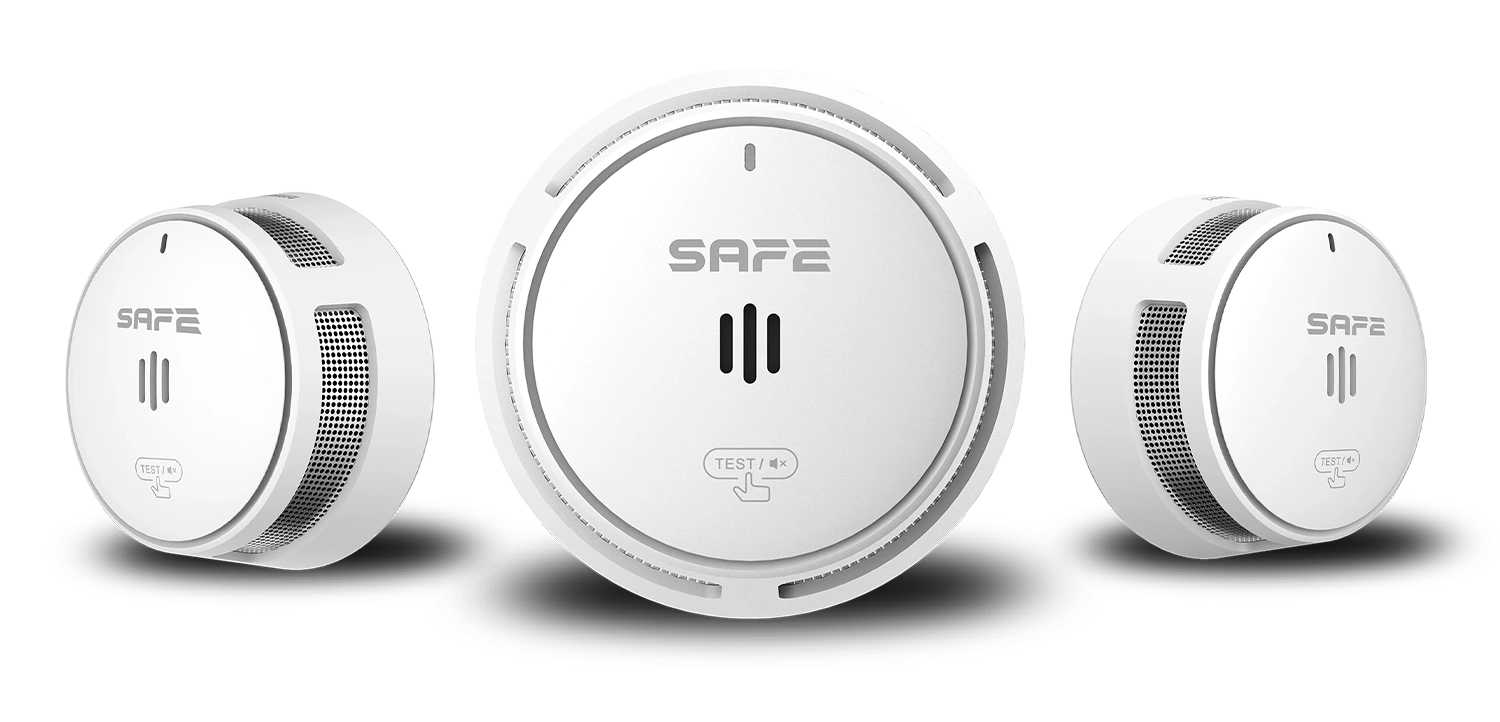
SAFE 10Y30-RF is a new-generation wireless smoke alarm with a photoelectric dual-spectrum, dust-resistant sensing chamber and SIC technology for temporarily silencing the alarm using an IR remote control. It can work as part of the FireSafe fire safety system with the support of the FireSafe Hub, or completely standalone. Power is supplied by an integrated lithium battery (built in, non-replaceable) with guaranteed operation of more than 10 years and an extended 10-year warranty on both the battery and the device itself.
Foreword
General
This user manual describes the installation, functions and operation of the wireless smoke alarm (hereinafter the “alarm”). Read the manual carefully before using the device and keep it for future reference.
Safety instructions
The following signal words may appear in the user manual:
| Signal word | Meaning |
|---|---|
| NEBEZPEČÍ | Indicates a high potential hazard which, if not avoided, may result in death or serious injury. |
| VAROVÁNÍ | Indicates a medium or low potential hazard which, if not avoided, could result in minor or moderate injury. |
| UPOZORNĚNÍ | Indicates a potential risk which could lead to property damage, data loss, reduced performance or an unpredictable result. |
| TIP | Provides methods to help you solve a problem or save time. |
| POZNÁMKA | Provides additional information, such as emphasis or a supplement to the text. |
Revision history
| Version | Revision content | Release date |
|---|---|---|
| V1.0.0 | First release. | September 2026 |
| V1.0.1 | Colours according to the FireSAFE brand (red). | October 2026 |
About the manual
- The user manual serves as a reference only. Minor differences may occur between the information provided and the product.
- We are not liable for damage resulting from use of the product in a manner that is not in accordance with the instructions in the user manual.
- The manual will be updated in line with the current laws and regulations of the relevant countries. For detailed information, see the printed user manual, scan the QR code or visit our website. The manual is for information purposes only. The electronic and printed versions may differ in minor details.
- All designs and software may be changed without prior written notice. As a result of product updates, certain differences may appear between the product and the information in the manual. The latest version of the software and supplementary documentation is available from customer service.
- Printing errors or deviations may occur in the description of functions, operations and technical data. In case of doubt or dispute, we reserve the right of final interpretation. If the manual (in PDF format) cannot be opened, update your reader software or try another common reader.
- All trademarks, registered trademarks and company names in the manual are the property of their respective owners.
- If any problems occur while using the device, visit our website, or contact your supplier or customer service.
- In case of ambiguity or dispute, we reserve the right of final interpretation.
Important precautions and warnings
This section contains information on the correct handling of the product, risk prevention and prevention of property damage. Read it carefully before using the device and follow the instructions provided while using it.
Operating requirements
- Under no circumstances ignore the alarm's sounding; such behaviour could lead to serious injury or death.
- Exposing the alarm to high or low temperatures or to high humidity can significantly reduce battery life.
- Before using the device, make sure the alarm is correctly installed in the mounting bracket and that its power has been activated.
- Use the device in accordance with the instructions given for the operating environment.
- Transport, use and store the device under the humidity and temperature conditions permitted by the manufacturer.
- Do not expose the product to water or moisture, or to dripping or splashing water.
- Do not insert any objects into the ventilation openings of the product, do not cover the product, and take care to prevent water or other liquid from entering the alarm.
- This fire alarm is intended only to indicate the presence of smoke; it is not intended to detect carbon monoxide (CO), flammable gases or other hazards.
Installation requirements
- Incorrect installation and operation of this device will prevent it from functioning correctly and consequently from responding to the danger of fire.
- When working at height, follow all safety procedures and use the required protective equipment intended for this purpose.
- Do not expose the product to direct sunlight, extreme cold, humidity or sudden changes in temperature.
- Before using the device, you must stick on it the information label “CAUTION! – Battery is not replaceable, see user manual” in your language.
- If dusty construction work is taking place at your premises, you should remove the device from the mounting bracket to prevent it from becoming soiled or the detection chamber from being contaminated by dust particles. If this is not possible for some reason, cover the alarm for the duration of the work (e.g. with a plastic bag) to prevent contamination by dust. A covered fire alarm cannot detect smoke, so uncover it every day after work has finished.
- Installation and handling of this device must always comply with local electrical safety requirements, requirements for protection against electric shock and other relevant regulations.
Functional elements
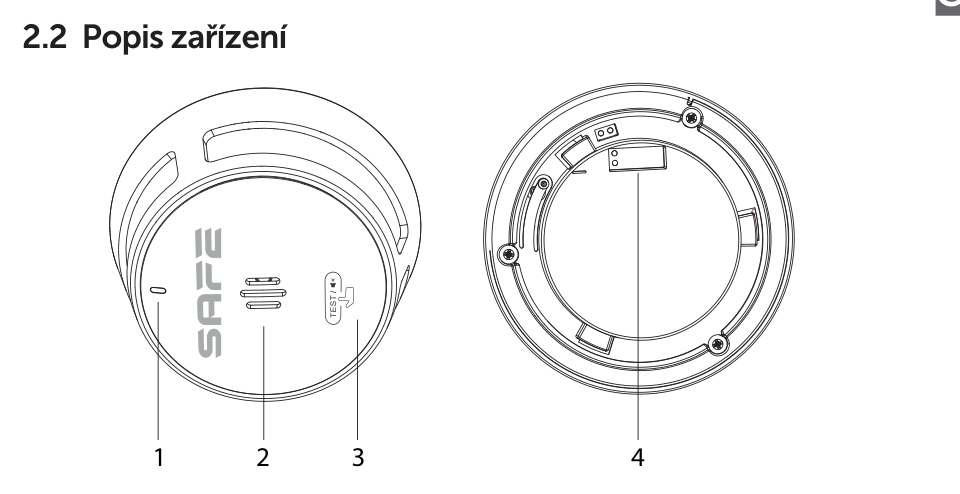
- LED indicator – visually signals the states of the individual modes of the device (see States and signalling).
- Buzzer – alarm volume 85 dB (A) at a distance of 3 m.
- Test / Silence button – verifies the functionality of the device; also used to temporarily silence the acoustic alarm signal.
- Battery location – built-in battery, not user-replaceable.
Principle of operation
The wireless smoke alarm is designed for continuous monitoring, detection and signalling of smoke. As soon as the smoke concentration around the sensor reaches the alarm level, the alarm immediately triggers an acoustic and visual alarm signal to inform the user of the approaching danger. The alarm includes an integrated RF module which, thanks to the CONNECTED function, makes it possible to wirelessly link two or more FireSafe alarms (maximum 24 units) and create an interlinked network – when an alarm is raised, the alarm immediately passes the event on to the other devices in the network. A FireSafe Hub can be added to the network, which, thanks to its internet connection, allows convenient setup and control of the whole system, including remotely, using the app of the same name, and immediately informs the user by push notifications if danger is detected. The alarm can also work completely standalone, without connection to a Hub.
Dual-spectrum smoke chamber
A dual-spectrum optical sensor with blue and infrared LED sources of different wavelengths is integrated into a dust- and insect-resistant smoke detection chamber. The chamber design is directly linked to the AI SAFE microprocessor, which enables measurement of the concentration of microparticles directly in the air in real time. This technology can determine the size of volatile particles inside the optical chamber and respond only to a real threat in the form of smoke, while ignoring the similar composition of water vapour or other fumes.
Protection against false alarms
The AI SAFE microprocessor was developed on the basis of a detailed analysis of the combustion properties of materials and works with a predictive algorithm that compares data from the dual-spectrum optical sensor and filters potential false alarms in real time. If the recorded data correspond to liquid particles of water vapour or other types of fumes, the alarm will not react. However, if the dynamics of the data pattern correspond to the real parameters of the solid smoke particles of a fire, the alarm immediately triggers a fire alarm.
SIC technology – remote silencing with an IR remote control
The alarm has a combined button with TEST and Silence functions, which is used both for testing and verifying the correct functioning of the device and for temporarily silencing the alarm. If you know the cause of the fire alarm activation and need to silence the loud acoustic signalling, there is no need to reach the alarm directly and press the button on it – the technology SIC allows remote silencing of the acoustic signalling by pressing any button on an ordinary IR remote control (most remote controls for household appliances, for example for a TV).
IZOVAX protection for damp spaces
The electronic components and printed circuit board of the SAFE 10Y30-RF alarm are coated with an insulating and protective layer of varnish with nanoparticles IZOVAX. Thanks to this, and to the dual-spectrum optical chamber technology, which distinguishes smoke particles from water vapour, the device can also be installed in very humid environments (near bathrooms, drying rooms, kitchens or utility rooms) – unlike conventional fire alarms.
FireSafe wireless communication
The device can be linked by pairing only with wirelessly linkable FireSafe elements; it is not intended for communication with devices of other brands or manufacturers.
- operating frequency 868 MHz,
- two-way communication between the alarms and the Hub,
- range of up to 1,000 m in open space,
- max. 24 interlinked FireSafe devices.
Interconnection
This device can be linked by pairing only with wirelessly linkable FireSafe elements. It is not intended for communication with wirelessly linkable devices of other brands or manufacturers.
Before you start linking the devices wirelessly, make sure all devices are activated and powered. To activate the alarm, insert it into the mounting bracket and turn it clockwise until it locks into the fixing position.
How to link the devices
- Entering pairing mode – on the first device to be paired, press the TEST/Silence button 4× briefly in succession (the interval between presses must be shorter than 1 second). The device emits 1 short acoustic tone and the LED indicator flashes red at short regular intervals (approximately once every 0.5 s) to indicate that the device has entered pairing mode.
- Connecting the second device to the network – on the second device, press the TEST/Silence button 2× briefly in succession (interval shorter than 1 s). The device emits 1 short acoustic tone and the red LED indicator flashes approximately once every 0.25 s to indicate transmission mode.
- Confirming pairing – after the two devices have been paired successfully, the second device emits a short sound signal and the LED indicator flashes green. The green indicator flashes until device 1 leaves pairing mode, or until you press the TEST/Silence button on device 2 to switch to normal mode.
- Connecting a third and further devices – if device 1 is still in pairing mode, press the TEST/Silence button 2× briefly in succession on the next device and repeat the procedure. In the manner described, up to 24 wireless FireSafe devices can be linked into the network.
- Checking functionality – after connecting all wireless elements, test all devices in the network (see Function test and Silence).
Removing a device from the network
- On the device you want to remove from the network, press the TEST/Silence button 4× in succession (interval shorter than 1 s). The device emits a short acoustic tone and the LED indicator flashes red approximately once every 0.5 s.
- Press and hold the TEST/Silence button until the red LED indicator stops flashing, then release the button. The device emits a short acoustic tone and the LED flashes green once to indicate that it has been removed from the network.
Adding to the FireSafe app
A FireSafe Hub can be added to the wireless network, which, thanks to its internet connection, allows convenient setup and control of the whole system, including remotely, using the FireSafe app (for Android and iOS, and also in a PC version). The Hub monitors the operation of all connected FireSafe detectors and devices and immediately informs the user by push notifications if danger is detected.


Commissioning the FireSafe Hub
- Connect your smartphone to a Wi-Fi network.
- Install the FireSafe app on your phone from the App Store (iOS) or Google Play (Android).
- Connect the FireSafe Hub to the power supply.
- Connect the FireSafe Hub to the internet using an Ethernet cable (not included) or Wi-Fi.
- Launch the app and carry out the basic setup.
- In the app, tap the (+) button to add a device, scan the QR code on the back of the Hub and fill in the required details following the setup wizard.
- Confirm that the Hub has been added successfully in the app and tap the Save button.
Pairing the alarm with the Hub
- On the Hub, press the “PAIRING” button 3× briefly in succession (interval shorter than 1 s). The Hub's LED indicator flashes green approximately once every 0.5 s to indicate that the Hub has entered pairing mode. The mode can be ended by pressing the “PAIRING” button again.
- On the alarm you want to link, press the TEST/Silence button 3× briefly in succession (interval shorter than 1 s). The device emits a short acoustic tone and the green LED indicator flashes approximately once every 0.25 s to indicate pairing.
- After it has been added successfully, the alarm emits a short acoustic signal and the LED flashes green slowly for one minute, then switches to normal operation.
- To add another device, end the pairing of the previous device by pressing the TEST/Silence button and repeat step 2 with the new device. If the Hub's pairing interval (1 minute) expires, switch the Hub to pairing mode again (step 1).
States and signalling
| LED indication / sound | Event |
|---|---|
| Short buzzer beep + green LED flash | Alarm locked into the mounting bracket – automatic activation, a short initialisation follows |
| Green LED flashes 1× every 60 s | Standby (operating) mode – everything is in order |
| Red LED flashes 1× per second + buzzer beeps 1× per second (repeatedly) | Fire alarm triggered – the device simultaneously sends a radio alarm signal to the other alarms in the network |
| 3 long buzzer tones + red LED flashing (repeatedly) | Alarm received from another alarm in the wireless network |
| Red LED flashes 1× per second, no acoustic signal | Temporary alarm silencing active (using the TEST/Silence button or the IR remote control) |
| Red LED flashes 2× every 60 s | Device fault – the alarm is not functional; check and clean it and test it with the TEST/Silence button |
| Red LED flashes 1× every 60 s + buzzer beeps 1× every 60 s | Low battery / end of life approaching – reported approx. 30 days before full depletion; the alarm must be replaced with a new one |
Choosing the installation location
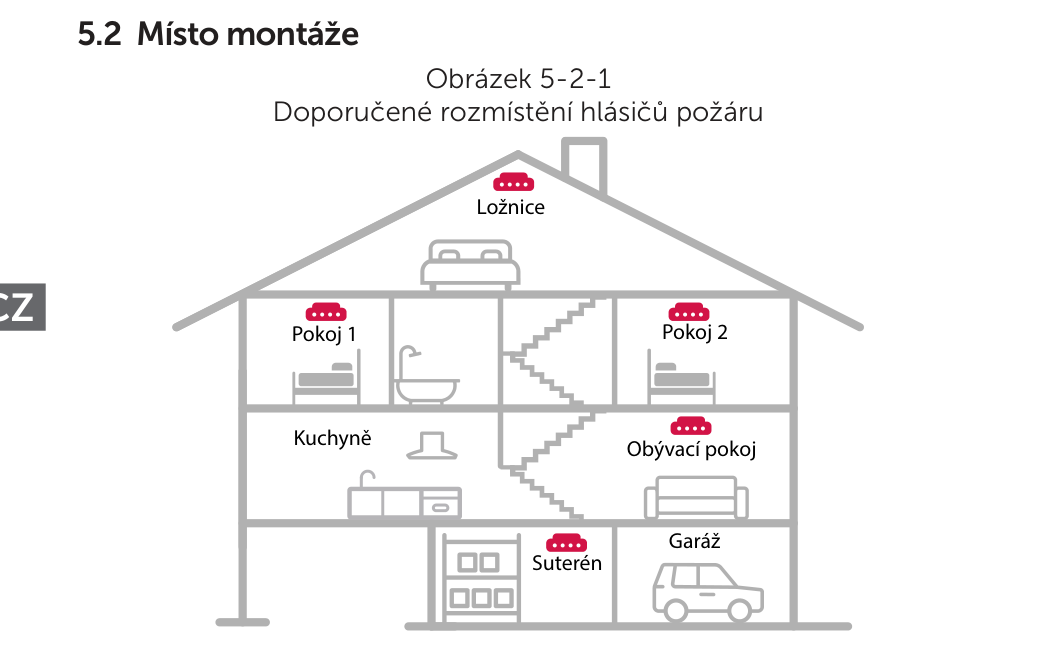
Smoke alarms should ideally be installed in all rooms of the house except kitchens, bathrooms and garages. At least one alarm should be placed on every floor of the house, including the staircase. Place the alarms where you can hear them even when asleep – for example in the hallway in front of the bedroom. Install an alarm on the ceiling of each bedroom and in the hallway in front of the bedroom.
- If the hallway is longer than 9 m, install an alarm at both ends.
- In a multi-storey house, install alarms in the same way on every floor – you will thus also be protected against smoke rising through the stairwell from a lower floor. In the basement, install the alarm on the ceiling at the bottom of the stairs.
Where not to install the alarm
- In bathrooms and kitchens – water vapour and steam from food can trigger a false alarm.
- In a garage – the alarm could react to exhaust fumes from vehicles.
- In places where the ventilation openings around the alarm are not freely accessible – do not cover them or otherwise seal them.
- Do not use aerosol products near the alarm.
Ceiling or wall installation
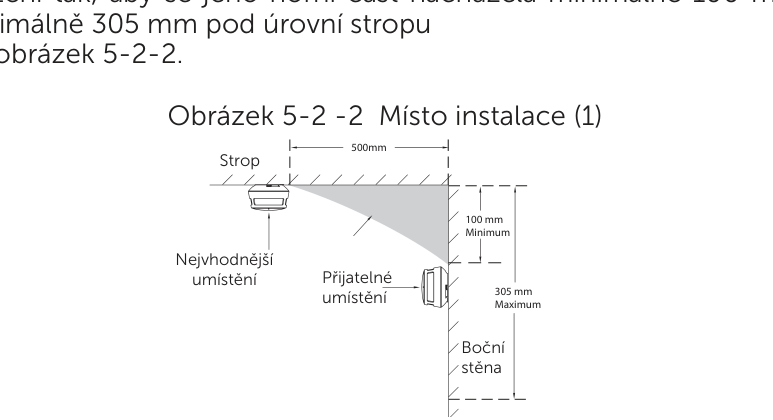
The manufacturer allows the device to be installed both on the ceiling and on a side wall, the preferred mounting location being central installation on the ceiling. If the device is installed on the ceiling, install it at a distance of at least 500 mm from the corners of the room. When mounting on a side wall, position the device so that its upper part is at least 100 mm and at most 305 mm below the ceiling level.
Installation on a sloping ceiling
If the ceiling slope is less than 45°, a suitable distance from the apex is at least 500 mm. If the slope is greater than 45°, a wooden base must be installed (not included in the package).
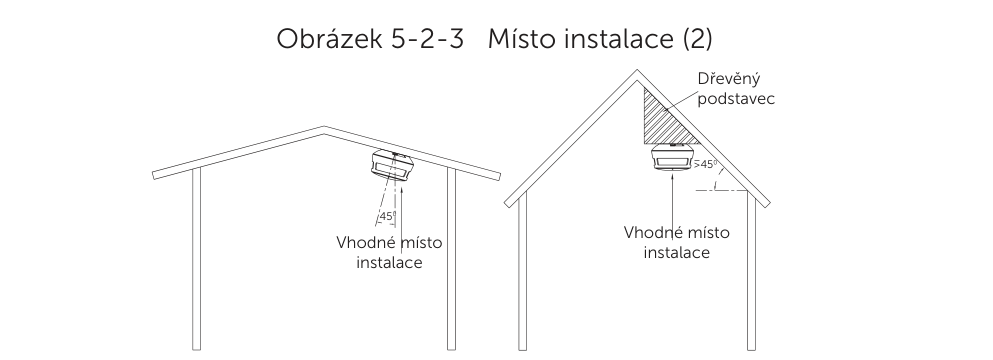
Installing the alarm
- Choose a suitable location for installing the fire alarm (see Choosing the installation location).
- At the installation location, drill holes (⌀ 6 mm) using the mounting bracket. Insert wall plugs into the prepared holes.
- Fix the bracket with self-tapping screws.
- Stick the information label “CAUTION! – Battery is not replaceable, see user manual” in your language on the device.
- Insert the alarm into the mounting bracket and turn it clockwise until it locks into position.
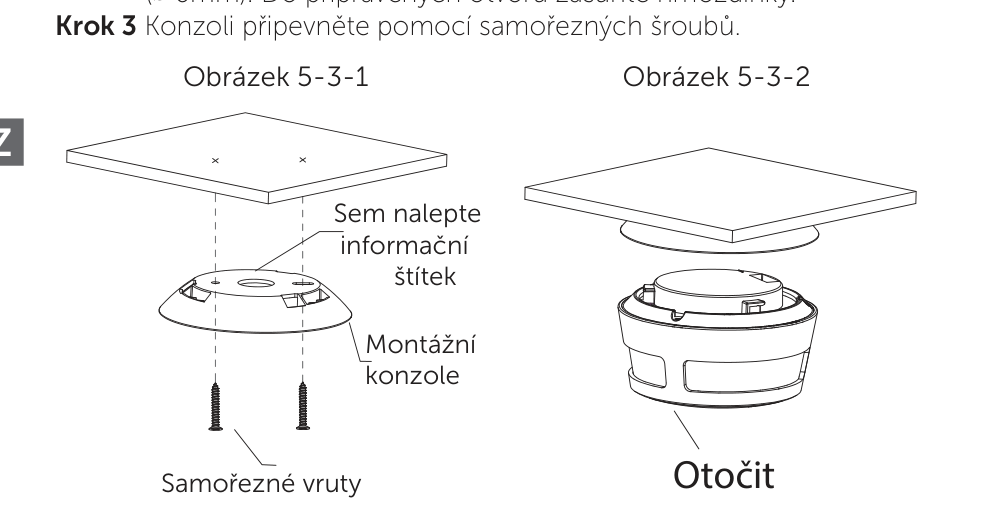
Function test and Silence
After installing the device, or during its regular maintenance, an alarm test must be carried out to prove its functionality.
Testing the device on its own
Briefly press the button TEST/Silence – the buzzer sounds an acoustic tone and the LED indicator flashes red, followed by a pause and then the buzzer beeps 3 times in a row accompanied by a flash of the red LED, another pause and one more repetition.
Testing a device linked in a wireless network
Press and hold the TEST/Silence button of any alarm connected in the network. The alarm emits a short acoustic tone with a flash of the red LED and sends a radio test mode signal. Keep the button pressed until the other alarms in the network also indicate test mode (short tone + alternating flashing of the green and red LED).
Testing devices connected via the FireSafe Hub
In the FireSafe app, select the device you want to test and press the “Node Test” button.
Temporary alarm silencing
In the case of a false alarm, the acoustic signalling can be temporarily silenced by pressing the TEST/Silence button on the alarm that raised the alarm – this silences the acoustic signalling of all devices in the network. Pressing the button on any other alarm silences the acoustic signalling of all devices except the one that initiated the alarm. Temporary silencing is also possible using an IR remote control (SIC technology) – by pressing any button. Silencing lasts 9 minutes, after which the alarm returns to alarm mode if the smoke concentration has not dropped below the threshold value.
| Problem | Solution |
|---|---|
| The alarm does not sound the buzzer during testing | If you are testing immediately after the first activation, wait a few seconds for the alarm to initialise. Make sure you have pressed the TEST/Silence button correctly. |
| The alarm chirps intermittently | Check that the device is correctly positioned (see Choosing the installation location) and carry out maintenance (see Maintenance). |
| The LED indicator flashes red and the buzzer beeps every 60 s | The alarm's battery is depleted – the alarm must be replaced with a new one immediately (see End of life). |
If the device test is not completed successfully, send the alarm in for a warranty claim.
Maintenance
- Simulate a fire alarm test at least once a week by pressing the TEST/Silence button to verify that the device is functioning correctly.
- Clean the alarm at least once a month: remove it from the bracket (by turning it anticlockwise), use a vacuum cleaner to remove accumulated dust particles through the ventilation openings and wipe the outside with a damp cloth. Do not use cleaning agents or solvents – there is a risk of sensor contamination and loss of warranty. After cleaning, install the alarm back and test it with the TEST/Silence button.
- Do not paint the device – paint may seal the air circulation openings and impair the sensor's ability to detect smoke.
- Do not place the alarm in places prone to vibration and shocks.
- Do not expose the alarm to excessive pressure, impacts, dust, high temperature or humidity – they may cause malfunction, shorten its life, damage the battery or deform the plastic parts.
- Do not place sources of open flame (lighter, candle, etc.) on or near the device.
- Do not install the alarm in places where sufficient air flow is not ensured, near fans or other devices connected with air conditioning.
- Do not disassemble the alarm or interfere with its internal electrical circuits – any such interference leads to loss of the warranty. Servicing is carried out only by the manufacturer's authorised service centre.
- If the alarm is damaged or faulty, do not attempt any repairs yourself – contact your seller or our service support.
- This device is not intended for use by persons (including children) with reduced physical, sensory or mental capabilities without supervision or instruction by a responsible person. Make sure children do not play with the device.
End of life
The SAFE 10Y30-RF alarm is powered by an integrated 3 V CR123A lithium battery, not user-replaceable, with a guaranteed life of more than 10 years of operation. The power battery is activated when the alarm is placed and locked into the mounting bracket.
If the battery capacity and voltage drop below the threshold value or the end of the device's life is approaching, the alarm signals this by flashing the red LED accompanied by a beep of the buzzer at regular 60-second intervals for 30 days before the battery is fully depleted.
The alarm must be replaced with a new one after 10 years from the date of installation – the replacement date is shown on the information label on the back of the alarm.
Technical specifications
| Detection parameters | |
| Detection type | Smoke, fault, low battery capacity |
| Sensor | Photoelectric – dual-spectrum (blue + IR LED) |
| Microprocessor | AI SAFE with predictive algorithm |
| Preset alarm value | 0.2–0.3 dB/m |
| Detection area | 20–40 m² (for a room height up to 8 m) |
| Max. number of linked devices | 24 pcs |
| Signalling | |
| Acoustic | 85 dB at a distance of 3 m |
| Visual | LED indicator (red and green) |
| Silence function | Yes – TEST/Silence button, IR remote control (SIC technology, not included in the package) |
| Silence time | approx. 9 min |
| FireSafe CONNECTED wireless transmission | |
| Operating frequency | 868 MHz |
| Communication type | Two-way |
| Radio signal range | Up to 1,000 m in open space |
| Max. number of linked devices | 24 FireSafe units |
| Interfaces and functions | |
| Controls | TEST/Silence button |
| PCB protection | IZOVAX insulating and protective varnish layer with nanoparticles |
| Low battery / end-of-life warning | Yes |
| General | |
| Model | SAFE 10Y30-RF, white version |
| Power supply | 1× CR123A battery, 3 V, lithium (integrated, non-replaceable) |
| Current consumption | Standby mode ≤ 15 µA; in alarm ≤ 35 mA |
| Battery life / lifetime | 10 years |
| Operating temperature | −10 °C to +55 °C |
| Operating humidity | ≤ 95 % RH (non-condensing) |
| Storage temperature / humidity | −20 °C to +60 °C, 5–95 % RH (non-condensing) |
| Dimensions | ⌀ 81.5 mm × h 51.6 mm |
| Weight | 110 g (with battery) |
| Housing material | PC + ABS |
| Housing colour | White |
| Mounting method | On a ceiling or wall |
| Device life | 10 years from the date of installation |
| Compatibility | FireSafe Hub (e.g. SAFE 50HUB-WRF, SAFE 100HUB-WLRF) |
| Certification | EN 14604:2005+AC:2008; ISO 7731; Regulation (EU) No 305/2011 |
| Declaration of Conformity | CE |
| EAN code | 0703123018227 |
| Warranty | 10 years (on the device and battery) |
Package contents
- Wireless smoke alarm – 1 pc
- Self-tapping screw – 2 pcs
- Wall plugs – 2 pcs
- Mounting bracket – 1 pc
- User manual with a set of information labels – 1 pc
Safety notices
- Read these instructions carefully before use and keep them for future reference.
- Under no circumstances ignore the alarm's sounding – such behaviour could lead to serious injury or death.
- Exposing the alarm to high or low temperatures or to high humidity can significantly reduce battery life.
- Before using the device, make sure the alarm is correctly installed in the mounting bracket and that its power has been activated.
- Transport, use and store the device under the humidity and temperature conditions permitted by the manufacturer.
- Do not expose the product to water or moisture, or to dripping or splashing water. Do not insert any objects into the ventilation openings and do not cover the product.
- This alarm is intended only to indicate the presence of smoke – it is not intended to detect carbon monoxide (CO), flammable gases or other hazards.
- Installation and handling of the device must always comply with local requirements for electrical safety and protection against electric shock.
- Do not disassemble or modify the alarm – in case of a fault, contact support; servicing is carried out only by the manufacturer's authorised service centre.
- The device is not intended for use by persons (including children) with reduced physical, sensory or mental capabilities without supervision or instruction by a responsible person. Make sure children do not play with the device.
- The battery is built in and not replaceable; do not burn the alarm or throw it into a fire.
- Do not dispose of the product with general municipal waste – hand it in for recycling in the electrical equipment take-back system. If electrical appliances are disposed of in landfills, hazardous substances can leak into groundwater.
Safety habits and evacuation planning
- Place fire extinguishers on every floor of the house, in the kitchen, the basement and the garage, and keep them in working order. Learn how to use them before an emergency occurs.
- Draw up an evacuation plan of the building, including each floor with all doors and windows, and mark at least two main escape routes.
- Make sure everyone is familiar with the fire evacuation plan and with the alarm signalling of the smoke alarm, so that they leave the building immediately once it is detected.
- Designate an evacuation point outside the building where everyone will meet in the event of a fire.
- Carry out a fire drill with evacuation practice at least once every six months, including at night, so that even small children can hear the alarm signal and can be woken as soon as it sounds.
What to do in the event of a fire alarm
- Wake small children and leave the endangered area immediately along a pre-planned escape route. Do not waste time getting dressed or collecting valuables.
- Never open interior doors without touching them first. If the door is hot or smoke is coming through the gaps, do not open it and use an alternative escape route.
- If you enter an area with a concentration of smoke, move low to the ground and breathe slowly, ideally through a dampened cloth.
- Once you are outside the building, go to the designated evacuation point and make sure everyone is present. Do not return to the building until the danger has passed.
- Contact the emergency services only once you are safe.
Warranty
The manufacturer guarantees that the SAFE 10Y30-RF alarm will be free from defects in material and workmanship under normal use and operation for a period of ten years from the date of sale – the warranty covers both the device and the built-in battery. Under this warranty, the manufacturer's obligation is limited to repairing or replacing the alarm, or any of its defective parts, free of charge after the alarm has been sent, together with proof of the date of purchase, to the address of the SAFE HOME europe s.r.o. service centre, Čechova 1005/4, 750 02 Přerov, Czech Republic.
The warranty becomes void if the product has been damaged, altered, misused or modified after purchase, or if it has stopped working as a result of poor maintenance or incorrect placement. The warranty does not cover damage caused by failure to follow the instructions in this manual. This warranty does not affect your statutory rights.
In case of problems with the device, first contact technical support – most situations can be resolved remotely.
Need help?
SAFE HOME europe technical support:
E-mail: info@safe-home.eu · Telephone: (+420) 581 222 262
Web: www.smart-safe.eu