
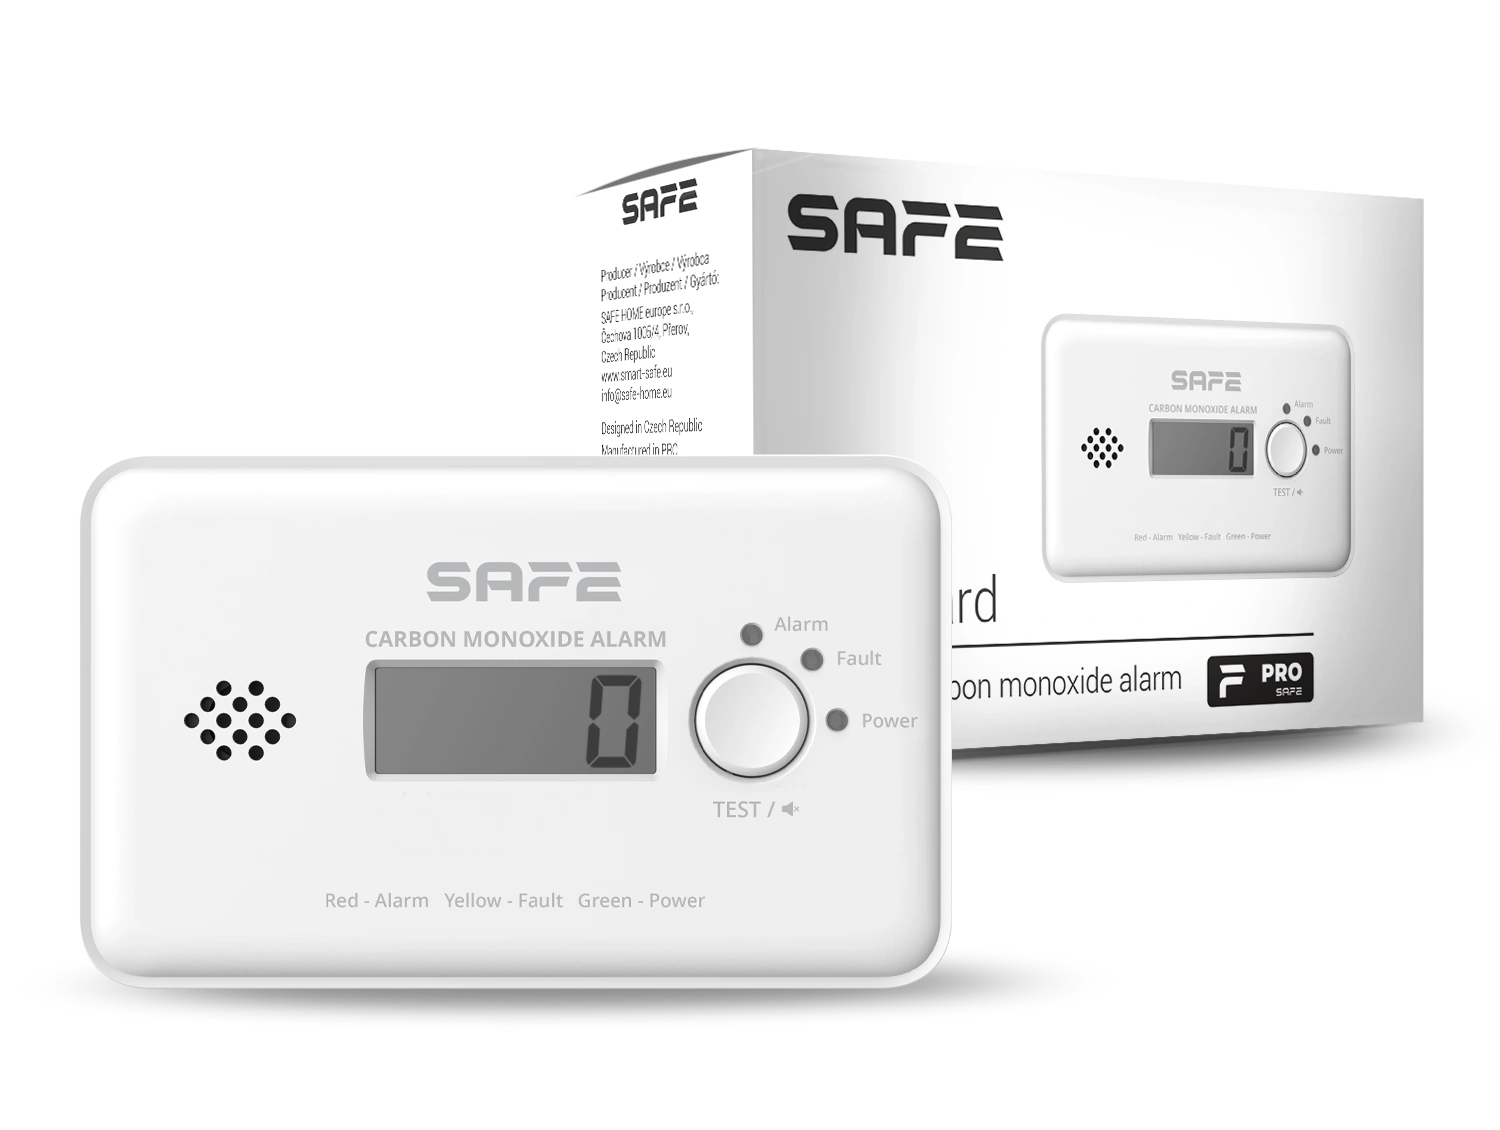
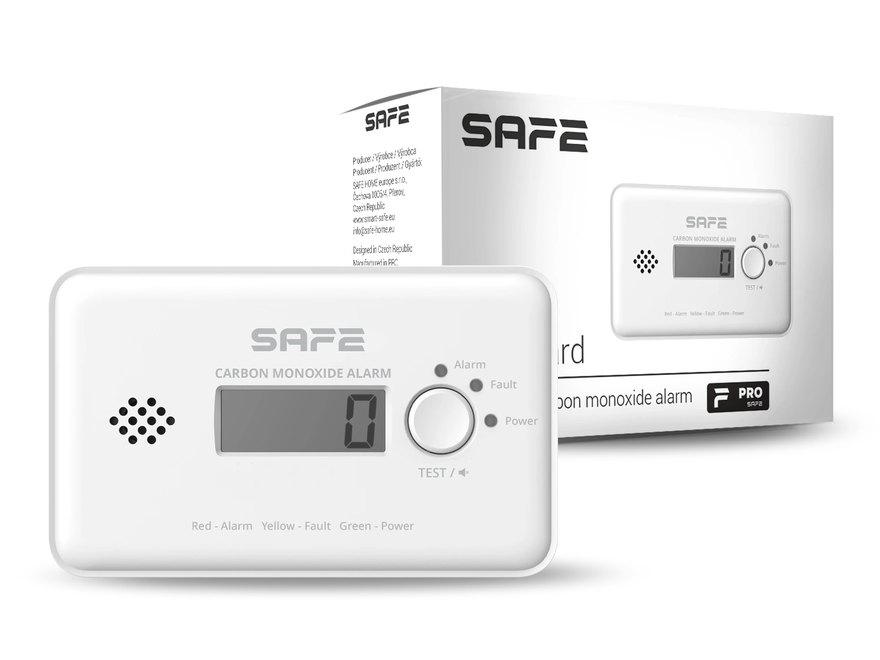
CO Guard is a wireless carbon monoxide detector with detection via an electrochemical sensor, 2nd generation, an LCD display and a design allowing free-standing installation on a horizontal surface. The detector is designed for indoor installation, where it can operate as part of the SAFE security system with hub support, or completely autonomously as a standalone detector. Power for up to 3 years is provided by a replaceable CR123A lithium battery.
Preface
General
This user manual introduces the installation, functions, and operation of the wireless carbon monoxide detector (hereinafter the "detector"). Before using the device, read the manual carefully and keep it for future reference.
Safety Instructions
The following signal words may appear in the user manual:
| Signal Word | Meaning |
|---|---|
| DANGER | Indicates a high potential hazard that, if not avoided, may result in death or serious injury. |
| WARNING | Indicates a medium or low potential hazard that could cause minor or moderate injury if not avoided. |
| CAUTION | Indicates a potential risk that could lead to property damage, data loss, reduced performance, or an unpredictable outcome. |
| TIP | Provides methods to help you solve a problem or save time. |
| NOTE | Provides additional information, such as emphasis and supplementary text. |
Revision History
| Version | Revision Content | Release Date |
|---|---|---|
| V1.0.0 | First release. | August 2026 |
Privacy Notice
As a device user or data controller, you may collect personal data of others, such as their face, fingerprints, and license plate number. You must comply with local privacy laws and regulations to protect the legitimate rights and interests of other people by implementing measures that include, among others: providing clear and visible identification to inform people of the existence of the monitored area and providing the required contact information.
About the Manual
- The user manual serves as a reference guide only. There may be minor differences between the information provided and the product.
- We are not liable for any damage resulting from using the product in a manner that does not comply with the instructions in the user manual.
- The manual will be updated according to the latest laws and regulations of the relevant jurisdictions. For detailed information, refer to the printed user manual, scan the QR code, or visit our official website. The manual is for reference purposes only. There may be minor differences between the electronic and paper versions.
- All designs and software are subject to change without prior written notice. Due to product updates, certain differences may occur between the product and the information in the manual. Customer service will provide you with the latest version of the software and supplementary documentation.
- There may be printing errors or discrepancies in the description of functions, operations, and technical data. In the event of doubt or dispute, we reserve the right of final explanation. If the manual (in PDF format) cannot be opened, update your reader software or try a different common reader software.
- All trademarks, registered trademarks, and company names in the manual are the property of their respective owners.
- If you encounter any problems while using the device, visit our website or contact your supplier or customer service.
- In the event of ambiguity or dispute, we reserve the right of final explanation.
Important Safeguards and Warnings
This section contains information on the proper handling of the product, risk prevention, and prevention of property damage. Read it carefully before using the device and follow the instructions provided when using it.
Operating Requirements
- Before use, make sure the device's power supply is working properly.
- Do not unplug the device's power cable while it is switched on.
- Use the device only within its rated power range.
- Transport, use, and store the device within the permitted humidity and temperature conditions.
- Prevent liquids from splashing or dripping onto the device. Make sure there are no liquid-filled objects on the device, to prevent liquid from entering it.
- Do not disassemble the device.
Installation Requirements
- Before switching on, connect the device to the power adapter.
- Strictly comply with local electrical safety standards and make sure the voltage in the area is stable and matches the device's power requirements.
- Do not connect the device to more than one power source. Otherwise, the device could be damaged.
- When working at heights, follow all safety procedures and use the required protective equipment.
- Do not expose the device to direct sunlight or heat sources.
- Do not install the device in damp, dusty, or smoky locations.
- Install the device in a well-ventilated location and do not block its ventilation.
- Use the power adapter or power supply provided by the device manufacturer.
- The power supply must meet the ES1 requirements of IEC 62368-1 and must not exceed PS2. The power supply requirements are governed by the device's rating label.
- Connect Class I electrical appliances to a socket with protective earthing.
What to do in the event of a CO alarm
If the detector detects a dangerous concentration of carbon monoxide, it triggers a loud alarm signal (85 dB) accompanied by the red LED indicator flashing Alarm – a short buzzer beep once per second together with the LED flashing once per second, while the display shows the currently measured CO concentration in ppm units.
- Stay calm and open all doors and windows. Stop using all fuel-burning appliances and, if possible, ensure they are switched off (e.g., close the emergency shut-off valve on gas appliances).
- Press the TEST/Silence button to temporarily silence the alarm (for 45 seconds). If the warning signal persists, inform other occupants and evacuate the building – leave the doors and windows open and do not re-enter the premises.
- Obtain medical help for anyone showing symptoms of CO poisoning (headache, nausea), and inform the doctor of suspected carbon monoxide inhalation.
- Call the emergency line 112, the gas company's emergency number, or the appliance service organization. Ensure the source of the CO leak is identified and removed.
If the area is ventilated after the alarm is triggered, the carbon monoxide may disperse before help arrives. Even in that case, the source of the CO leak must be identified and its cause removed. Do not start using any fuel-burning appliances again until they have been inspected and cleaned by a competent person in accordance with national regulations.
Time to alarm activation depending on CO concentration
| CO concentration | Time to alarm activation |
|---|---|
| 30 ppm | 120 min |
| 50 ppm | 60 to 90 min |
| 100 ppm | 10 to 40 min |
| 300 ppm | up to 3 min |
About carbon monoxide (CO)
What is carbon monoxide
Carbon monoxide is the main gaseous product of incomplete (uncontrolled) combustion of carbon-based materials. It is a colorless, non-irritating gas without taste or smell, whose toxic effects adversely affect the blood's ability to carry oxygen. Exposure to a high concentration of CO can cause serious tissue damage or be fatal. The severity of poisoning depends on the concentration (ppm) and duration of exposure – CO is a cumulative poison, and symptoms can be caused even by long-term exposure to low concentrations (>10 ppm).
| CO concentration (ppm) | Effects on adults |
|---|---|
| 100 ppm | Mild headache, nausea, fatigue (flu-like symptoms) |
| 200 ppm | Dizziness and headache within 2–3 hours |
| 300 ppm | Nausea, headaches at the temples and forehead, drowsiness, disorientation, and increased heart rate; life-threatening after more than 3 hours of exposure |
| 400 ppm | Severe headache, convulsions, failure of vital organs; death may occur within 2–3 hours |
- This device may not prevent the effects of continuous exposure to carbon monoxide and will not fully protect individuals against special hazards.
- The device detects only carbon monoxide (CO); it does not detect other gases, smoke, or flame. In case of any doubt about the cause of the alarm, a dangerous CO level should be assumed and occupants should be evacuated.
Possible sources of carbon monoxide
CO is produced by the incomplete combustion of carbon-based fuels (coal, wood, charcoal, heating oil, kerosene, gasoline, propane, butane, natural gas).
- Fuel-burning appliances – gas boilers, water heaters, stoves, wood stoves, solid fuel or pellet stoves, fireplaces, charcoal grills, especially with neglected maintenance or insufficient ventilation.
- Devices with combustion engines – portable generators, cars, lawn mowers – pose a deadly hazard in enclosed spaces (garages, utility rooms).
- Portable gas heaters, heaters, or grills (both gas and charcoal) used indoors.
- Blocked or obstructed flue passages, ducts, and chimneys.
- Other sources: large amounts of tobacco smoke, coal gas, emissions from a smoking hearth, or emissions from neighboring apartments in multi-unit buildings through shared or poorly located flues.
Basic steps to protect against CO poisoning
- Install one or more carbon monoxide detectors in your home (see Choosing the installation location).
- Have a qualified technician inspect your heating system and fuel-burning appliances (boilers, gas, oil, and similar devices) every year.
- Have a qualified technician inspect and professionally clean flue passages (ducts, chimneys) every year.
- Ensure that fuel-burning devices and engines are used only in very well-ventilated areas.
- Use gas appliances according to the manufacturer's recommendations. Never use a gas stove or oven to heat the interior.
- Do not use grills inside the home or in an attached garage.
Functional Elements
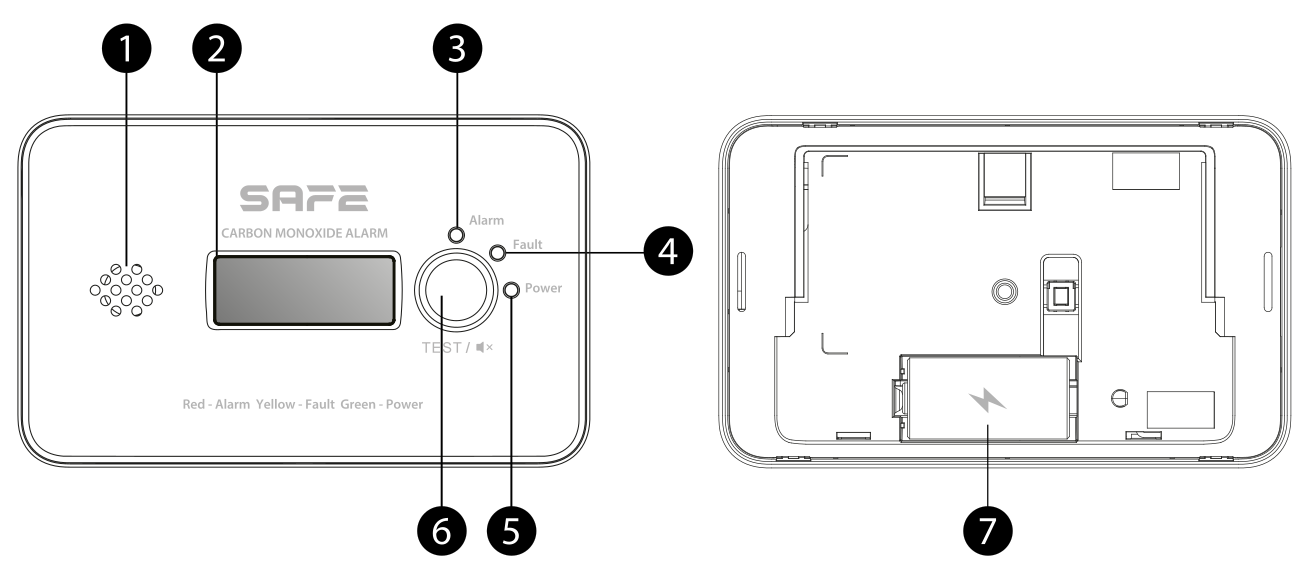
- Buzzer – acoustically (85 dB) informs about the device's individual operating states, accompanied by the LED indicator's visual signal.
- LCD display – shows current status information, the carbon monoxide concentration, or the highest measured CO value in ppm units.
- Red Alarm LED indicator – indicates a CO alarm.
- Yellow Fault LED indicator – indicates a fault.
- Green Power LED indicator – indicates power.
- TEST / Silence button – verifies device functionality, is used to temporarily silence the acoustic alarm signal, recall the memory of the highest measured values, and reset.
- Battery compartment (back) – replaceable CR123A battery.
Operating Principle
CO Guard continuously monitors, detects, and signals the presence of carbon monoxide in living spaces using advanced technology of an electrochemical sensor, 2nd generation , with high sensitivity and stable performance, capable of detecting even very low CO concentrations (from 30 ppm). The sensor does not require further calibration during its service life (more than 10 years). The detector combines a minimalist design with advanced hardware and intelligent software – an integrated loud siren (85 dB), an LCD display with memory of the highest measured value, a design allowing both fixed wall mounting and free-standing installation on a horizontal surface, and two-way encrypted data transmission between the device and the hub.
When an alarm is triggered, the detector immediately relays the event to the hub, and the user receives a notification in the ProSAFE. The detector is type A, intended for both fixed and portable installations, and is certified according to the European standards EN 50291-1:2018 and EN 50291-2:2019 for carbon monoxide detectors (including caravans, motorhomes, and boats).
Local alarm signaling
Once the CO threshold concentration is reached, the detector triggers a warning signal: the red LED Alarm flashes and the buzzer beeps at a regular interval of once per second, while the display shows the currently measured CO concentration in ppm. If a hub is connected to the SAFE system, it monitors the activity of all devices and, in the event of an alarm, immediately informs the user in the ProSAFE app according to the configured settings.
Temporary alarm silencing
If necessary, or in the event of a false alarm, the acoustic signal can be temporarily silenced by pressing the TEST/Silence button for 45 seconds. The detector indicates temporary silencing mode by flashing the red Alarm LED at an interval of once per second without the accompanying buzzer sound. If the CO concentration subsequently drops below the specified value, the detector automatically returns to normal operating mode.
Memory of the highest measured value
The detector has a highest-measured-value memory function – it records information about the highest measured CO concentration, which remains displayed on the screen until it is reset. Pressing the TEST/Silence button recalls, for 3 seconds, a display of "8888" and then the last highest measured value; while it is displayed, the memory can be reset by holding the button for 3 seconds. Information about the highest measured value is also available in the ProSAFE app.
SAFE Keeper protocol
Communication with the hub is provided by the encrypted two-way radio protocol SAFE Keeper in the 868 MHz band:
- AES128 data encryption with a rolling code,
- frequency hopping as protection against interference,
- range up to 1 000 m in open space,
- two-way communication between the detector and the hub.
Adding to the System
Before adding the device
- Install the app ProSAFE and log in to your account.
- Make sure you have a compatible hub added in the app (Hub 2 Plus LTE, SAFE 38300) with a stable internet connection.
- The hub must be in the Disarmed state.
- Insert the CR123A power battery into the detector and activate the device by pulling out the insulating strip on the battery contact.


How to add CO Guard
- In the ProSAFE app, open your hub and click Device.
- Click + Add device.
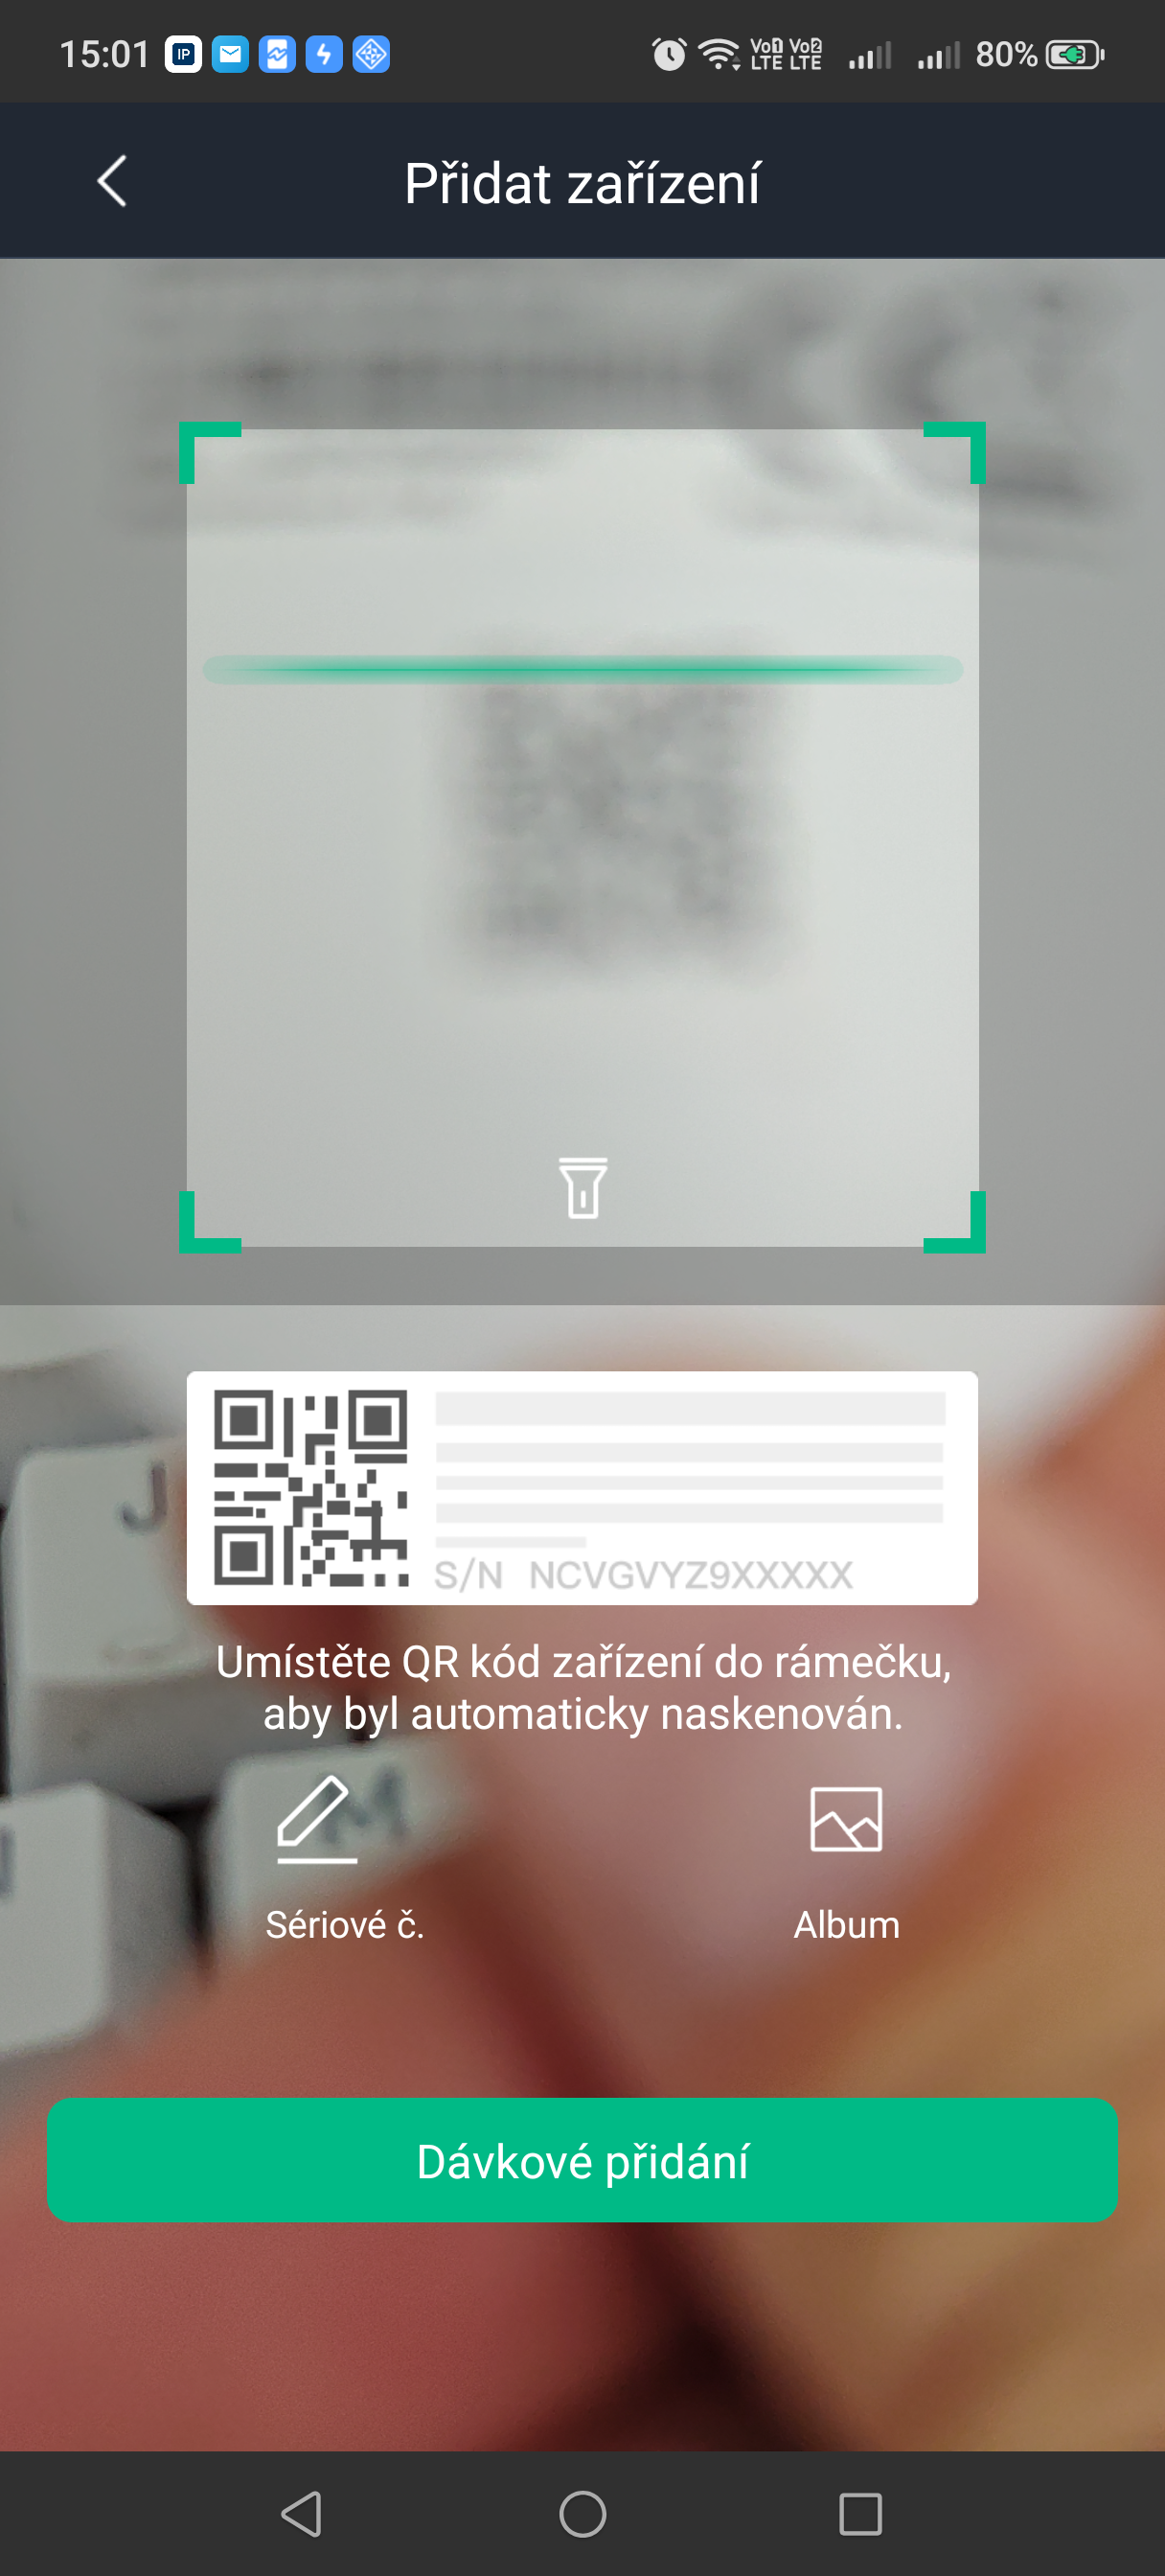
- Scan the QR code with the serial number on the back of the detector and click Next.
- On the accessory screen, select the option Wireless CO detector and continue.
- Following the on-screen instructions, activate the detector by pressing and holding the TEST/Silence.
- Wait for pairing to complete.
- Enter the detector name, select the area (subsystem), and complete the setup.
- Check the signal strength of the connection to the hub at the installation site and test the device's functionality.
States
You can view the current detector status in the ProSAFE app by selecting the detector in the Devices list.
| Parameter | Meaning |
|---|---|
| Online status | Connection between the detector and the hub
|
| Signal intensity (strength) | Radio signal strength between the hub and the detector: no signal / very weak / weak / good / excellent |
| Battery capacity status | 100 % full / 65 % medium / 45 % sufficient / 15 % insufficient |
| Gas concentration | Current measured CO value in ppm |
| Connection via repeater | Whether the detector sends messages to the hub via a signal repeater (Yes/No) |
| Temporarily disable | Enable – the detector sends alarm messages to the hub / Disable – it does not |
| Firmware version | Current detector firmware version |
Settings
You can change the settings in the ProSAFE app: select the detector in the Devices list and click the edit icon.
| Settings | Value |
|---|---|
| Device configuration | Displays the device's name, type, SN, and model; confirm the name change with the Save button |
| Area (zone) | Assigning the detector to a system area |
| Temporarily disable | Enable (default) – the detector sends alarm messages to the hub / Disable – it does not |
| Siren linkage | When the alarm is triggered, the detector simultaneously activates the siren linked to the hub |
| Alarm and video linkage | In the event of an alarm, the event is linked to the video of the selected channel |
| Video channel | Selection of the video channel to link with the alarm |
| LED indicator | On (default) / off
|
| Transmission power | High / low / automatic – higher power extends range and increases power consumption |
| Signal strength detection | Test the current radio signal strength |
| Cloud update | Remote (online) firmware update for the device |
| Delete | Removing the device from the system (swipe left in the device list) |
Signaling
| LCD display | LED indicator | Buzzer | Device mode |
|---|---|---|---|
| Empty | Green (Power) flashes once every 60 s | No signaling | Normal standby mode |
| Displays the CO concentration in ppm | Red (Alarm) flashes once per second | Beeps once per second | Alarm – a CO leak has been detected. Evacuate people to fresh air and call 112 |
| Displays the CO concentration in ppm | Red (Alarm) flashes once per second | No sound | Temporary alarm silencing (45 s) |
| Displays the last highest value | No signaling | No signaling | Highest measured value mode – recall and reset it by holding the TEST/Silence button |
| 3 s, "8888", then 5 with "0", then "8888" again, then 60 with "0" | All 3 LEDs flash 3× | Beeps 3× | Test mode (by pressing the TEST/Hush button) |
| "Lb" | Yellow (Fault) flashes 1× per 60 s | Beeps 1× per 60 s | Low battery voltage – replace the battery with a new one immediately |
| "Err" | Yellow (Fault) flashes 2× per 60 s | Beeps 2× per 60 s | Fault – clean the detector; if the notification persists, the device must be replaced |
| "End" | Yellow (Fault) flashes 3× per 60 s | Beeps 3× per 60 s | End-of-life signaling (30 days before the end of operation) – replace the device with a new one |
Choosing the installation location
CO detectors should ideally be installed in every room containing a fuel-burning appliance. We strongly recommend installing additional detectors in bedrooms and rooms where you spend a lot of time during the day – in places where you will hear the alarm even while asleep (e.g. on a nightstand in the bedroom).
Which rooms to install in
Preferably install a detector in every room with a fuel-burning appliance. Install additional devices so that audible signaling is ensured for occupants of remote rooms as well (living rooms, all bedrooms). If there are multiple appliances and the number of detectors is limited, consider:
- placement in a room with appliances without a flue or with an open exhaust,
- placement in the room where users spend the most time,
- for a living/bedroom, placement as far as possible from the stove, but as close as possible to where people sleep,
- if the appliance is in an unused room (e.g. boiler room), placement so that the signaling is better heard,
- if the appliance has an extended or hidden flue, installing a detector in every room the flue passes through.
Where in the room to install
Room with a fuel-burning appliance (stove, boiler, gas fireplace, fireplace): CO rises with the warm gas mixture, so install the detector above the level of the appliance and close to the ceiling:
- top edge of the detector at least 15 cm from the ceiling, bottom edge no more than 30 cm from the ceiling,
- above the level of the top edges of windows and doors,
- at a distance of at least 1 m and at most 3 m (horizontally) from the edge of the nearest potential CO source,
- if there are partitions in the room, on the same side as the potential CO source,
- in a room with a sloped ceiling, on the higher side of the room.
Bedrooms or rooms remote from the appliance (hallways, landings): install the detector on the wall at a height 1,5–1,6 m above the floor, close to the users' breathing zone. Never install the detector at floor level – carbon monoxide is lighter than air and rarely settles near the floor.
Caravans and boats
The detector is also suitable for caravans, motorhomes and boats. Do not install it directly above a heat or steam source and keep a distance of 1–3 m from the CO source. If you are moored next to a jetty, wall or another boat, do not leave the engine running – exhaust fumes may damage the sensor. If the caravan or boat has a single living space that is also used for sleeping, one detector is sufficient; every sleeping space separated from the fuel-burning appliance should have its own detector.
Where not to install the detector
- In an enclosed space (e.g. in a cupboard or behind a curtain), or near a door or window.
- Directly above a sink, in a garage where vehicles are started, or near heat sources or air-conditioning vents.
- In close proximity to a kitchen stove, hot plates, deep fryers – risk of sensor contamination.
- At or near the floor.
- In places exposed to direct sunlight, extreme cold, damp or sudden temperature changes.
- In areas with extreme humidity (>95 %) – bathrooms, showers; nor directly above a sink or near dishwashers and washing machines.
- Where there is a risk of contamination by insects, dust or dirt.
- Where it could be blocked or covered (curtains, furniture) or detection could otherwise be restricted.
- Near an extractor hood, ventilation openings or places with strong air currents.
- In rooms where the temperature can drop below −10 °C or rise above 40 °C (garage, unfinished attic).
- In areas with limited or hazardous access – the device must be regularly tested and maintained.
Detector installation
The CO Guard detector can be installed in two ways – fixed mounting on a wall, or freestanding placement on a horizontal surface thanks to two stabilizing feet on the base of the device.
Wall Mounting
- According to the chapter Choosing the installation location select a suitable location.
- Using the included drilling template, drill holes at the installation site (⌀ 5 mm) and insert wall plugs into them.
- Place the detector's back cover (mounting plate) in position and screw it into the wall plugs using self-tapping screws.
- From the set of information labels, attach labels A and B to the front of the device and labels C and D to the back, in the required language.
- Activate the detector by pulling out the insulating strip from the battery contact.
- Fit the detector body onto the mounted back cover and slide it downward until it clicks securely into place.
- Test the device's function by pressing the TEST/Hush button – check the correct operation of the LED indicators, buzzer and LCD display (see Functionality Test).
Free-standing installation on a horizontal surface
The base design of the detector features two feet that allow flexible and stable free-standing installation on a horizontal surface (shelf, nightstand, windowsill, etc.) without the need for drilling.
- In free-standing installation, the detector must be positioned vertically – it must not lie flat on the horizontal surface.
- Position it so there is no risk of it being knocked over, falling, or otherwise damaged.
- Even with free-standing installation, follow the recommended placement described in the chapter Choosing the installation location.
Functionality Test
After installation, battery replacement, or as part of regular maintenance, test the CO detector. We recommend performing an alarm test simulation at least once a week.
- Briefly press the TEST/Silence.
- All three LED indicators flash 3× (once per second) and the buzzer beeps briefly 3×.
- The LCD display shows for 3 seconds "8888", then for 5 seconds shows the digit "0", then again for 3 seconds shows "8888", and before the display turns off, it shows for 60 seconds the digit "0".
Battery replacement
The detector is powered by 1× CR123A lithium battery (3 H), lasts up to 3 years. The detector is equipped with a circuit monitoring the battery status – when the low battery signal ("Lb") appears, replace the battery within 30 days, otherwise there is a risk of an unannounced failure of CO detection.
- Remove the detector body from the back cover / mounting plate (for free-standing installation, open the battery compartment according to the base design).
- Remove the depleted battery and insert a new CR123A battery. Observe the correct polarity (+/−).
- Fit the detector back in place and test it by pressing the TEST/Hush button.
Maintenance
- Clean the detector at least once a month – remove accumulated dust particles from the ventilation openings around the perimeter using a vacuum cleaner, and wipe the outer part with a damp cloth. Do not use cleaning solutions or solvents.
- Do not use oils, cleaning liquids, polishes, paints, greases or other volatile substances (e.g. methane, propane, isopropanol, hydrogen sulfide, alcohol-based products, hair sprays, perfumes) near the detector – they may temporarily or permanently affect the sensor's sensitivity or cause a false alarm.
- Do not paint the device – paint could seal the air circulation openings.
- Do not place the detector in locations prone to vibration and shocks, or near open flame.
- After every test or handling of the detector, verify its function using the TEST/Hush button.
- Do not disassemble the detector or tamper with its internal circuits – this will void the warranty. Servicing may only be performed by the manufacturer's authorized service.
- The device has a specified service life 10 years from the date of installation – after it expires, the device must be replaced with a new one (see the "End" end-of-life signaling in the chapter Signaling).
Troubleshooting common problems
| Problem | Possible solution |
|---|---|
| Green Power LED does not flash 1× per 60 s | Insert the battery, or pull out the insulating strip from the battery contact; if the problem persists, contact technical support |
| Pressing the TEST/Hush button does not trigger the warning signal, or the detector detects CO but does not trigger the acoustic signal | Possible hardware fault – contact the retailer or technical support |
| The device emits a continuous warning tone | The detector may be reacting to a large amount of volatile substances (alcohol, perfume, gasoline, paint) – move it to a place with clean air and leave it running for approx. 2 hours; if the problem persists, contact support |
Technical Specifications
| Detection parameters | |
| Detection type | Carbon monoxide (CO) |
| Sensor | Electrochemical CO sensor, 2nd generation |
| Sensitivity / range | Detection from 30 ppm |
| Device type | A (fixed and portable installation) |
| Calibration | Not required during the sensor's service life |
| Detection certification | EN 50291-1:2018; EN 50291-1:2018/AC:2021; EN 50291-2:2019 (residential trailers, caravans, boats); BS EN 50291-1:2018 |
| Wireless transmission – SAFE Keeper | |
| Carrier frequency | 868.0–868.6 MHz |
| Transmitter power (EIRP) | limit 35,5 mW |
| Communication distance | Up to 1,000 m in open space |
| Communication type | Two-way |
| Encryption | AES128 with rolling code |
| Frequency hopping | Yes (automatic) |
| Interface and functions | |
| Indication | 3× LED (red Alarm, yellow Fault, green Power) + LCD display |
| Control Devices | 1× TEST / Hush / value memory recall button |
| Tamper contact | No |
| Remote update | Yes (cloud) |
| Low battery notification | Yes |
| Memory of the highest measured value | Yes |
| Temporary alarm silencing | Yes (45 s) |
| Test mode | Yes (TEST button) |
| General | |
| Power supply | 1× lithium CR123A battery, 3 V (replaceable, included) |
| Current draw | Operation ≤20 µA; alarm ≤20 mA |
| Battery life | Up to 3 years under normal operation |
| Device service life | 10 years from the installation date |
| Operating temperature | −10 °C to +40 °C |
| Operating humidity | up to 95 % RH, non-condensing |
| Storage / transport temperature | −20 °C to +60 °C |
| Storage / transport humidity | 5–95 % RH, non-condensing |
| Ingress protection rating | IP30 |
| Housing material | PC + ABS, white |
| Dimensions | 115,5 × 71,1 × 28,9 mm |
| Weight | 18,2 g (with battery) |
| Installation | On the wall, or freestanding on a horizontal surface |
| Compatibility | Hub 2 Plus LTE (SAFE 38300) |
| EAN | 0728204235188 |
| Certification | CE; EN 62479:2010; EN 50663:2017; EN 50270:2015; EN 301 489-1 V2.2.3; EN 301 489-3 V2.1.1; EN 300 220-2 V3.1.1; EN IEC 63000:2018 |
Package Contents
- Wireless CO Guard detector – 1 pcs
- Drilling template – 1 pcs
- Self-tapping screws – 2 pcs
- Wall plugs – 2 pcs
- CR123A battery – 1 pcs
- User manual with a set of information labels – 1 pcs
Safety Notices
- Before use, read this manual carefully and keep it for future reference and for any future user.
- Never ignore the detector's alarm under any circumstances – doing so could lead to serious injury or death.
- Do not attempt to open or disassemble the detector – risk of electric shock, failure or malfunction of the device.
- Exposing the detector to high or low temperatures or high humidity can significantly reduce the battery life.
- Before using the device, make sure the power battery is inserted and the power has been activated.
- Transport, use and store the device only under the humidity and temperature conditions permitted by the manufacturer. Do not expose it to water, moisture, dripping or splashing water.
- Do not insert any objects into the ventilation openings, do not cover the device, and prevent the ingress of water or other liquid.
- The detector is intended only to indicate the presence of carbon monoxide – it does not detect smoke, flame, temperature or other gases or hazards.
- The device is not intended for use by persons with reduced physical, sensory or mental capabilities, or by persons lacking sufficient experience and knowledge, unless they are supervised or instructed by a person responsible for their safety. Children must be supervised to ensure they do not play with the device.
- This device must be installed by a competent person according to the manufacturer's instructions; its installation does not replace the proper installation, use and maintenance of fuel-burning appliances, including adequate ventilation.
- Keep the battery out of the reach of children. Do not throw the battery into fire, do not crush or cut it – risk of explosion. If you suspect a battery has been swallowed, seek medical help immediately. Replace a depleted battery only with a battery of the same type (CR123A).
- Do not dispose of the product with ordinary municipal waste or incinerate it – hand it over for recycling through the electrical equipment take-back system.
Warranty
A warranty is provided for the SAFE CO Guard device 36 months from the date of sale (excluding the battery). The warranty does not cover defects caused by failure to follow the instructions in this manual, damage, modification, or improper use of the product.
If you experience any problems with the device, contact technical support first – most situations can be resolved remotely.
Gallery
Need Help?
SAFE HOME europe technical support:
Email: info@safe-home.eu · Phone: (+420) 581 222 262
Website: www.smart-safe.eu