
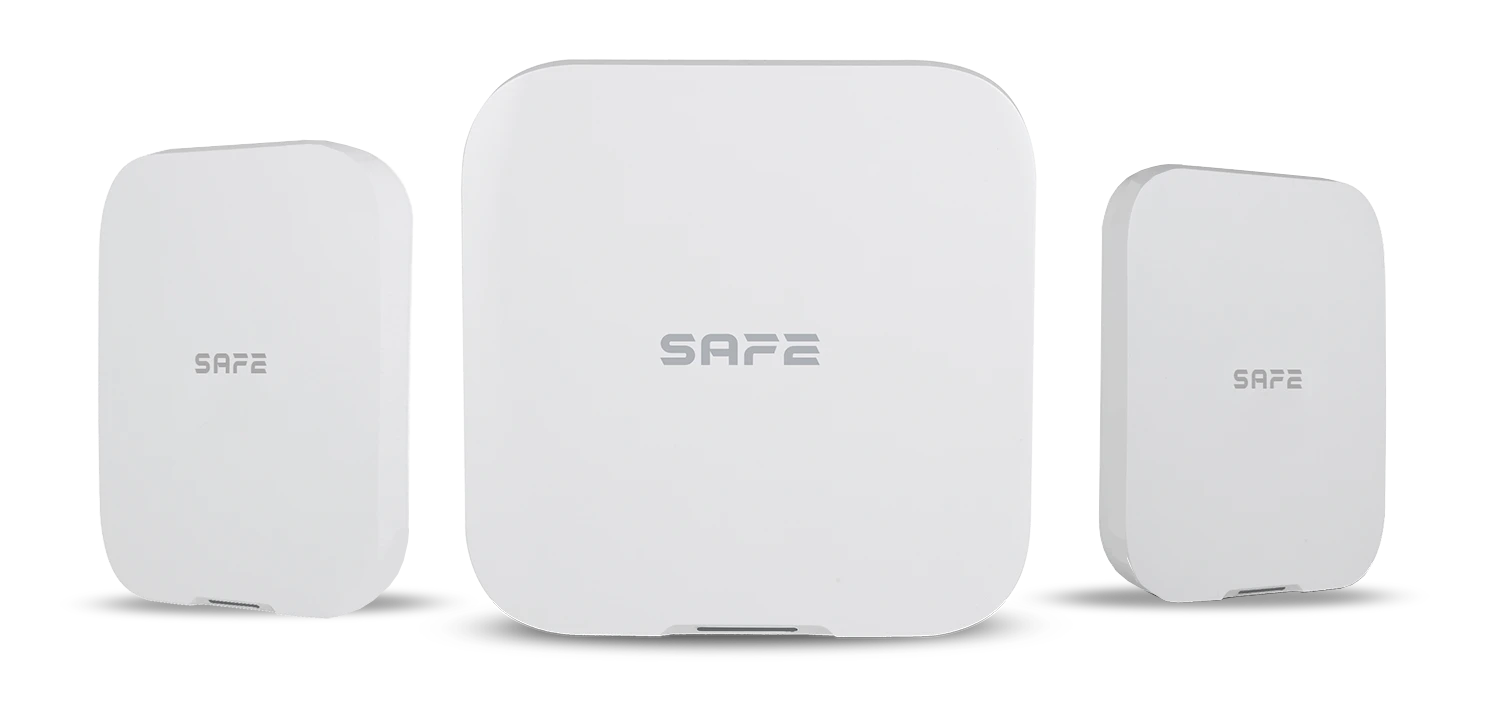
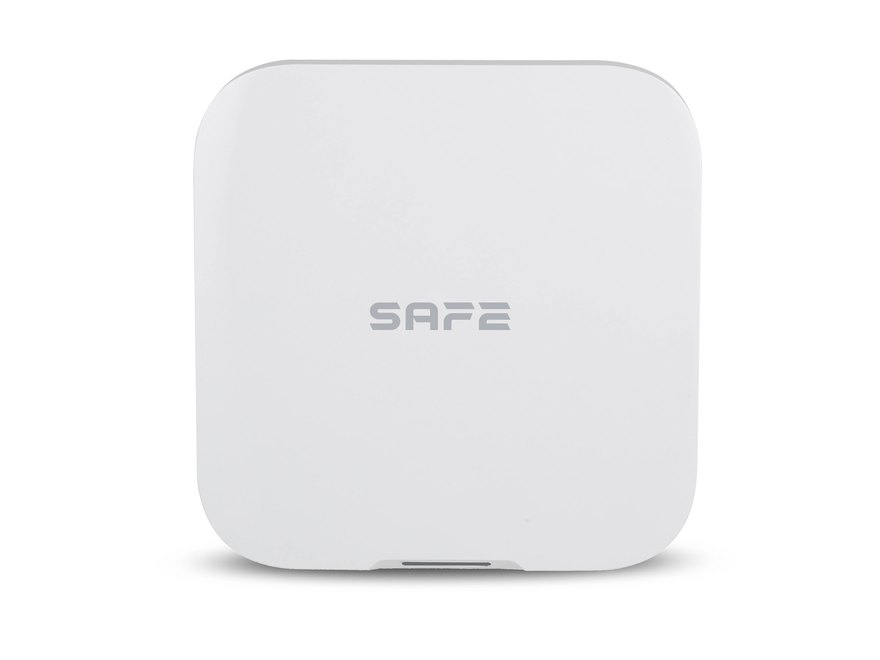
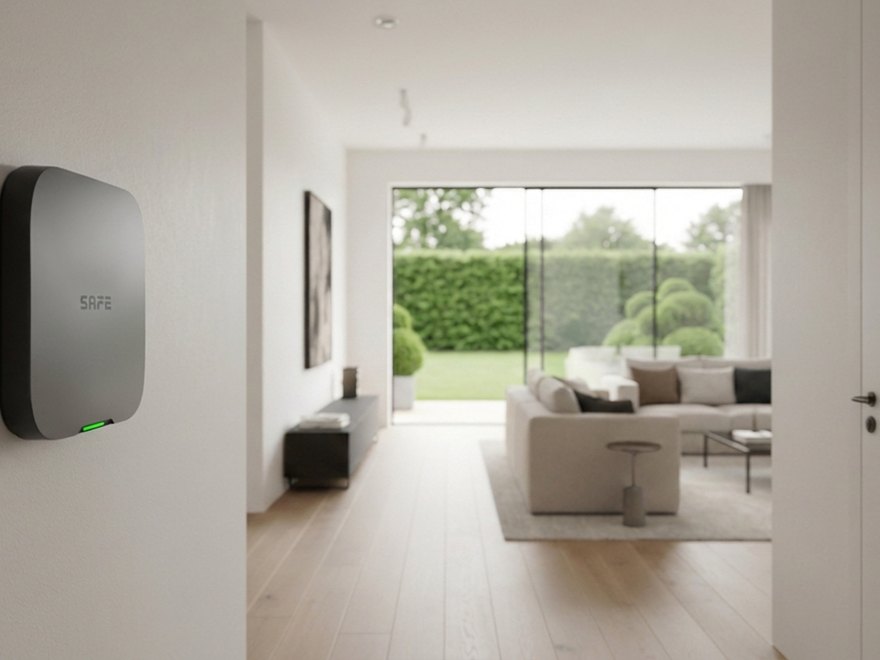
Hub 2 Plus LTE is a hybrid smart hub of the SAFE security system that controls all its devices and alerts users to potential dangers such as door forcing, window breakage, intrusion into the secured area, fire hazard or water flooding. It supports connection of up to 150 wireless devices and 64 wired elements. It represents a professional security solution and the first line of defense for your privacy against a wide range of potential threats. The Hub is certified at 2. security grade, and thus meets some of the most demanding requirements for resistance to tampering attempts, signal jamming or unauthorized manipulation, while supporting the latest trends in security, such as photo and video verification of alarm events, automation, or integration of IP cameras or third-party systems. It is manufactured in two color variants (SAFE 38300 white, SAFE 38301 black).
Preface
General
This user manual introduces the installation, functions and operation of the SAFE security system hub (hereinafter referred to as the "Hub"). Before using the device, read the manual carefully and keep it for future reference.
Safety Instructions
The following signal words may appear in the user manual:
| Signal Word | Meaning |
|---|---|
| DANGER | Indicates a high potential hazard that, if not avoided, may result in death or serious injury. |
| WARNING | Indicates a medium or low potential hazard that could cause minor or moderate injury if not avoided. |
| CAUTION | Indicates a potential risk that could lead to property damage, data loss, reduced performance, or an unpredictable outcome. |
| TIP | Provides methods to help you solve a problem or save time. |
| NOTE | Provides additional information, such as emphasis and supplementary text. |
Revision History
| Version | Revision Content | Release Date |
|---|---|---|
| V1.0.0 | First release. | August 2026 |
Privacy Notice
As a device user or data controller, you may collect personal data of others, such as their face, fingerprints, and license plate number. You must comply with local privacy laws and regulations to protect the legitimate rights and interests of other people by implementing measures that include, among others: providing clear and visible identification to inform people of the existence of the monitored area and providing the required contact information.
About the Manual
- The user manual serves as a reference guide only. There may be minor differences between the information provided and the product.
- We are not liable for any damage resulting from using the product in a manner that does not comply with the instructions in the user manual.
- The manual will be updated according to the latest laws and regulations of the relevant jurisdictions. For detailed information, refer to the printed user manual, scan the QR code, or visit our official website. The manual is for reference purposes only. There may be minor differences between the electronic and paper versions.
- All designs and software are subject to change without prior written notice. Due to product updates, certain differences may occur between the product and the information in the manual. Customer service will provide you with the latest version of the software and supplementary documentation.
- There may be printing errors or discrepancies in the description of functions, operations, and technical data. In the event of doubt or dispute, we reserve the right of final explanation. If the manual (in PDF format) cannot be opened, update your reader software or try a different common reader software.
- All trademarks, registered trademarks, and company names in the manual are the property of their respective owners.
- If you encounter any problems while using the device, visit our website or contact your supplier or customer service.
- In the event of ambiguity or dispute, we reserve the right of final explanation.
Important Safeguards and Warnings
This section contains information on the proper handling of the product, risk prevention, and prevention of property damage. Read it carefully before using the device and follow the instructions provided when using it.
Operating Requirements
- Before use, make sure the device's power supply is working properly.
- Do not unplug the device's power cable while it is switched on.
- Use the device only within its rated power range.
- Transport, use, and store the device within the permitted humidity and temperature conditions.
- Prevent liquids from splashing or dripping onto the device. Make sure there are no liquid-filled objects on the device, to prevent liquid from entering it.
- Do not disassemble the device.
Installation Requirements
- Before switching on, connect the device to the power adapter.
- Strictly comply with local electrical safety standards and make sure the voltage in the area is stable and matches the device's power requirements.
- Do not connect the device to more than one power source. Otherwise, the device could be damaged.
- When working at heights, follow all safety procedures and use the required protective equipment.
- Do not expose the device to direct sunlight or heat sources.
- Do not install the device in damp, dusty, or smoky locations.
- Install the device in a well-ventilated location and do not block its ventilation.
- Use the power adapter or power supply provided by the device manufacturer.
- The power supply must meet the ES1 requirements of IEC 62368-1 and must not exceed PS2. The power supply requirements are governed by the device's rating label.
- Connect Class I electrical appliances to a socket with protective earthing.
Functional Elements
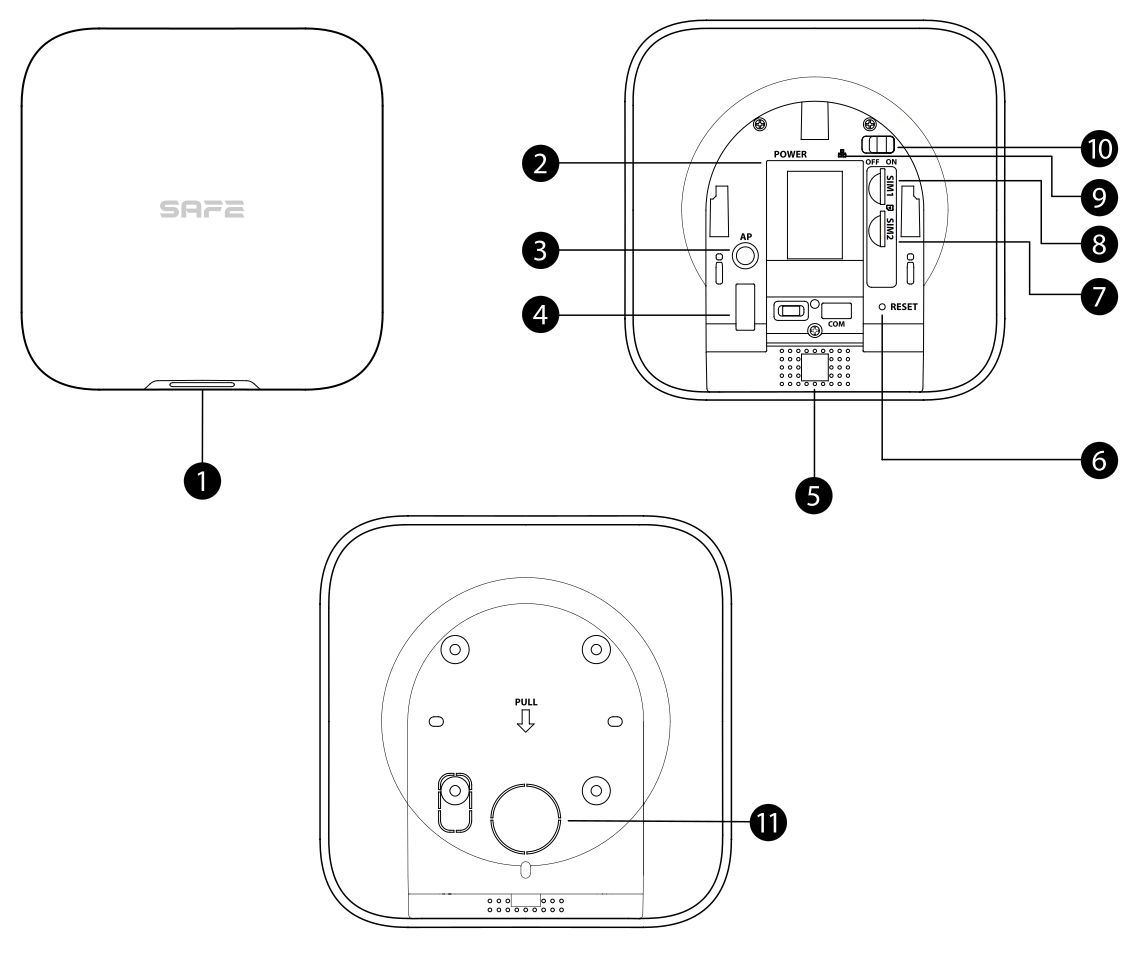
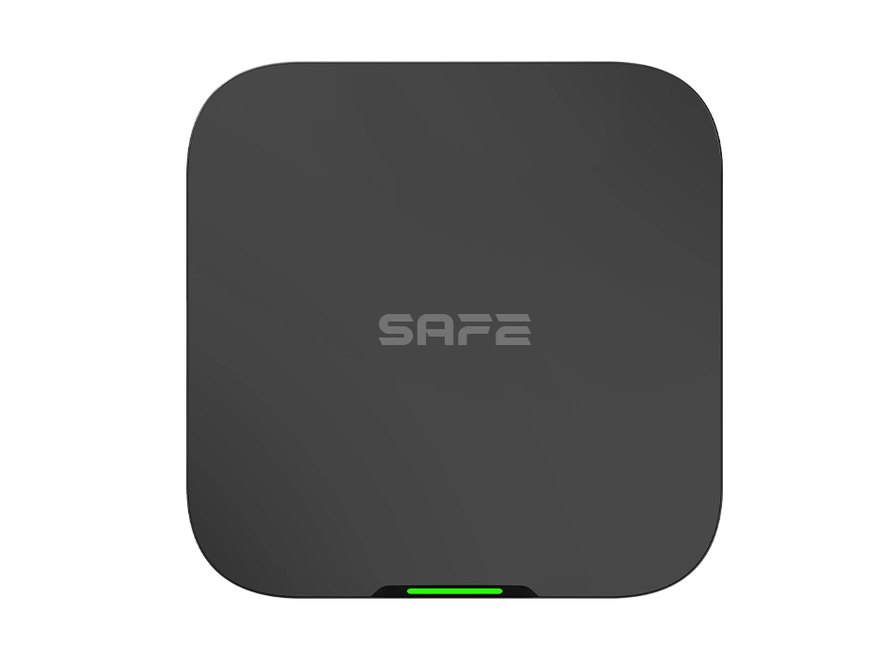
- Indicator — signals the Hub status in the following ways:
- Slowly flashes green: reduced sensitivity mode.
- Flashes green: the Hub is starting up.
- Lights up yellow: failed to connect to the cloud.
- Lights up green: Disarmed status.
- Lights up blue: Armed status.
- Flashes red: an alarm event has been triggered.
- Flashes yellow: a fault has been detected.
- Flashes blue: AP configuration or pairing of the Hub with devices is in progress.
- Flashes blue rapidly: card issuing mode.
- Power connector — used to connect the power supply.
- AP button — press and hold the button for 2 seconds to turn on the AP function; the phone then connects to the hotspot broadcast by the Hub, and the Wi-Fi network login credentials (username and password) are synchronized to the Hub. The AP function can be turned off the same way — press and hold the button for 2 seconds while AP is on.
- Tamper contact — when the tamper contact is released, a tamper alarm is triggered.
- Speaker — used to emit sound.
- Reset button — press and hold the button for 10 seconds to restart the Hub and restore factory settings.
- SIM 2 slot — install the primary card in the first slot and the backup card in the second slot.
- Two SIM cards are supported, one of which is a backup (dual SIM, single standby).
- SIM cards allow the Hub to use mobile data and send push notifications about alarms.
SIM cards will not work until the network configuration is completed.
The SIM function is available only on selected models.
- SIM 1 slot — slot for installing the primary SIM card; see item 7 above for description.
- Ethernet cable connector — used to connect the Hub to the Ethernet network.
- Power switch — used to turn the Hub on or off.
- Rear cover — when the back cover is opened, a tamper alarm is triggered.
Dimensions
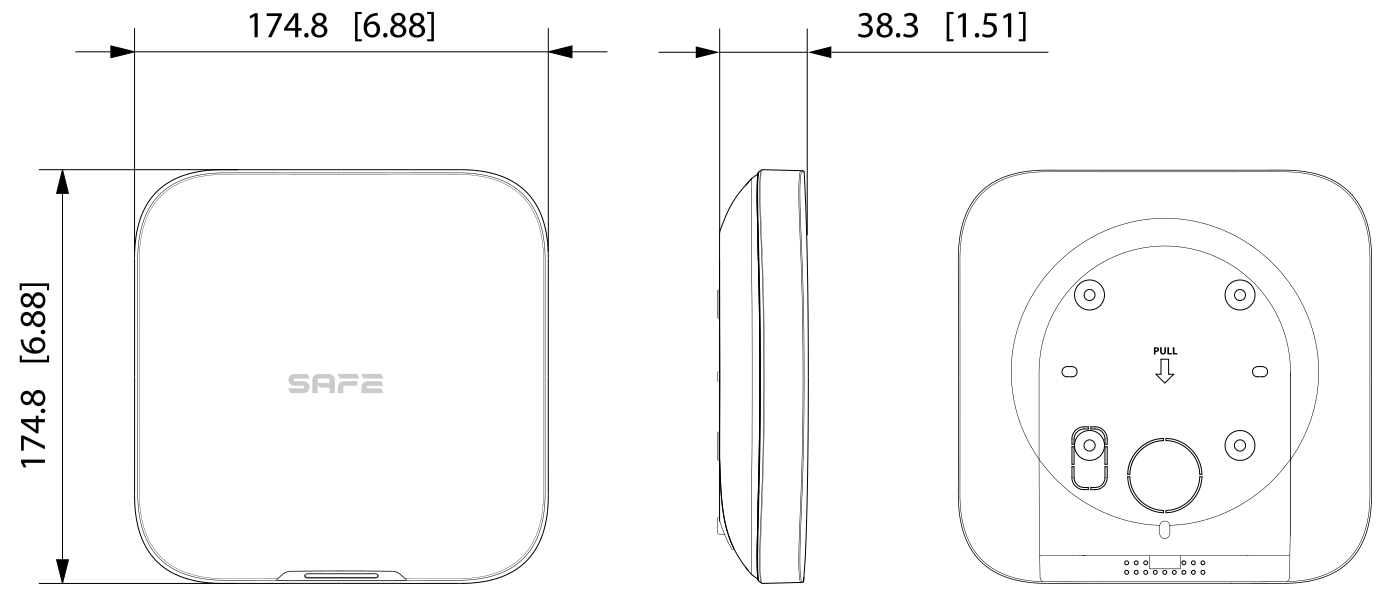
The Hub's dimensions are shown in the figure below (unit: mm [in]).
Operating Principle
The Hub collects information about the activity of connected devices in encrypted form and analyzes it. If the system detects an intrusion or other danger in an armed area, the Hub instantly:
- alerts the user in the app ProSAFE (push notification, SMS, phone call),
- sends an alarm message to DPPC (monitoring and alarm receiving center) using the SIA or SoftGuard protocol,
- for devices with a camera, sends images for visual verification of the alarm.
Four communication channels
The Hub can be connected to the internet via Ethernet, Wi-Fi and the LTE mobile network with two SIM cards (primary + backup; at any one moment, one is active). If one channel fails, the system automatically continues via the next available one — connectivity thus remains maintained even if the Ethernet cable is disconnected or Wi-Fi fails.
SAFE Keeper protocol
Communication between the Hub and devices is provided by an encrypted bidirectional radio protocol SAFE Keeper (868,0–868,6 MHz):
- AES-128 encryption with a rolling code and authentication of connected devices,
- range up to 2 000 m in open space,
- when jamming is detected, the system alerts the user and automatically switches to an unjammed frequency band,
- regular connection checks — the system immediately reports a device dropout.
Expansion with wired components
Hub 2 Plus LTE features an integrated port RS-232 for connecting Serial Bridge (SAFE 38181), which forms a communication bridge for connecting wired devices via integration modules IO Expander Board (SAFE 38182) and IO Relay Board (SAFE 38183). Thanks to the SAFE system, you are therefore not limited only to the options of a wireless solution — you can further expand the system with wired elements as your needs grow.
The modules make it possible to modernize existing installations without having to replace functional equipment. You simply connect older security elements to the SAFE platform and gain management via the ProSAFE app, automation scenes, and detailed notifications on your smartphone, all without any complicated additional programming.
Sabotage protection
The SAFE system cannot be taken out of operation without the user's knowledge. The Hub alerts on device failure or loss of connection and stores events in a log (up to 5 000 records). In the event of a power outage, it continues operating from the backup battery for up to 12 hours; the offline cache retains up to 50 alarm messages.
Photo verification of alarms
The Hub works with Motion Cam detectors (indoor and outdoor) with a photo verification function — images from the detectors are sent immediately to the ProSAFE app or to the DPPC. Up to 8 the system can also connect up to 8 IP cameras for sending video during an alarm.
Cloud update
The firmware of the Hub and connected devices is updated remotely from the cloud — automatically, or after user confirmation. A dual firmware backup system ensures automatic recovery if an update fails.
Users and roles
Users can only be created in the ProSAFE app. Divide users into different roles so that they have different levels of access to device control.
| User | Access level | Description and permissions |
|---|---|---|
| Administrator (ProSAFE) | L2 | The end user who adds the device to the ProSAFE app becomes the administrator. This role cannot be changed or transferred and has permissions such as device configuration and user management. During the time that a technician has borrowed the Hub from the user, or that the user has entrusted it to the technician, the administrator (ProSAFE) does not have permission to configure the device. |
| Regular user (ProSAFE) | L2 | Access is gained when the administrator (ProSAFE) shares the device with them through the ProSAFE app. This role can be changed and has only basic permissions, such as viewing device status and arming and disarming rooms. |
| Installer | L3 | Technicians provide operation and maintenance services to end users. This role must obtain access to the device by requesting permission from the end user (the ProSAFE administrator). The technician may be granted permissions, for example to configure the device and manage users. |
Commissioning procedure
Commission the wireless alarm system according to the following procedures.
End user
- Add the Hub in the ProSAFE app. This makes you the administrator (ProSAFE) of the system with all the relevant permissions.
- Next, choose one of the following procedures:
- Share the device with regular ProSAFE users.
- Entrust the device to an installer – the installer must approve your entrusting request.
- Once the installer approves the entrusting, you can at any time:
- change their permissions,
- cancel the entrusting of the device to the installer,
- extend the entrusting period.
- Arm and disarm the system using the keypad, key fob, or the ProSAFE app. After
sending the arm command, the ProSAFE app checks the system status. If the system reports a fault,
you choose whether to arm it anyway (forced arming).
Details for individual devices can be found in the operating manual of the respective peripheral device.
Installer
- Connect the Hub to the Ethernet network and turn it on.
- Add the Hub to the ProSAFE app and add peripheral devices to the Hub.
- Install the Hub on a wall. We recommend using wall plugs. Do not place the Hub:
- outdoors,
- near metal objects that cause attenuation and shielding of the radio signal,
- in places with a weak GSM signal,
- near sources of radio interference at a distance of less than 1 meter from the router and power cables,
- in places where the temperature and humidity exceed the permitted limits.
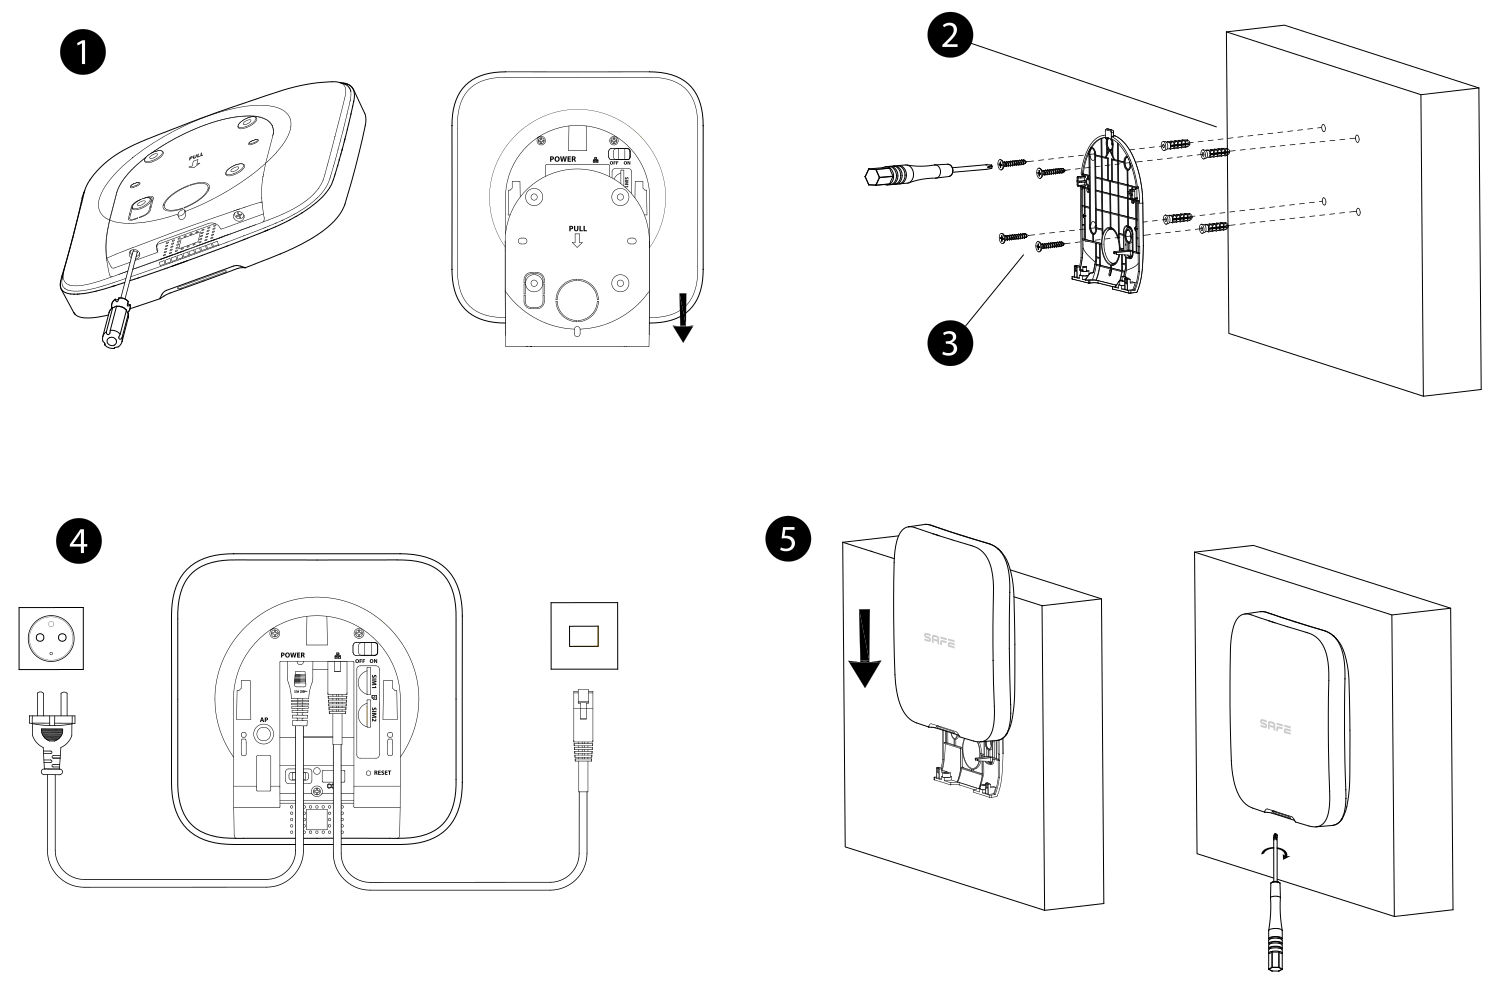
The installation set contains: the Hub, a countersunk screw M3 × 8 mm, a self-tapping screw ST4 × 25 mm, a mounting plate, and a wall plug (wall expansion screw).Installation procedure:- Determine the position of the screw holes and drill them into the mounting plate.
- Insert the wall plugs into the holes.
- Hold the mounting plate against the wall and align the holes in the plate with the wall plugs.
- Secure the mounting plate with self-tapping screws ST4 × 25 mm.
- Fit the alarm Hub onto the mounting plate from top to bottom.
- Secure the Hub to the mounting plate with countersunk screws M3 × 8 mm.
- Configure the Hub in the ProSAFE app.
- You can gain access to the device in one of the following ways:
- lend the device to the administrator (ProSAFE),
- request permission from the administrator (ProSAFE) – the administrator approves your request,
- accept the administrator's (ProSAFE) request to entrust the device,
- deliver the device to the administrator (ProSAFE).
- Perform device operation and maintenance (Device O&M).
- The procedure ends when the administrator (ProSAFE) cancels the entrusting of the device, or when you as the technician end the device lending.
ProSAFE account
The security system is configured and controlled through the ProSAFE app. The ProSAFE app is available for both iOS and Android. This chapter describes the procedure on iOS.
Prerequisite: you have the latest version of the app installed.
Registration
- Search for ProSAFE in the App Store and download the app.
Android users can download the ProSAFE app from Google Play.
- On your phone, click the app icon and launch it.
- Create an account.
- Click Register.
- Select your country or region from the list.
- Enter your email and password for registration.
Click the eye icon to show the password; the icon then changes to a crossed-out eye.
- Check the box to agree to the ProSAFE registration terms and conditions, the Privacy Policy, and the Smart-safe Pass Privacy Policy.
- Click Get verification code, check your email inbox, and enter the received code.
Use the verification code within 60 seconds of receipt, otherwise it will expire.
- Click OK.
Login
- Return to the login screen, enter your email and password, and click Log in.
Adding the Hub to the app
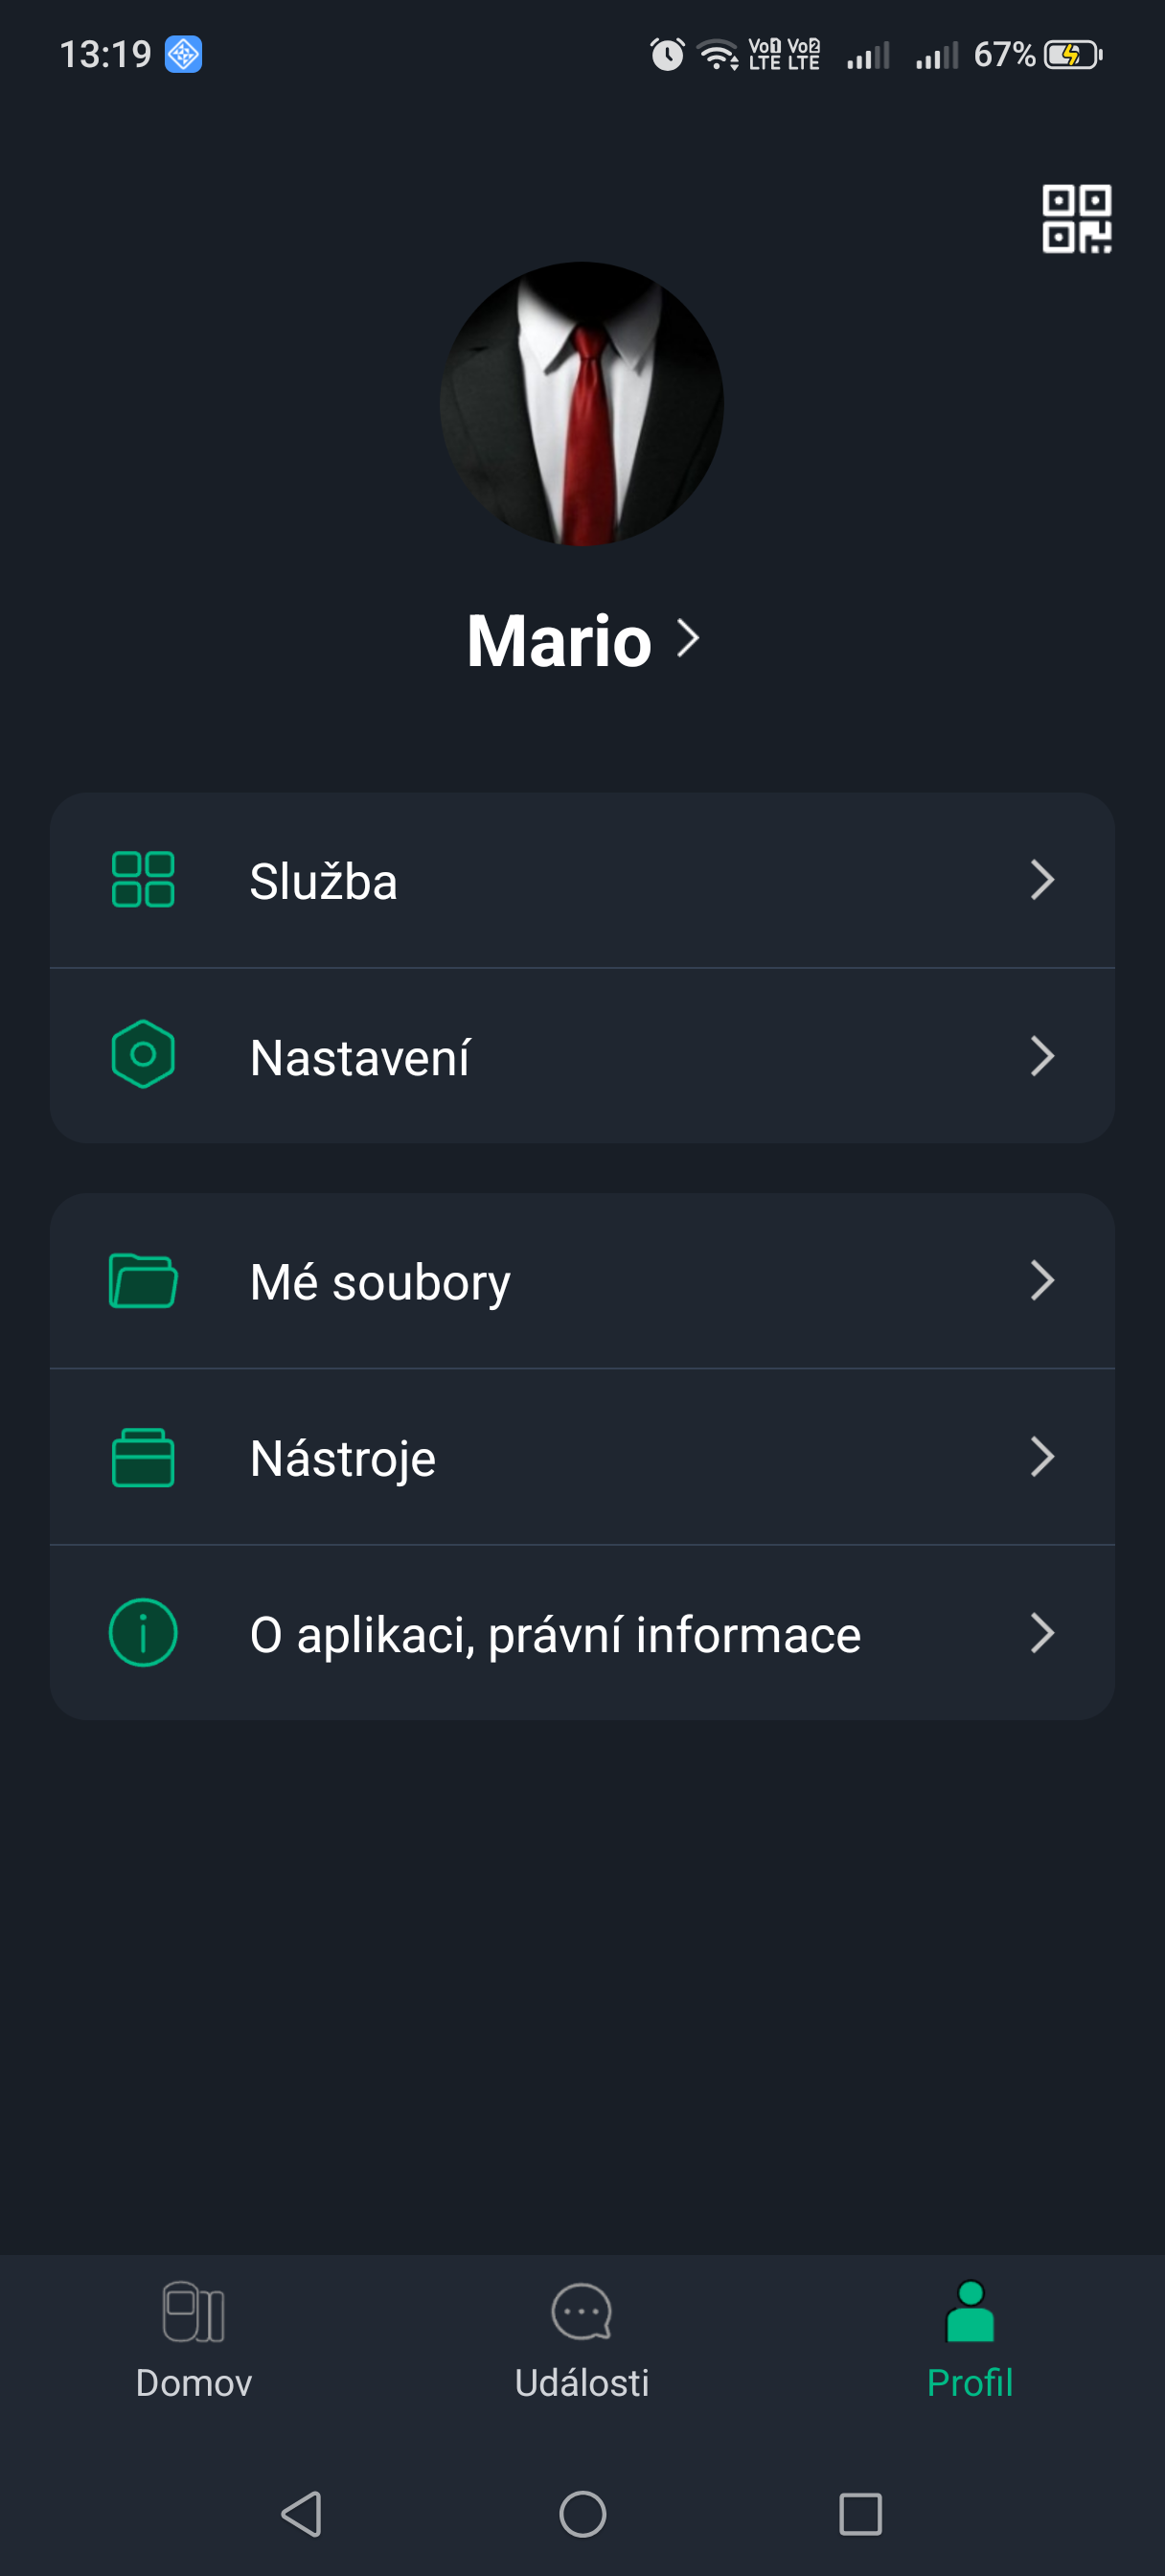
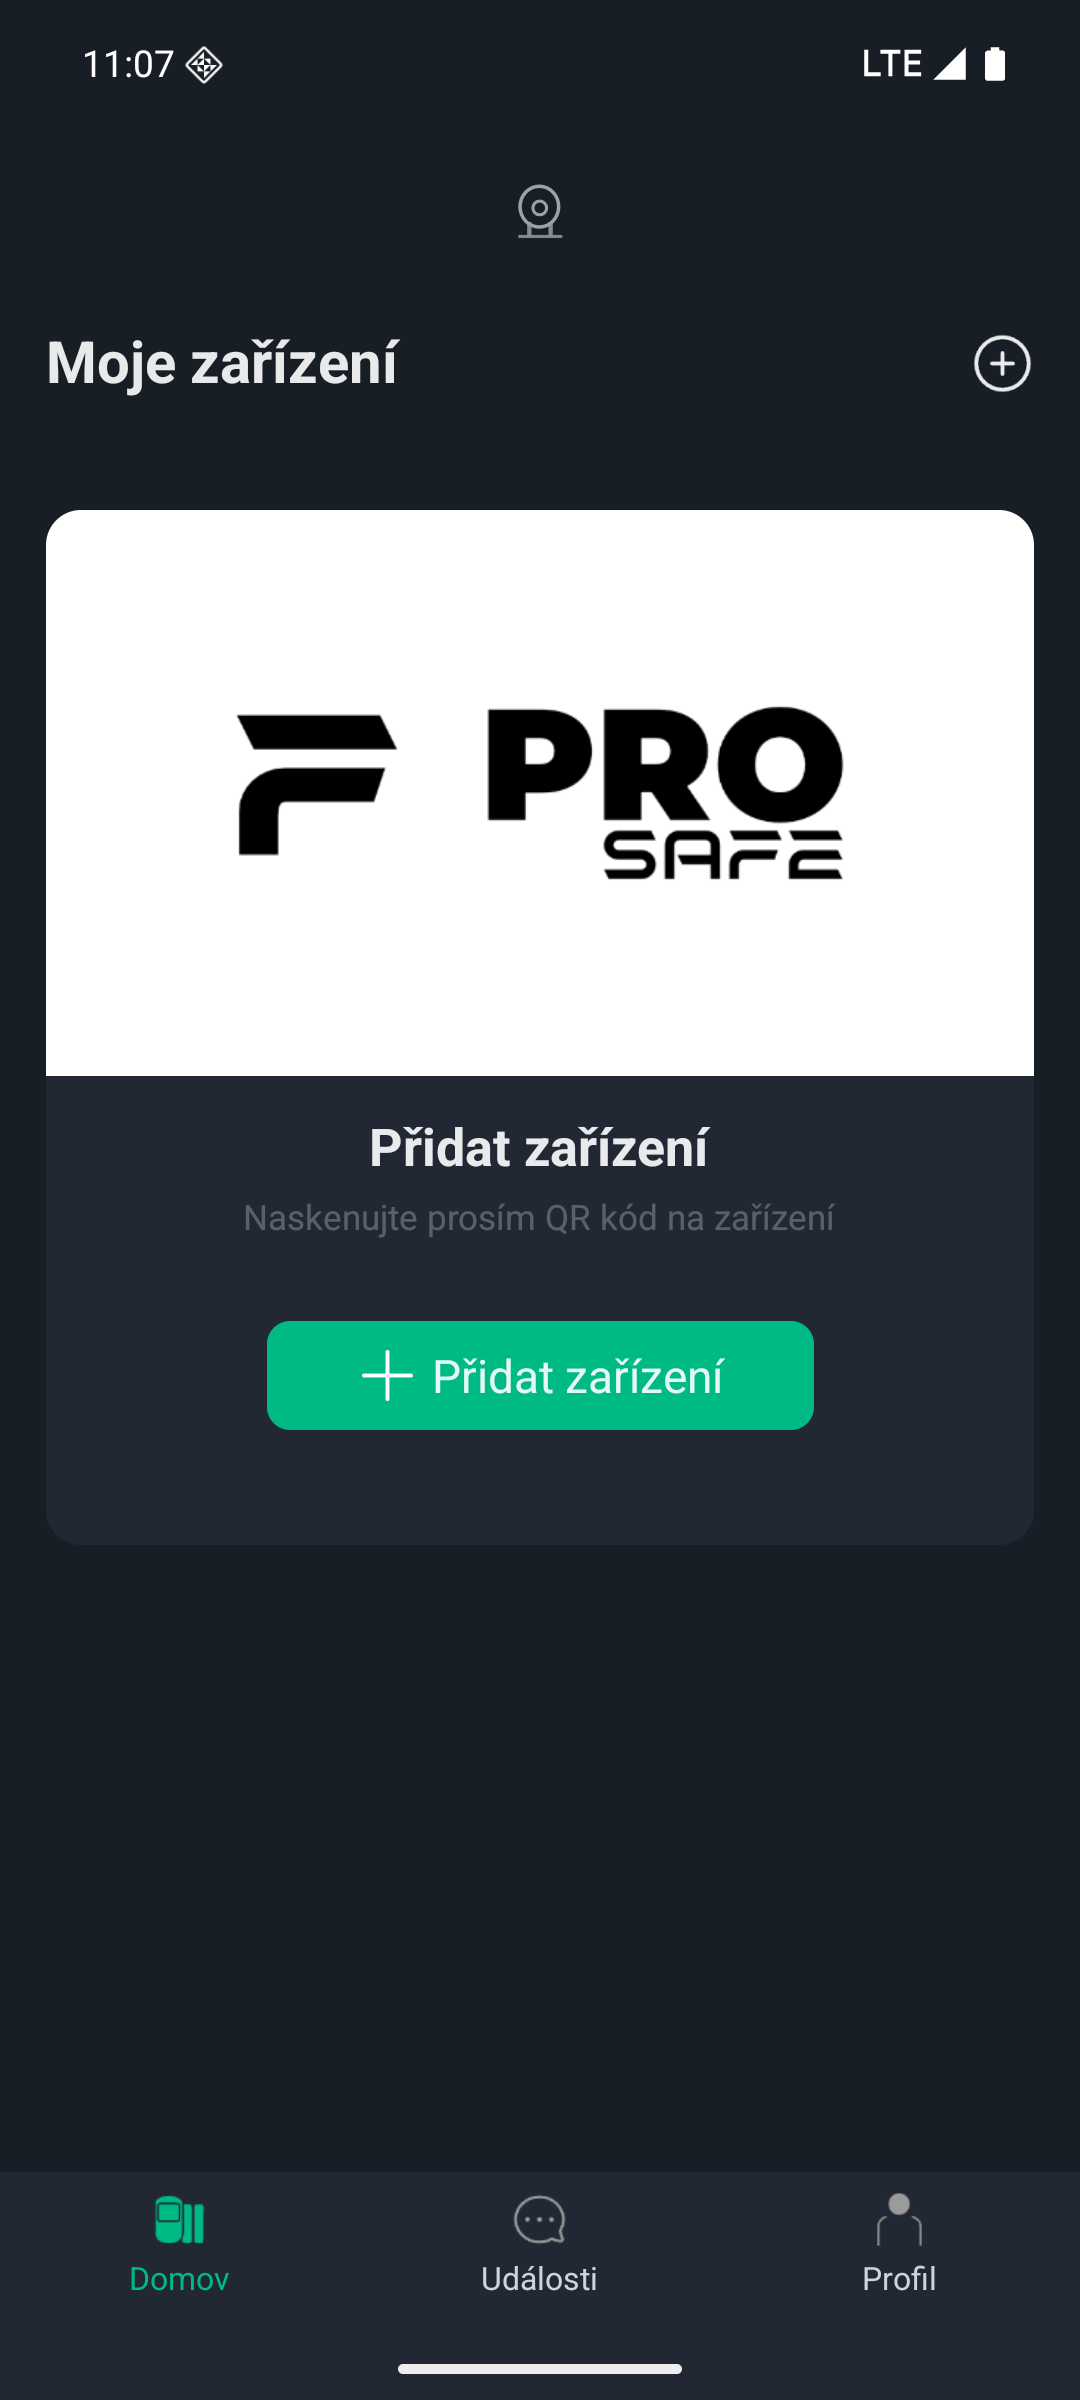
- On the Devices screen, click the + icon and select Scan QR code.
- Add a device.
- Scan the QR code directly on the device, or click the gallery icon and import an image with the QR code.
- Click Enter SN manually and enter the device's serial number to add it manually.
- Select the device type and click Next.
If the system recognizes the device type automatically, click Next directly.
- On the Add device screen, edit the device name, enter the device username and password, and click Save.
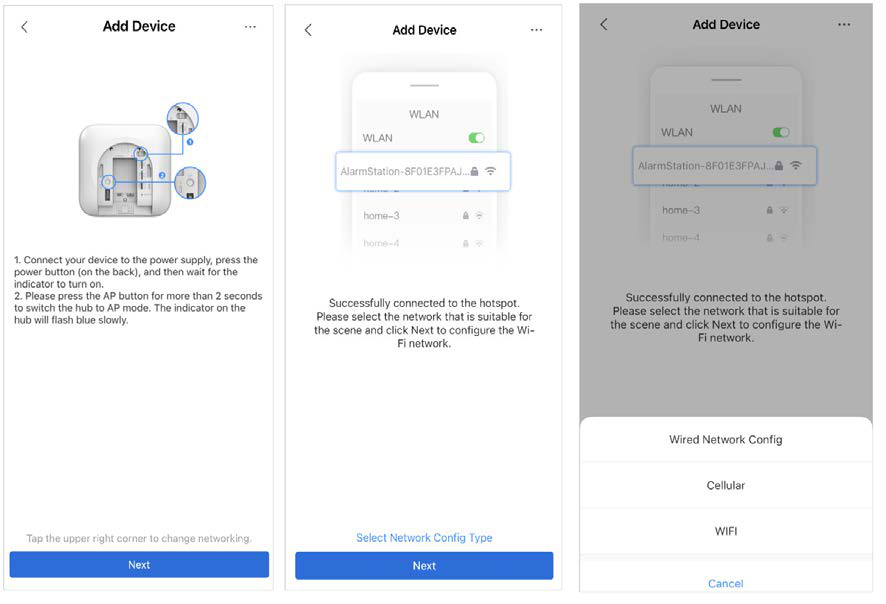
- Configure the network settings.
- On the Add device screen, click Next and connect to the Hub's hotspot.
- Once the connection is successfully established, click Select network configuration type.
- Select the network types you want to configure.
- Ethernet network: turn on the DHCP function, or manually enter the IP address, subnet mask, gateway, DNS, and MAC address.
- Mobile network: configure the APN, authentication mode, username, password, dial-up number, and data roaming for the SIM card.
- Wi-Fi: select the Wi-Fi network and enter the password to connect to it.
Adding devices to the Hub
You can add multiple devices to the Hub. Details on adding individual device types can be found in the user manuals of the respective devices.
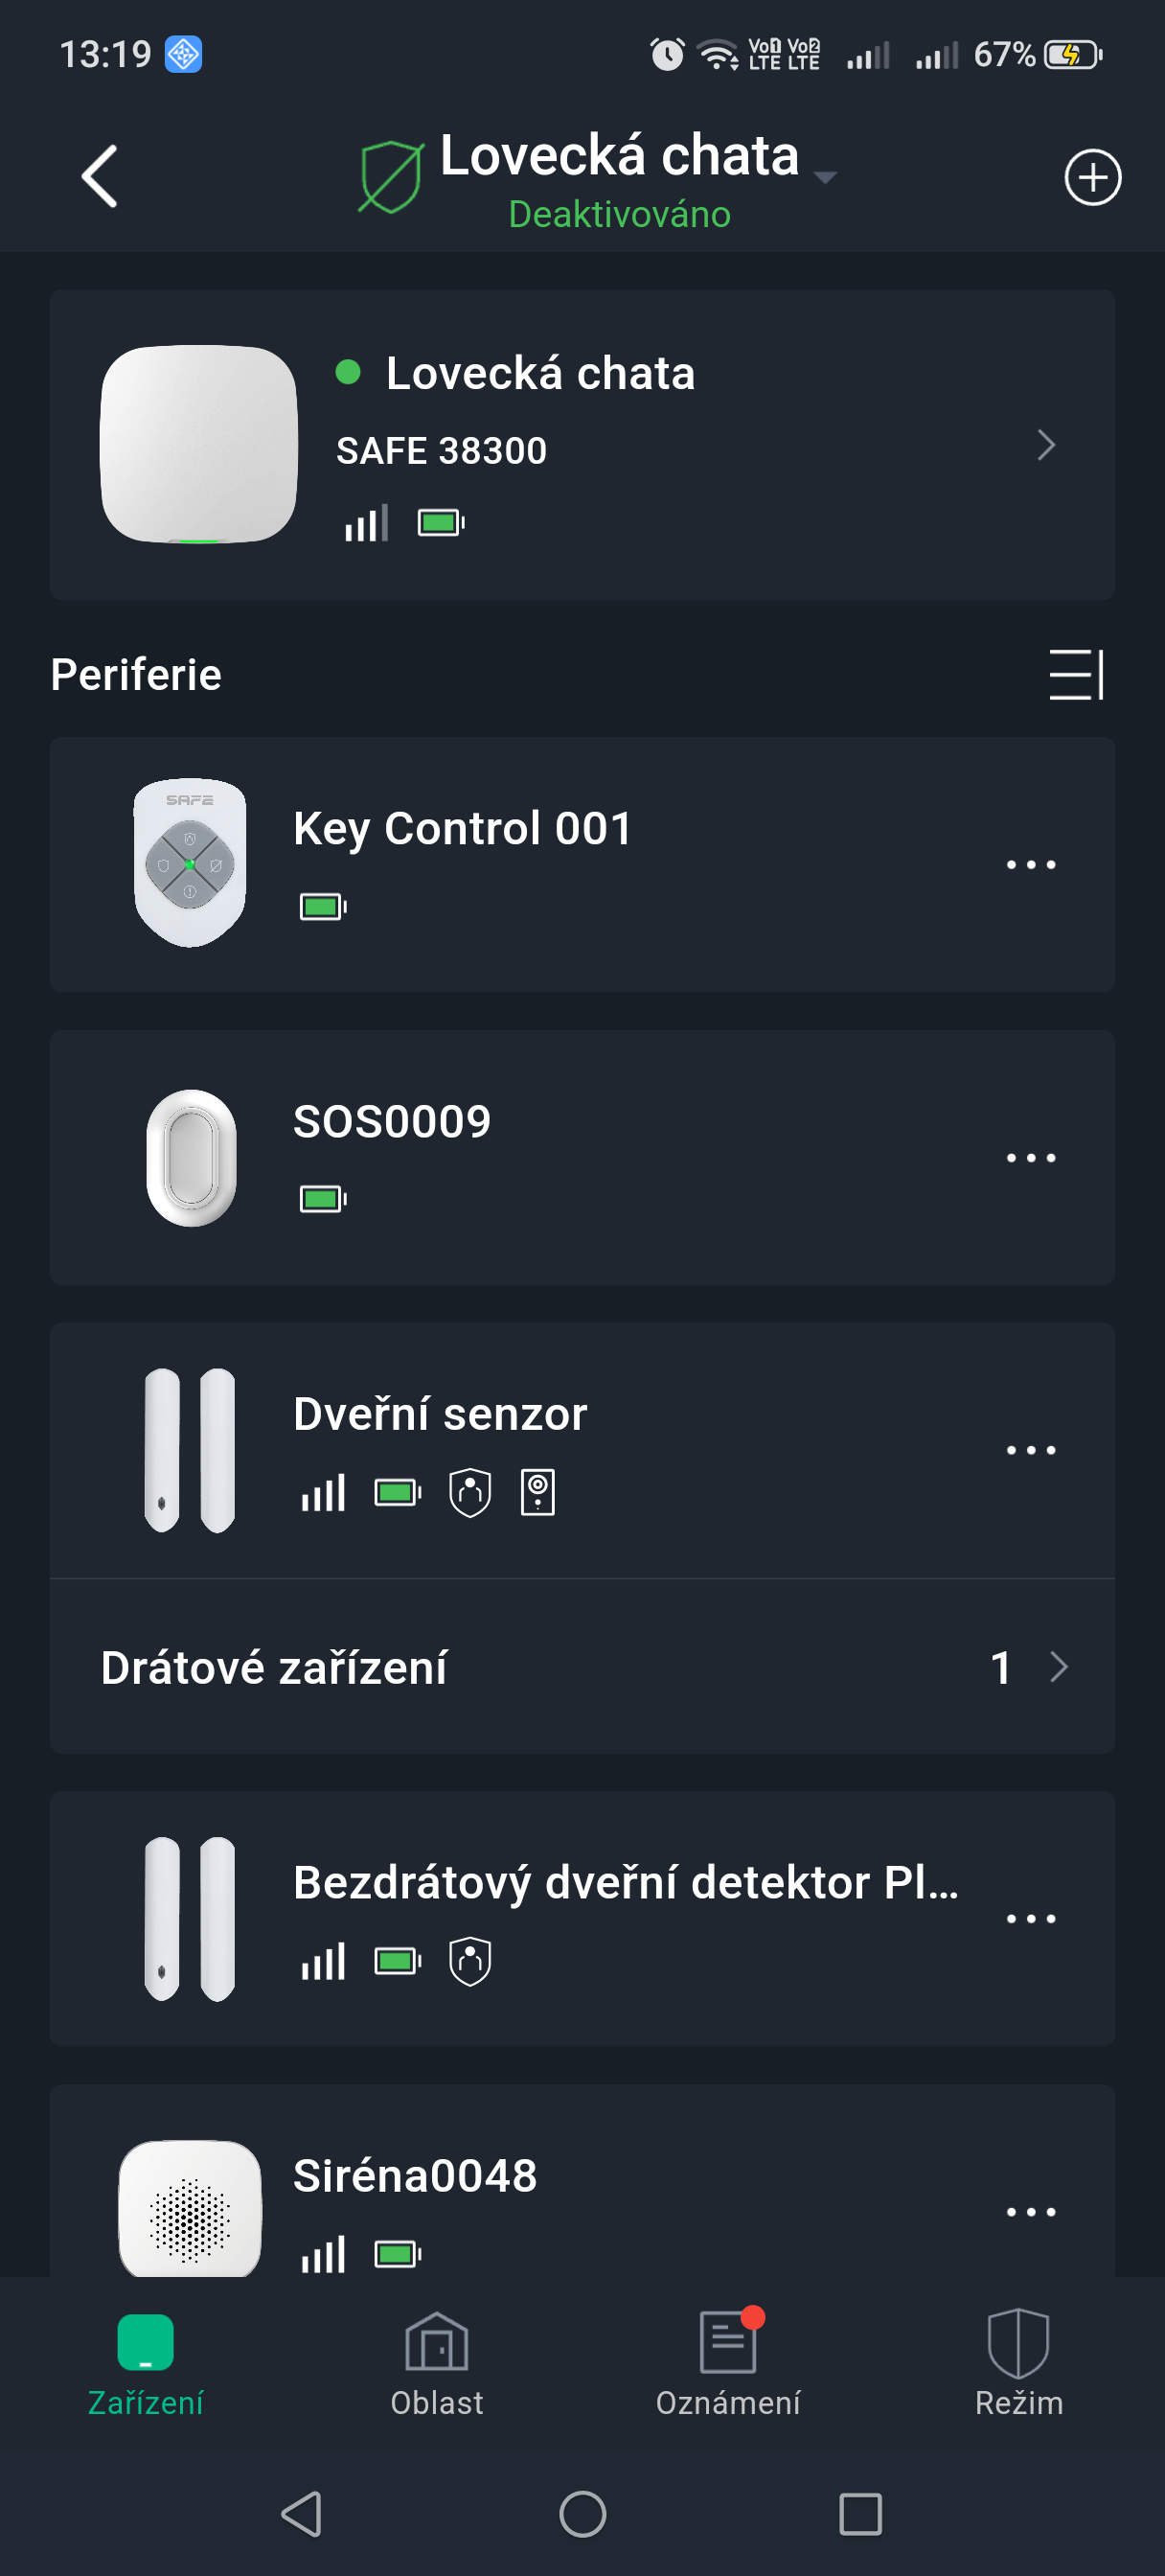
On the Hub devices screen, click the + icon and select Add device.
Adding a device
Adding one at a time:
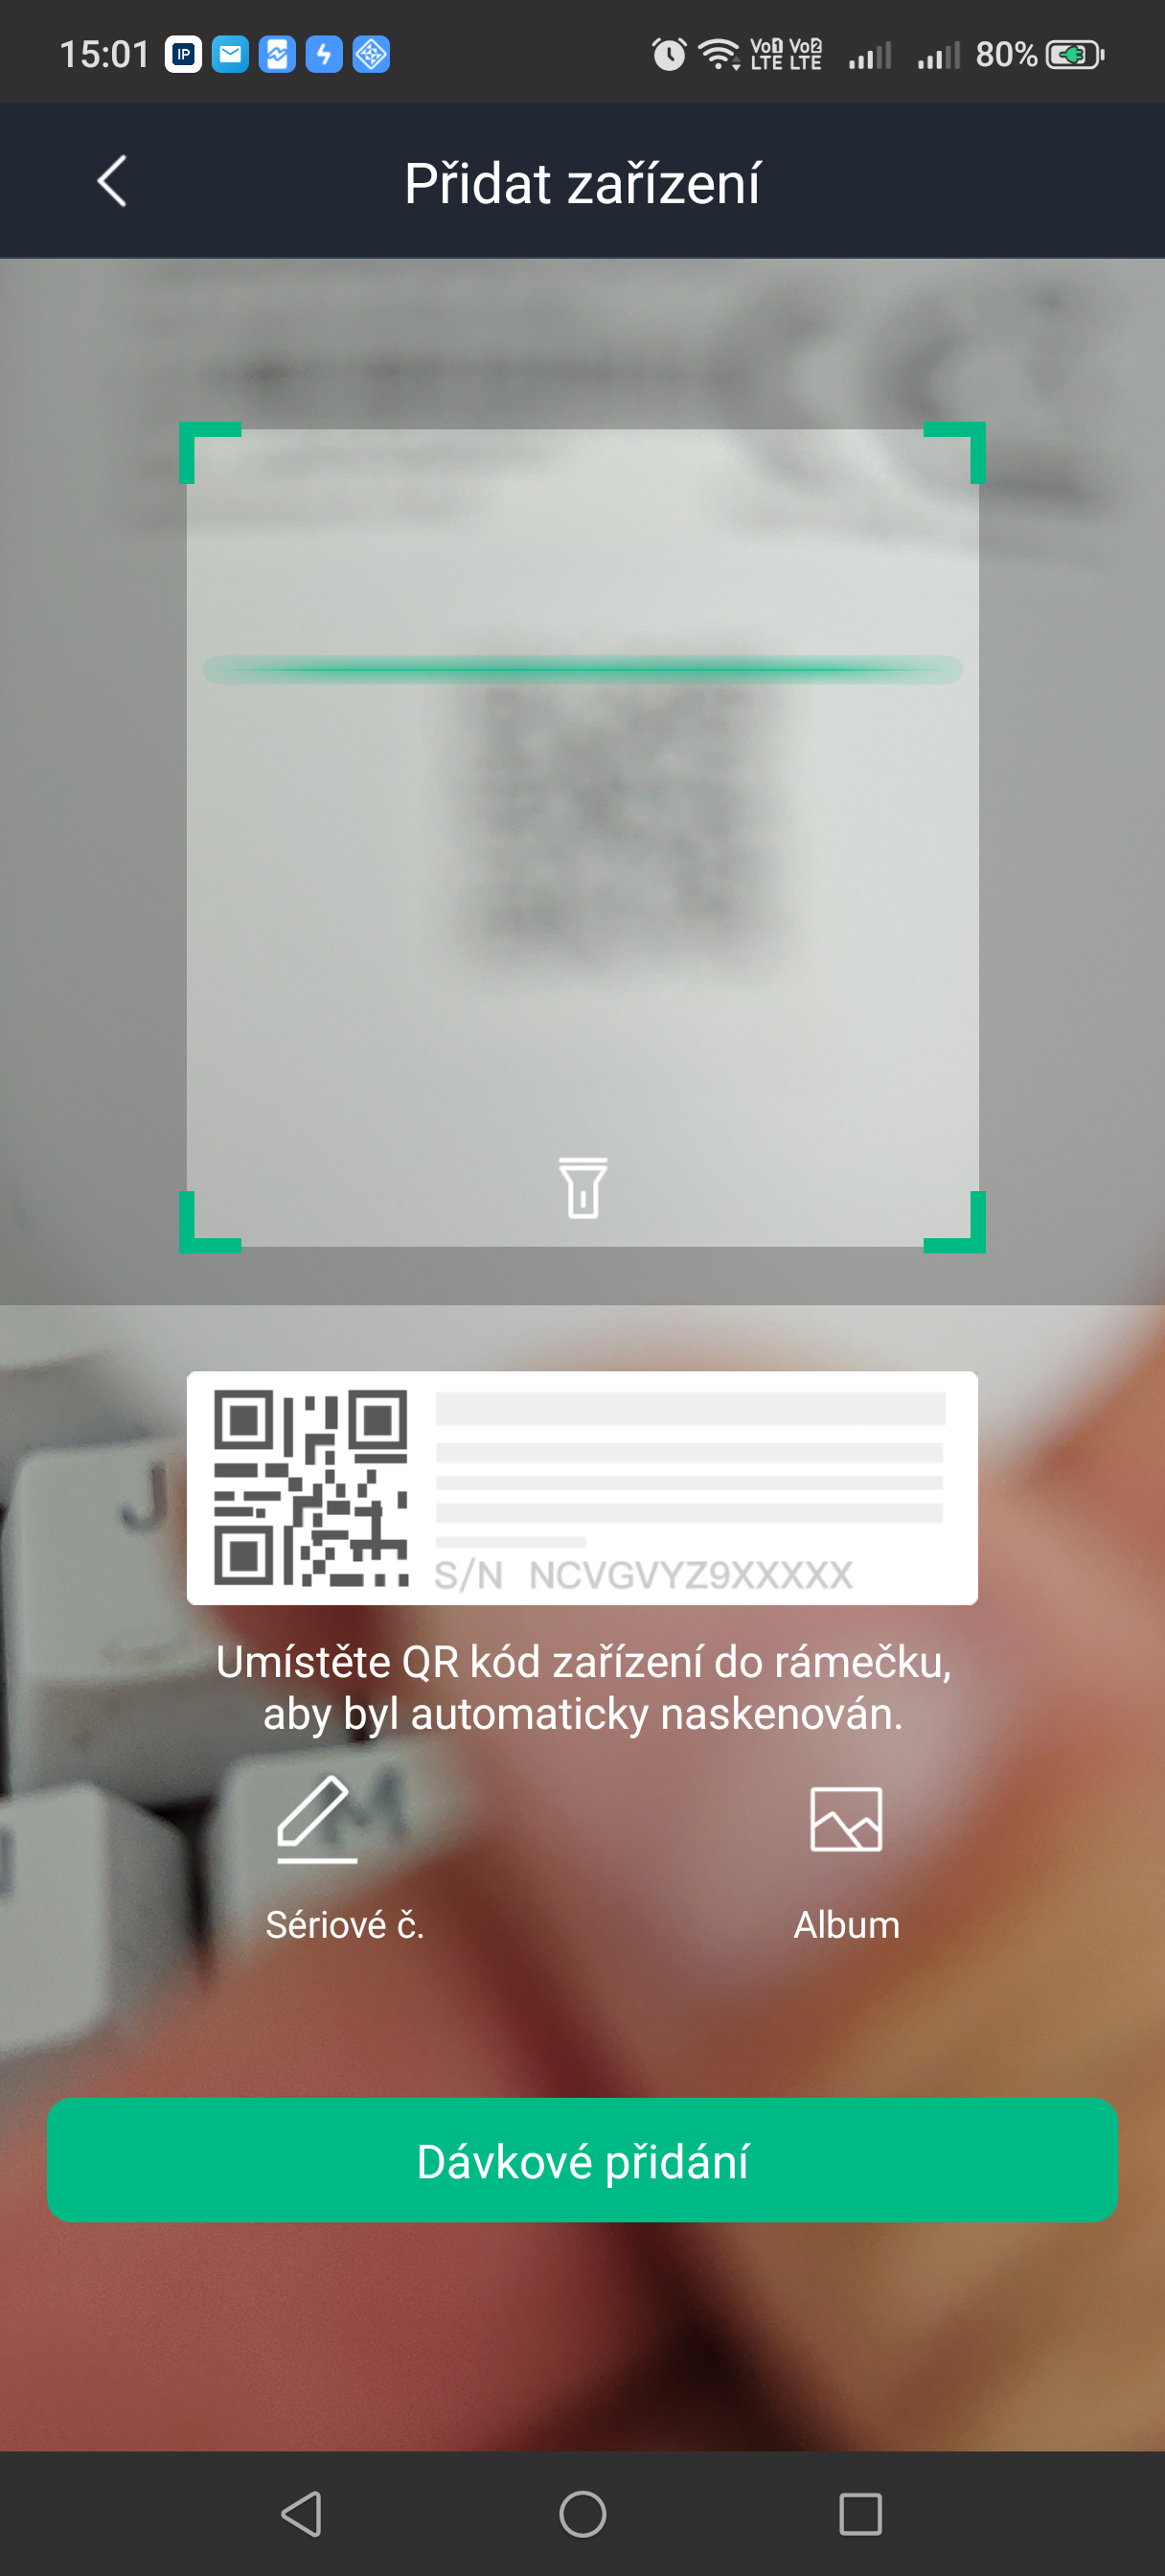
- Scan the QR code on the bottom of the device and click Next.
You can also enter the device's serial number manually by clicking SN, or select a QR code image from My Files.
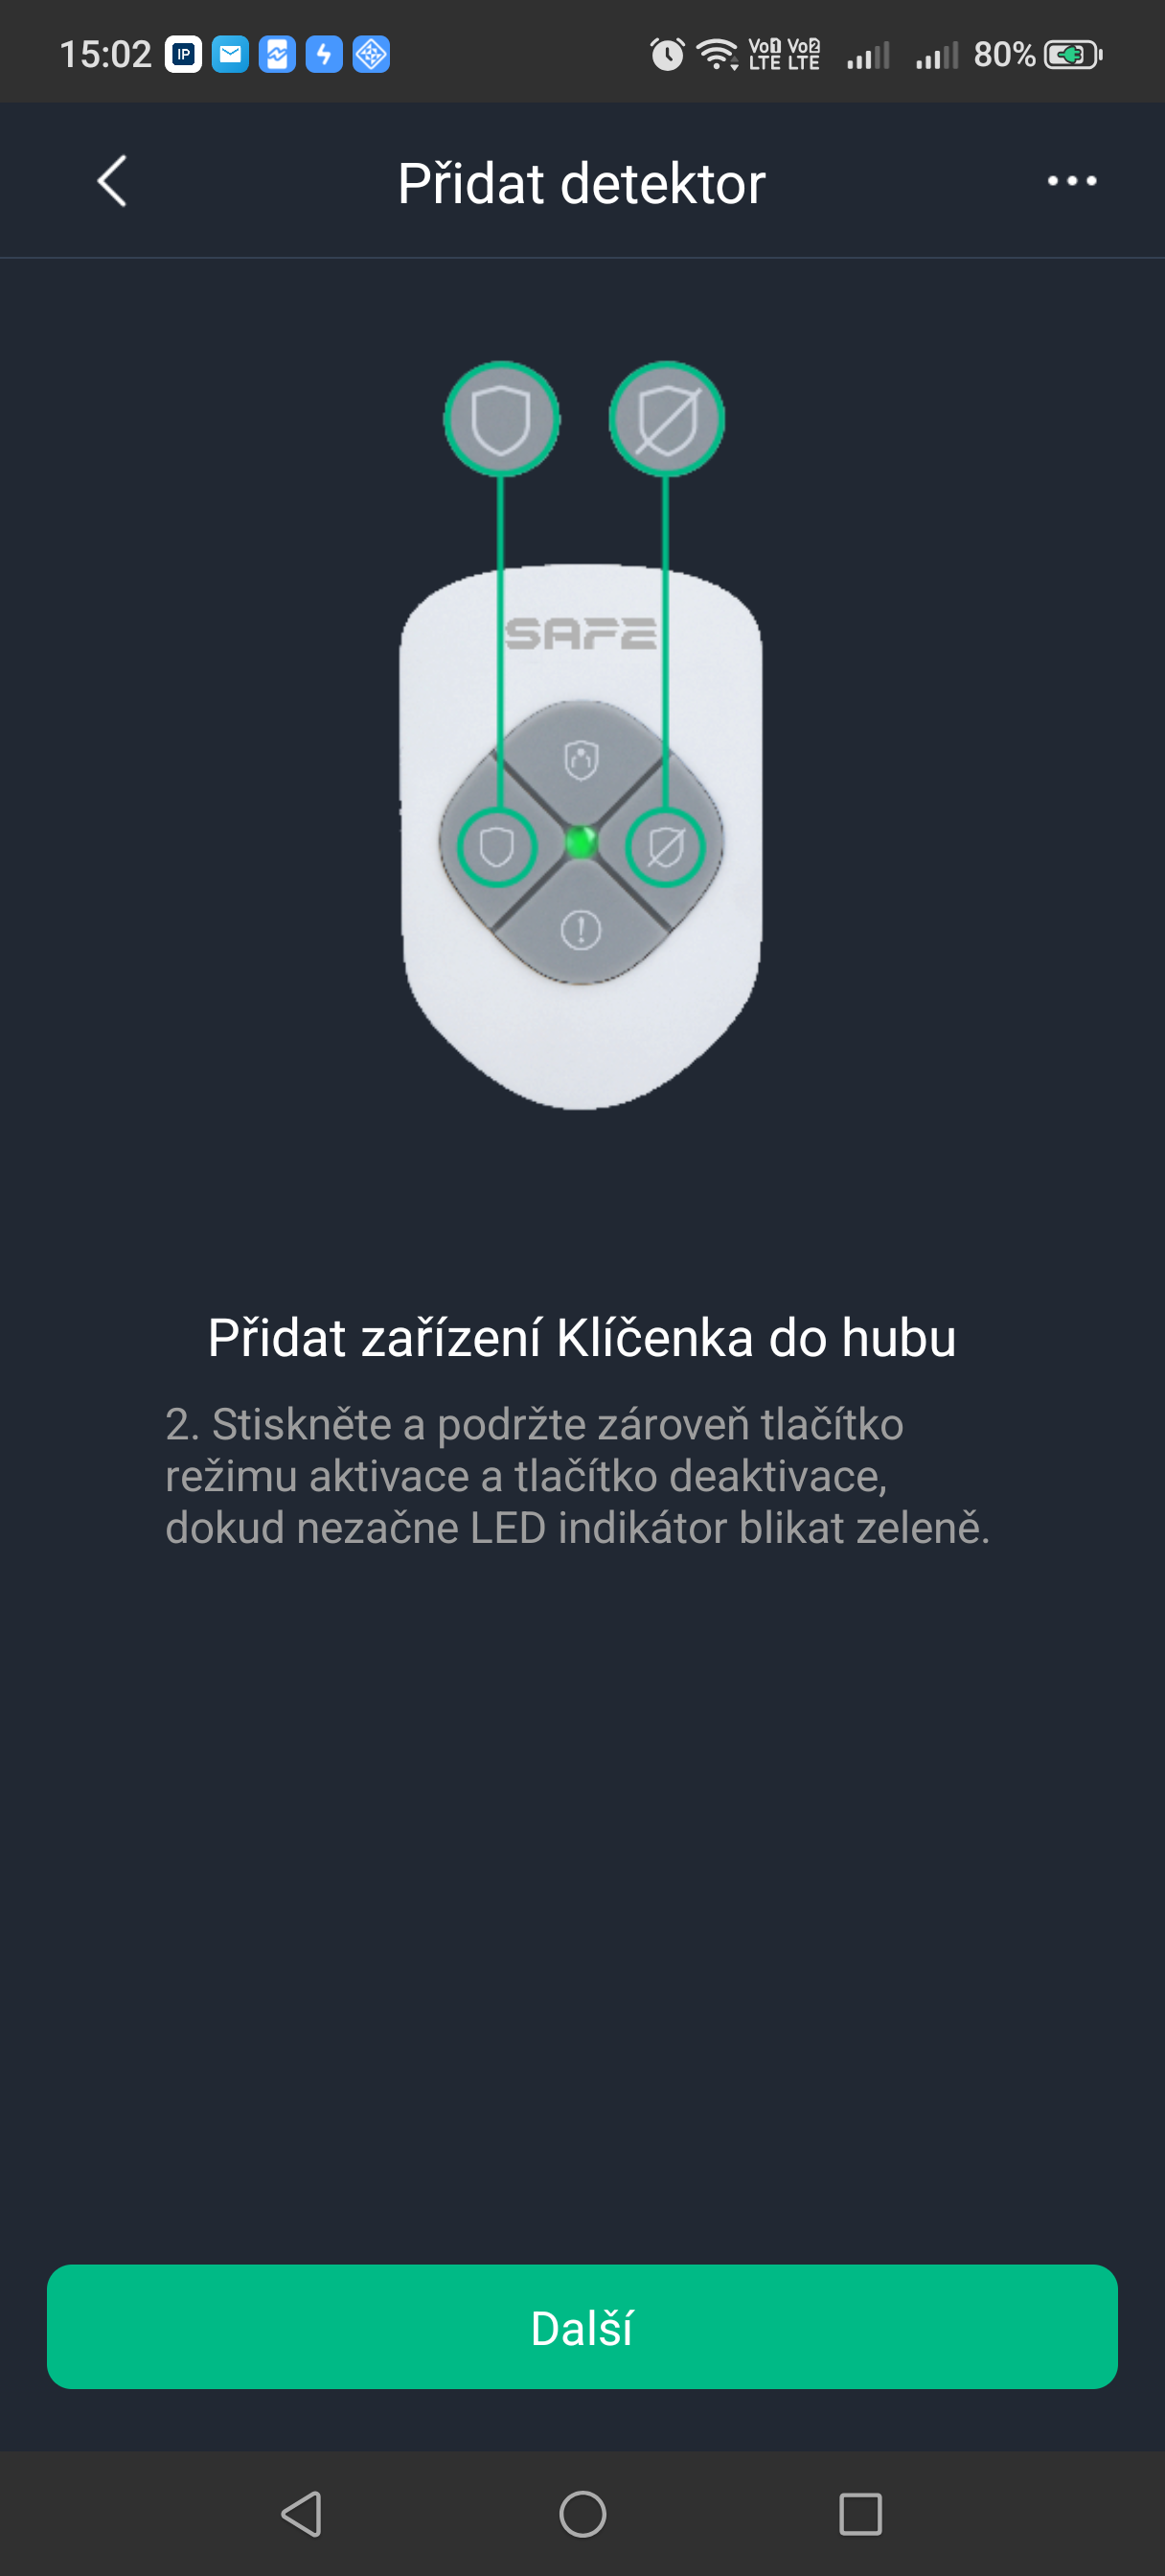
- Follow the on-screen instructions to turn on the device and click Next.
- Wait for pairing to complete.
- Enter the device name, select an area, and click Done.
Batch adding
Click Batch adding and then Start to begin pairing.
Turn on the device's power. If the indicator on the device flashes green rapidly and then turns off, pairing was successful. Repeat this procedure and add devices one at a time.
For remote controls (key fobs), start pairing by pressing the Arm and Disarm buttons simultaneously. For panic buttons, enter pairing mode by holding the button for 8 seconds.
Adding an IP camera
Add an IP camera (IPC) to the Hub.
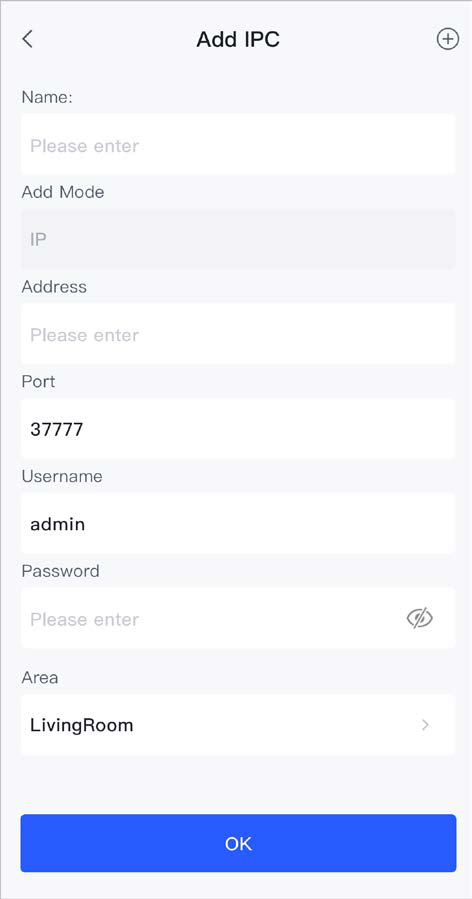
- On the Hub Devices screen, tap the + icon and select Add IP Camera.
- Add an IP camera to the hub.
- Manual addition:
- Enter the device name, the IP camera's IP address, port number, username and password, select the area to which the IP camera is assigned, and tap OK.
- Select the IP camera channel and tap OK.
- Online search:
- Tap the menu icon and select Search in LAN to search for IP cameras in the same network segment.
- Tap Next.
- Enter the IP camera password, select the area to which the IP camera is assigned, and tap OK.
- Select the IP camera channel and tap OK.
- Manual addition:
Related procedure
You can configure the parameters of an added IP camera.
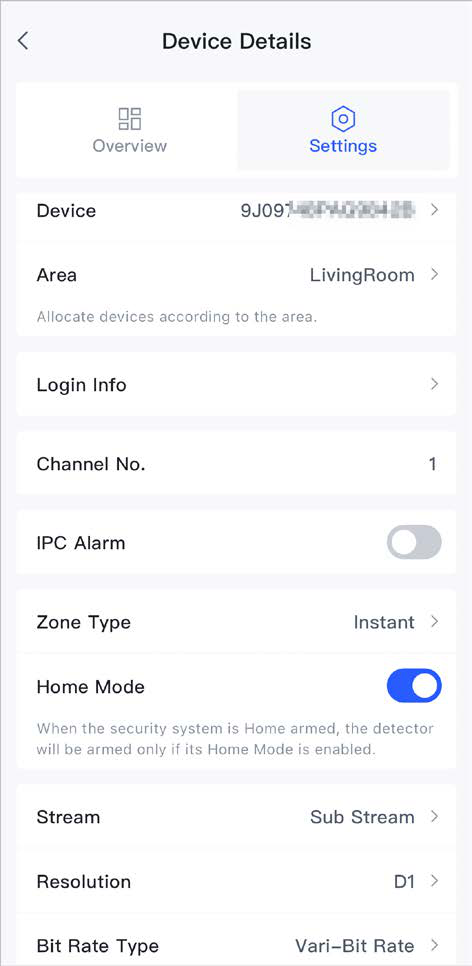
- For the given IP camera, select Device Details.
- Select Settings and configure the IP camera parameters.
Adding an expansion module
- On the Hub Devices screen, tap the + icon and select Add Expansion Module.
- Tap Start to add the expansion module.
Check that the expansion module's RS-485 bus is connected to the hub, use the DIP switch on the module to set a unique address, and then power on the module.
Video linkage to alarm
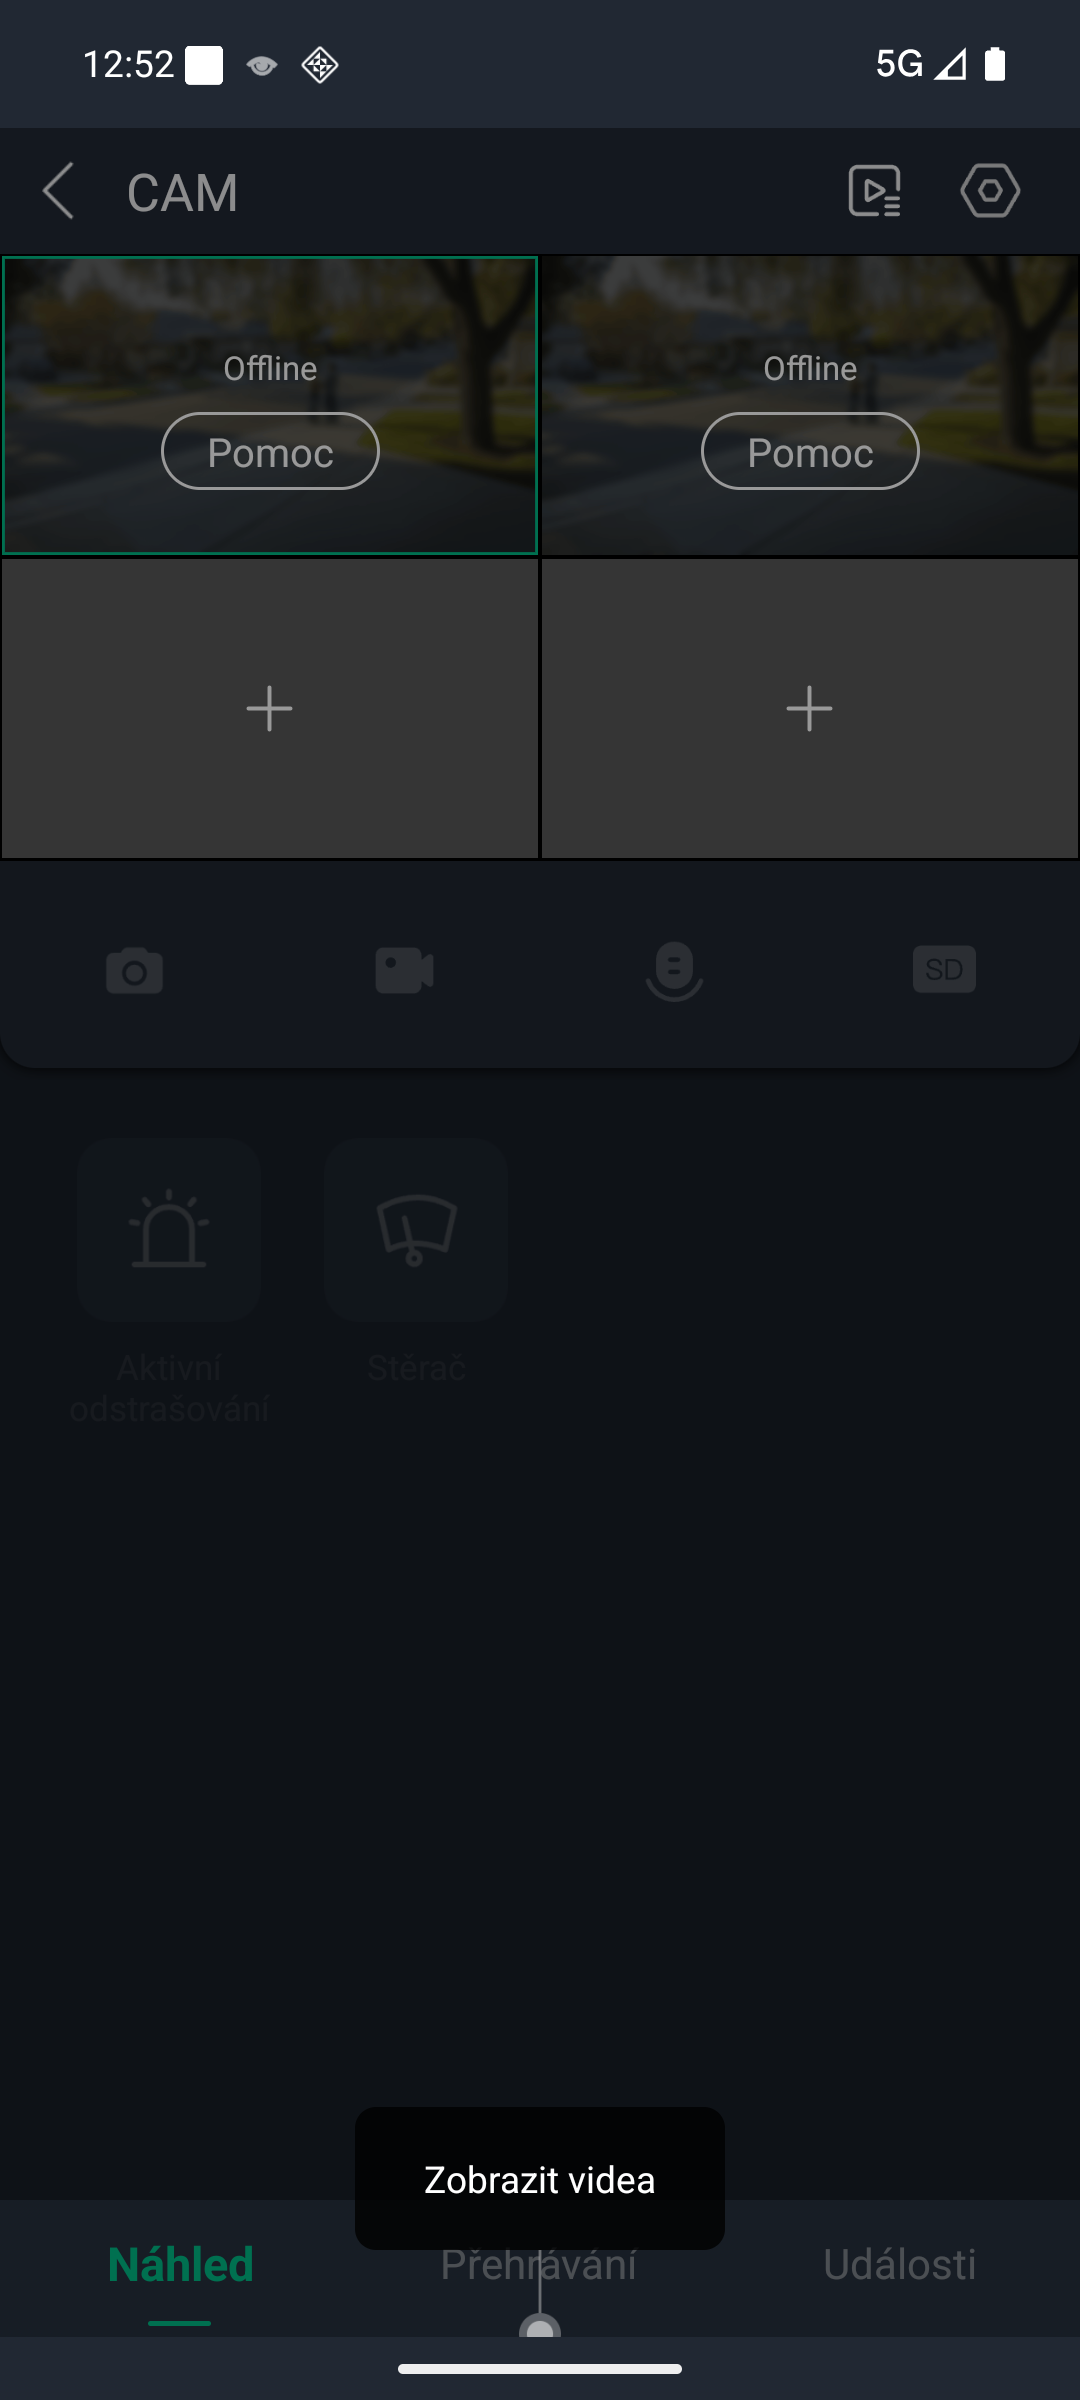
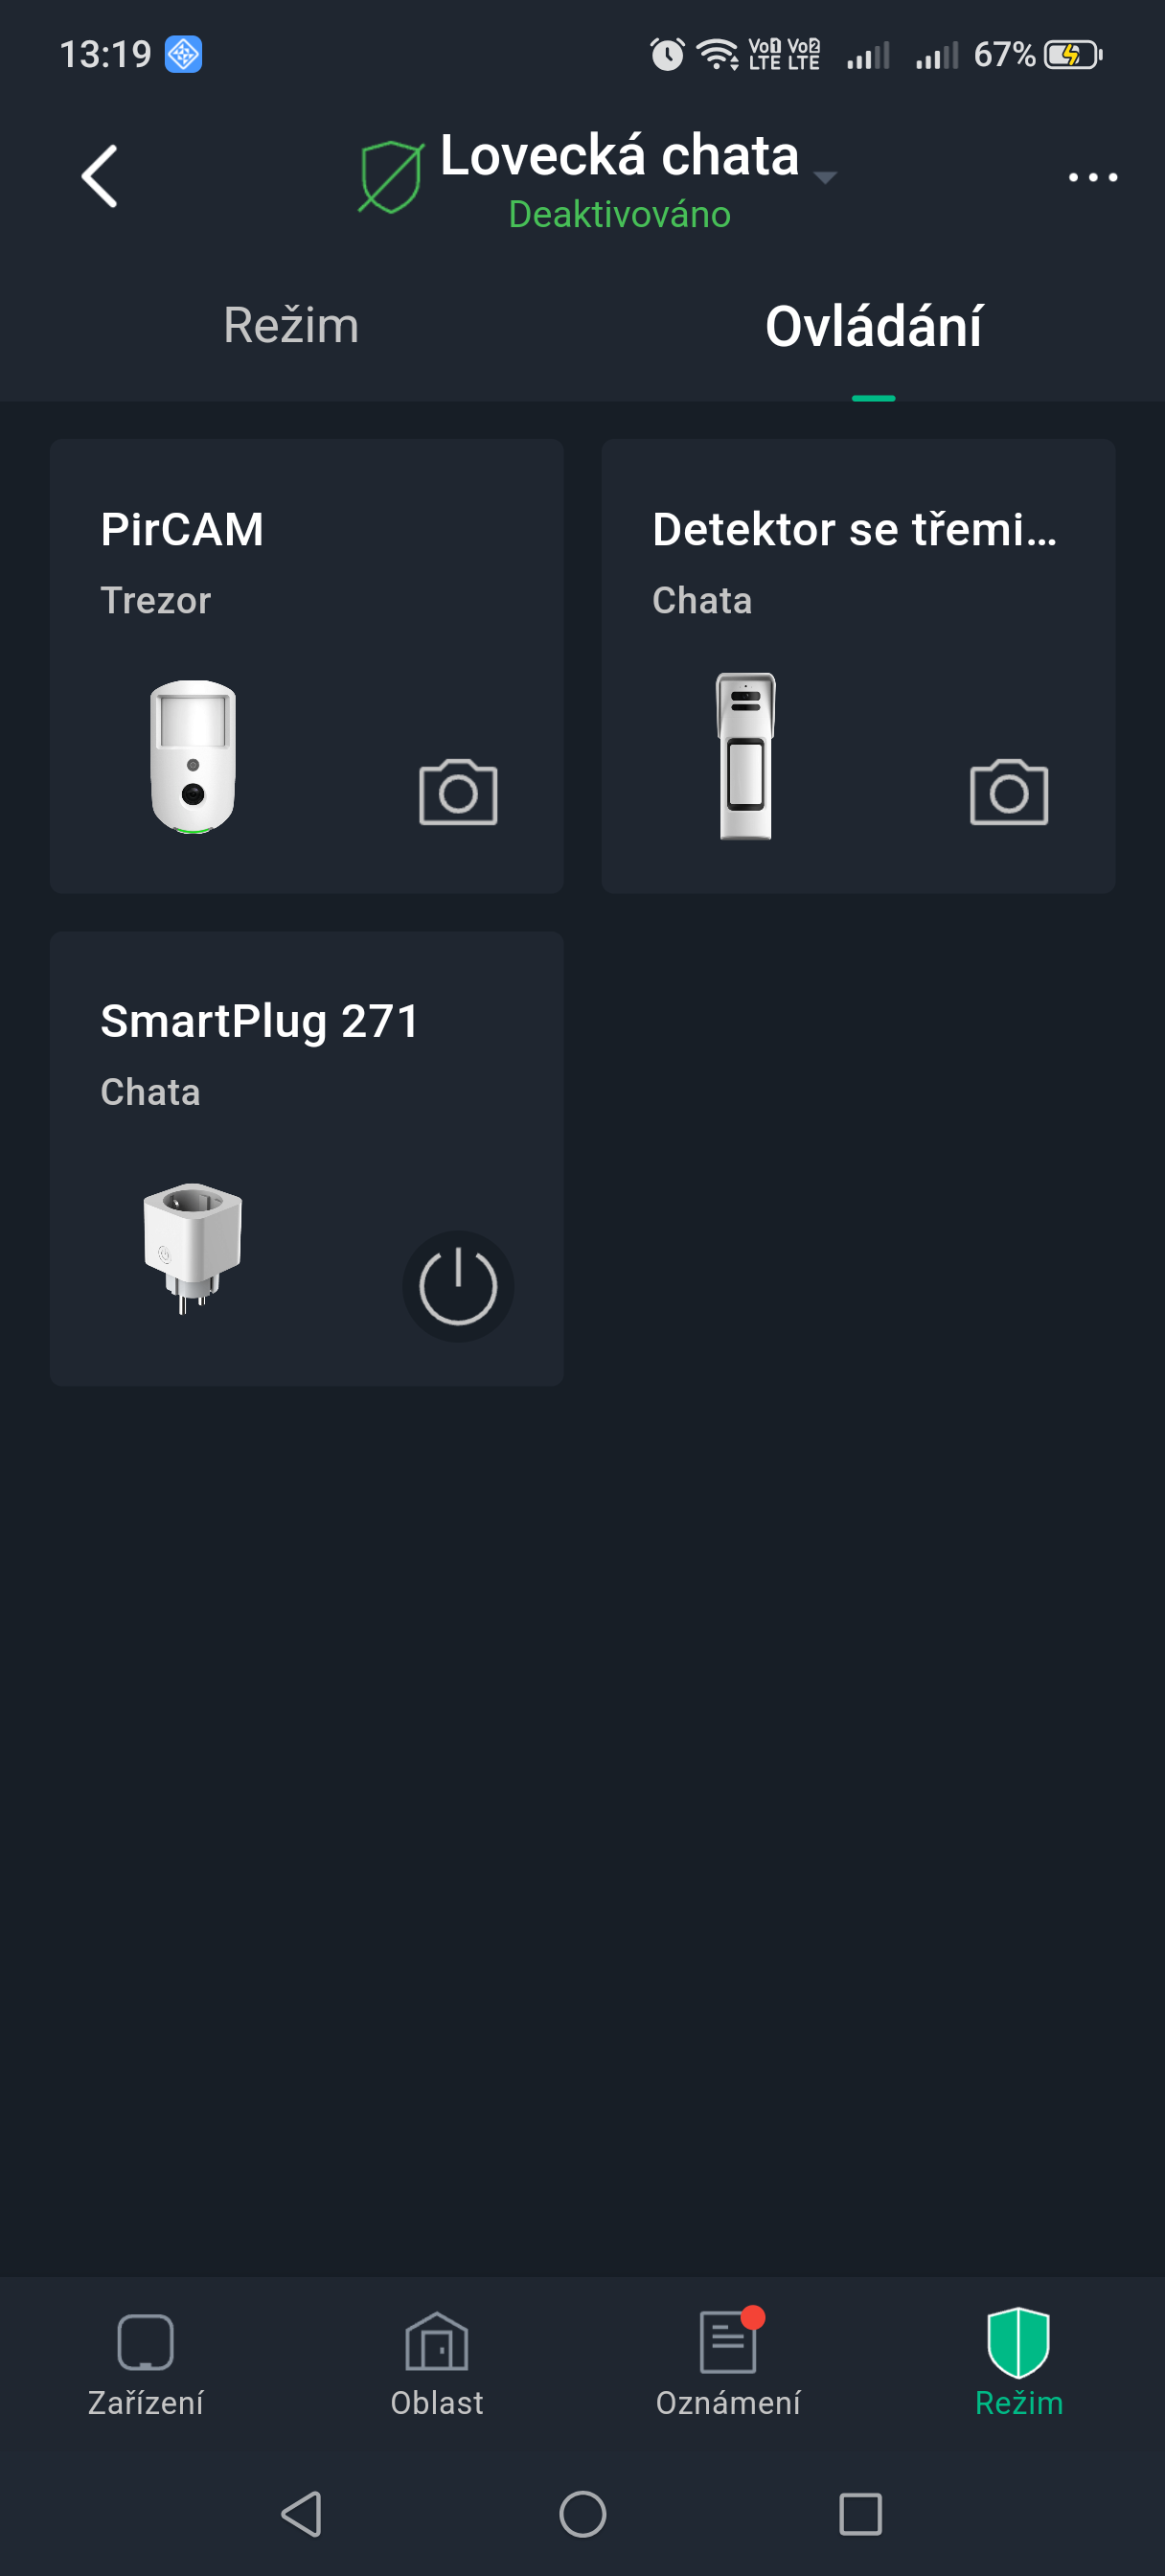
Configure video alarm linkage for the device so that you can view a video recording if an alarm is triggered.
Prerequisites
- Before configuring video alarm linkage, the hub must be armed.
- Devices must be added to the hub.
- On the Hub Devices screen, select the device and go to Device Details > Settings to configure the parameters.
- Turn on Video Alarm Linkage and select Video Channel.
- From the Linked Channel list, select the video channel and tap Save.
Hub status
Icons on the hub display
The hub display shows icons with the following meaning:
| Parameter | Meaning |
|---|---|
| LTE signal strength | States: very weak, weak, good, excellent, no signal. |
| Wi-Fi signal strength | States: very weak, weak, good, excellent, no signal. |
| SIM card | States: SIM card 1 active, SIM card 2 active, no SIM card, SIM card unlocked, SIM card locked. |
| Battery status | Displays the charge level in steps: 100 %, 80 %, 60 %, 40 %, 20 %. |
Hub overview and status
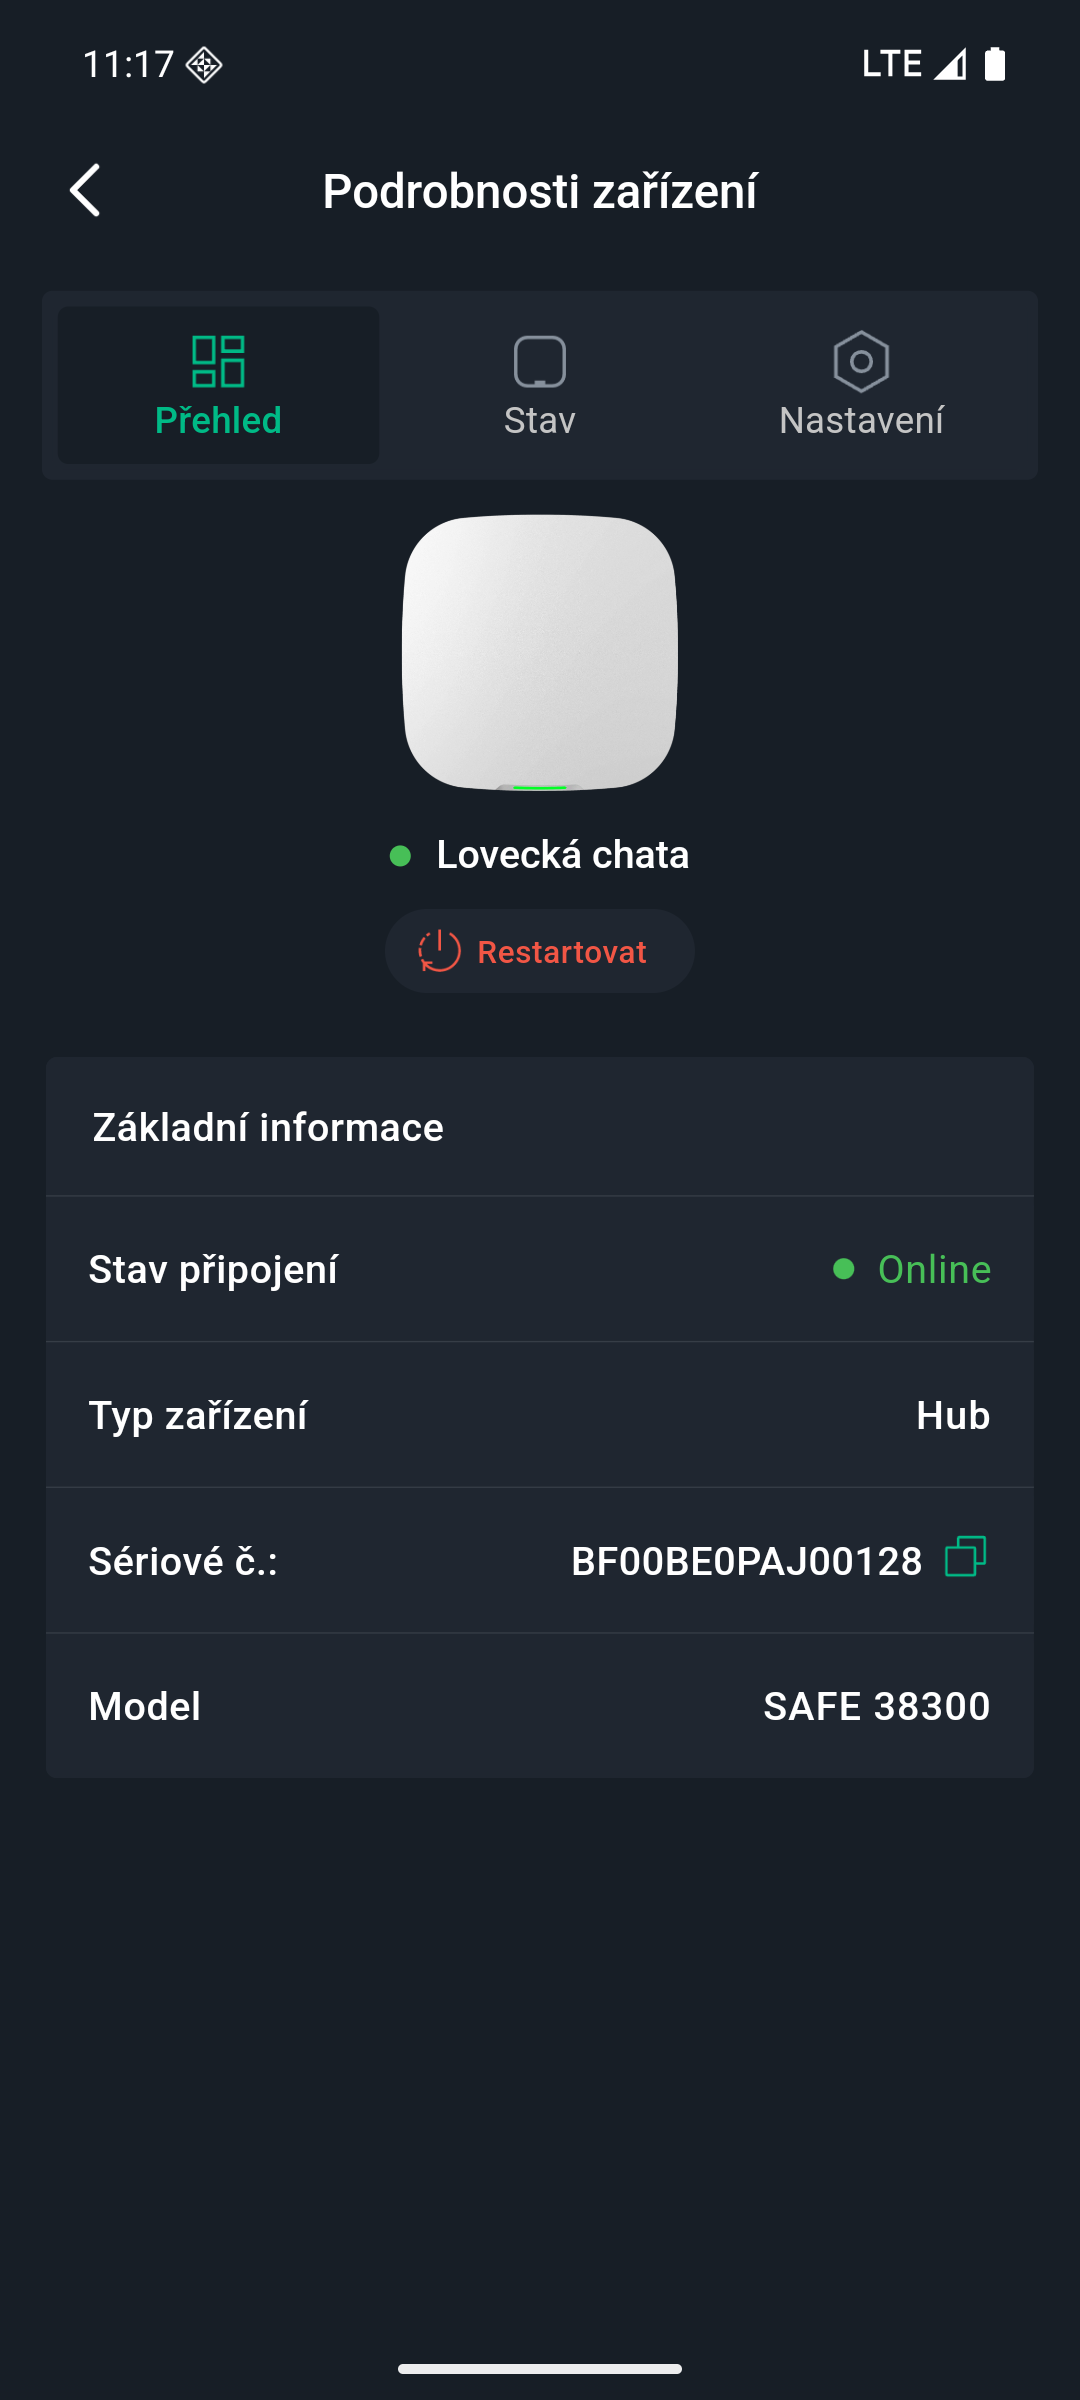
On the device screen in the ProSAFE app, select the hub and then the Overview or Status tab to view the hub's information and status.
Overview
| Parameter | Meaning |
|---|---|
| Basic information | Displays basic information about the hub. |
| Online status | Displays the hub connection status (online/offline). |
| Type | Displays the device type. |
| SN | Displays the hub's serial number. |
| Model | Displays the hub model. |
Status
| Parameter | Meaning |
|---|---|
| LTE signal strength | Mobile network signal strength for the active SIM card. |
| Wi-Fi signal strength | Hub connection status to the internet via Wi-Fi. For higher reliability, we recommend installing the hub in a location with a signal strength of at least 2 bars. |
| Battery status | Displays the remaining battery capacity in percent. |
| Tamper | Displays the hub's tamper protection status. States: open, disconnected. |
| External power supply | Displays the external power connection status. States: connected, disconnected. |
| GSM | Displays the hub's GSM connection status. States: connected, disconnected. |
| Wi-Fi | Displays the hub's Wi-Fi connection status. States: connected, disconnected. |
| Ethernet | Displays the hub's Ethernet connection status. States: connected, disconnected. |
| SIM card | Displays the SIM card connection status. States: SIM 1, SIM 2, none, locked (this state is displayed only if a SIM card is inserted in the hub). |
| DPPC1 – primary / DPPC1 – secondary / DPPC2 – primary / DPPC2 – secondary | Displays the connection status to the central monitoring station (DPPC) 1 and 2. States: connected, disconnected. |
| Firmware version | Hub software (firmware) version. |
Hub settings
General settings
On the hub screen, tap Settings — the device details will be displayed.
| Parameter | Description |
|---|---|
| Device | View the hub's name, type, serial number and model; edit the device name (confirm by tapping Save). |
| Hub settings | Configuration of hub parameters (see table below). |
| Network | View current network connection information. |
| Time zone | Select the time zone in which the hub operates; optionally daylight saving time (DST) — select the date or week and the start and end time. |
| Language | Language of voice announcements and SMS messages. 18 languages are supported: Arabic, Czech, Danish, Dutch, English, French, German, Italian, Portuguese, Russian, Spanish (LA and EU), Turkish, Slovak, Polish, Greek, Bulgarian, Estonian. The default is English. |
| User Manual | Open the hub's user manual. |
| Firmware update | Online update (cloud). |
On the device screen in the the ProSAFE app, select the hub and then tap Settings > Hub settings to view and edit general information about the hub.
| Settings | Description |
|---|---|
| Configuration backup | If the hub is damaged, you can transfer its parameters and device configuration to another hub. Once this function is turned on, the hub configuration will be backed up regularly. |
| User management | Allows you to add, edit or delete app or keypad users, only in the Disarmed state.
|
| SOS alarm | Configuration of SOS alarm types: panic alarm, siren linkage, medical alarm and fire alarm. Once the configuration is complete, you trigger the alarm by tapping SOS on the hub's Operation screen. If more than one alarm type is selected, a pop-up window will appear with a prompt asking which alarm should be triggered this time. |
| Installer | Authorizing the service provider. Tap Authorize, enter the service provider's account, the authorization period, and select the devices to be authorized, check I have read and agree to the User Agreement, and tap Next. |
| Global arm/disarm | With a single tap, you can arm or disarm all devices in all areas. |
| Scheduled arm/disarm | Arming or disarming areas according to a time schedule.
|
| Sound settings |
|
| LED indication | LED indication is turned on by default.
If LED indication is turned off, the indicator light will remain off regardless of whether the hub is functioning normally or not.
|
| Intercom service | Turning on the Intercom Service function activates the intercom.
|
| Phone number management |
|
| Test mode | Tap Start to test the status of the devices connected to the hub in individual areas; tap Stop to end the test. |
| Reduced sensitivity mode | When reduced sensitivity mode is turned on, the hub's transmit power is reduced. |
| Configuration import | Allows you to transfer the configuration from one hub to another hub of the same model. After the import, existing authorization, lending and security service relationships will not be preserved. Therefore, proceed with caution.
Before importing the configuration, you must turn on the Configuration Backup function.
|
| Connection to the cloud service | Set the ping interval between the server and the hub in the range of 150 to 900 seconds (default value 150 seconds). If D-cloud detects that the hub's disconnection time has exceeded 150 seconds, it will report the hub's status to the user via the app. |
| Heartbeat | Setting the ping interval between the hub and devices. This setting determines how often the hub communicates with devices and how quickly a loss of connection is detected.
|
| Siren tamper linkage |
|
| System integrity check | When turned on, the hub checks during arming whether the current system status is in order. If an anomaly is detected, it will prevent arming. The following items are checked: arming despite reported faults, main power failure, main power failure delay, hub tamper, connection with the cloud platform, Ethernet network fault, Wi-Fi fault, mobile network fault, radio frequency interference, and connection with the DPPC.
|
| DPPC | Enter the IP address/domain, port and device ID, and register the hub with the SAFEWatch / SAFEWatch Pro platform or the Converter. |
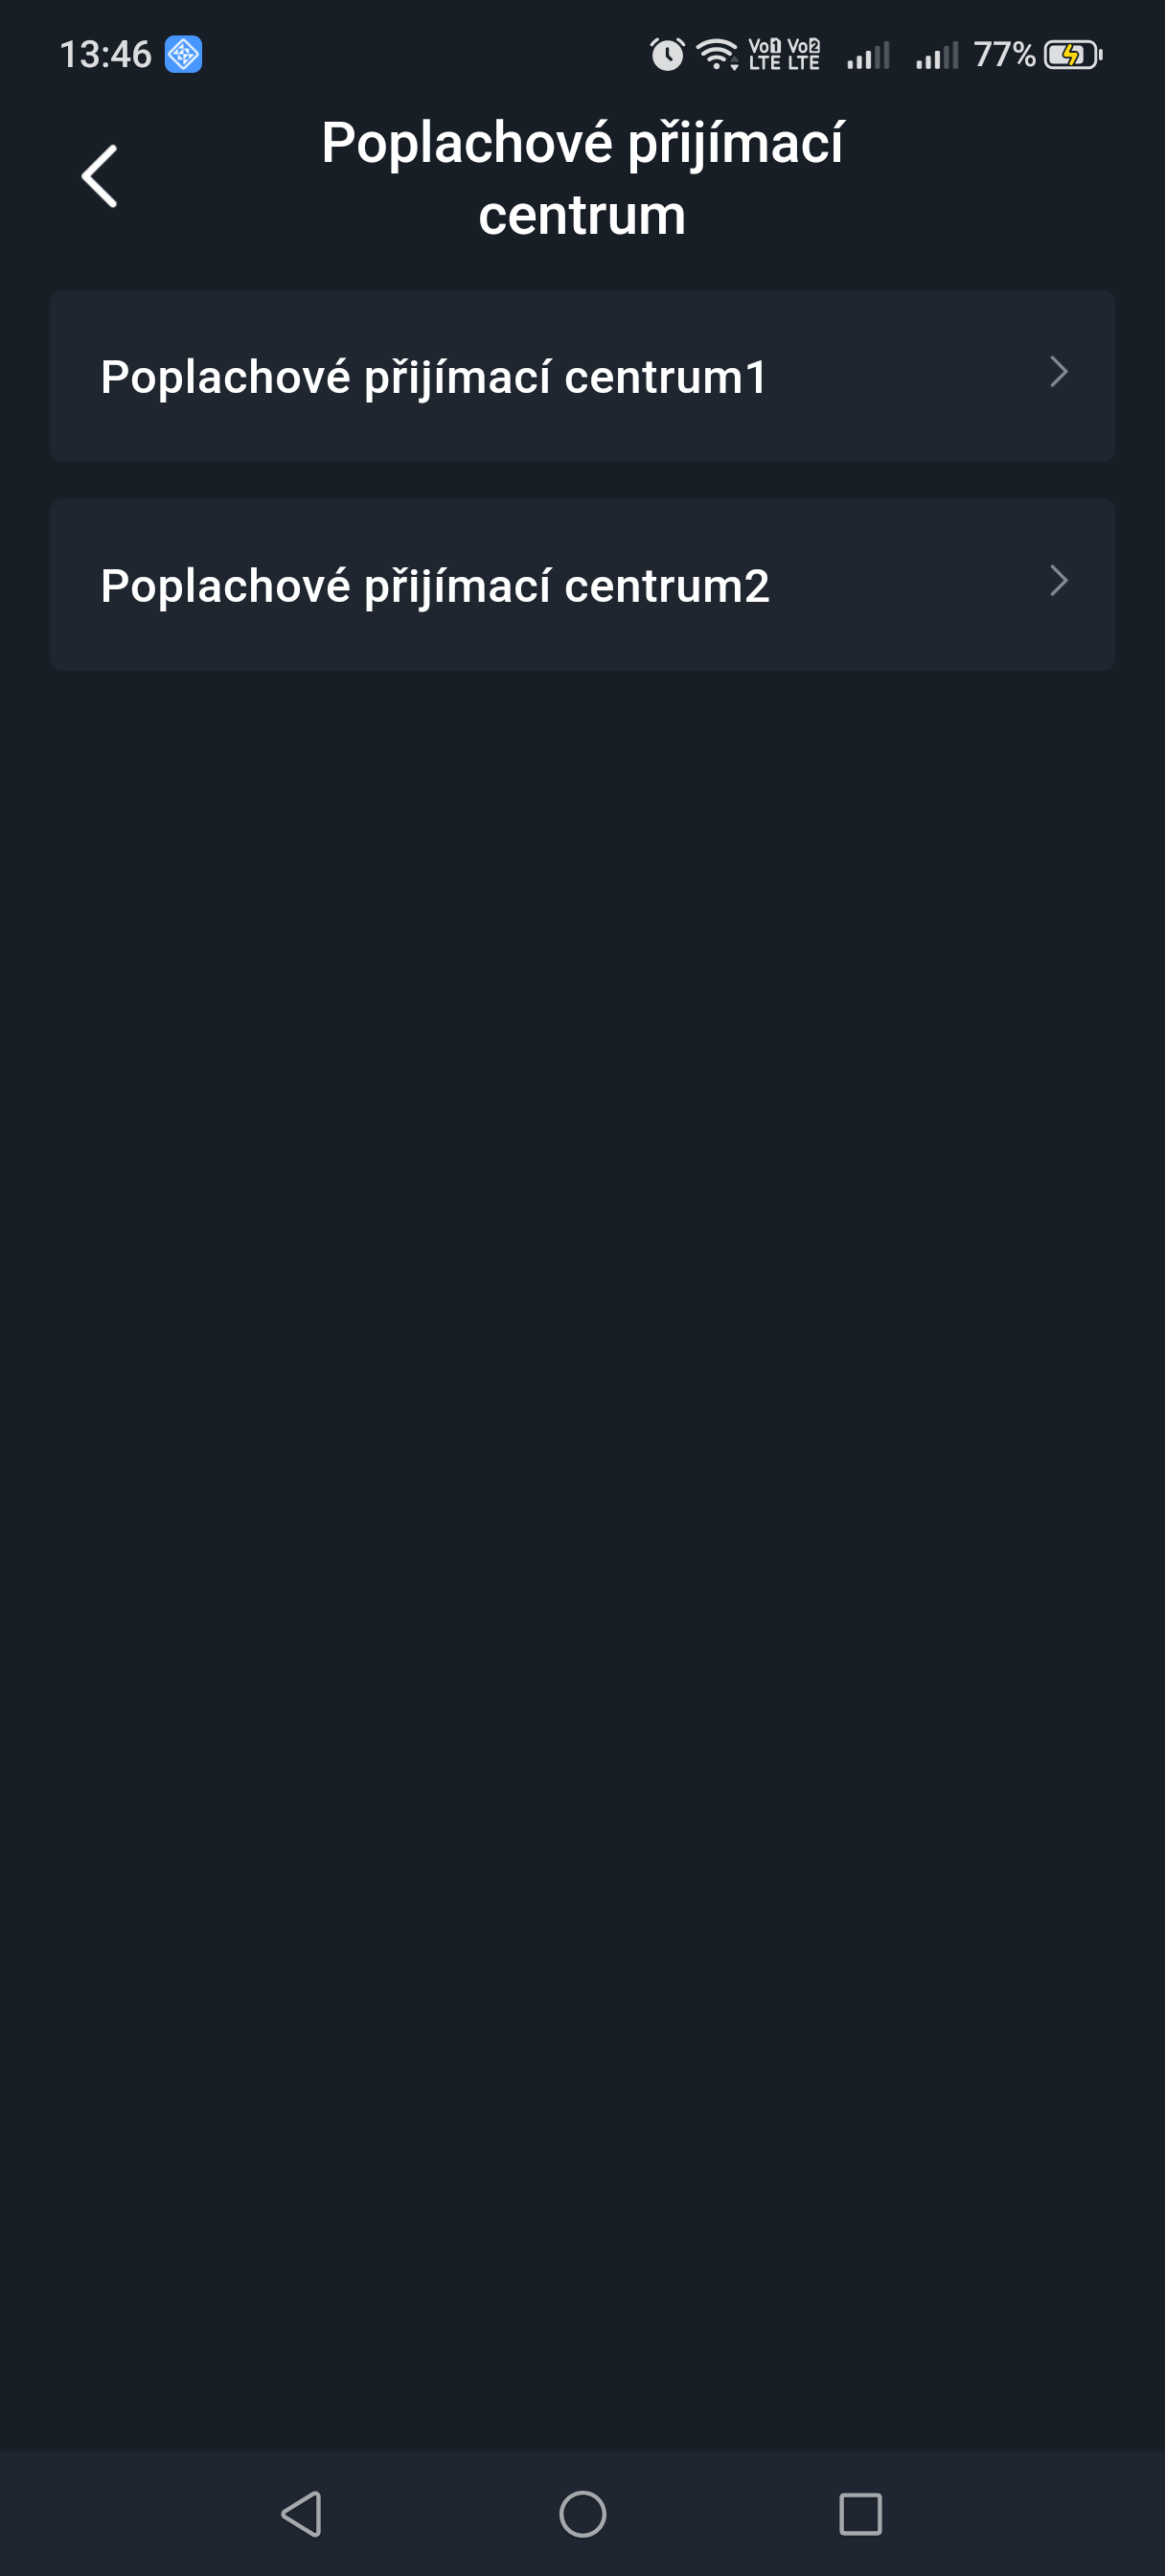
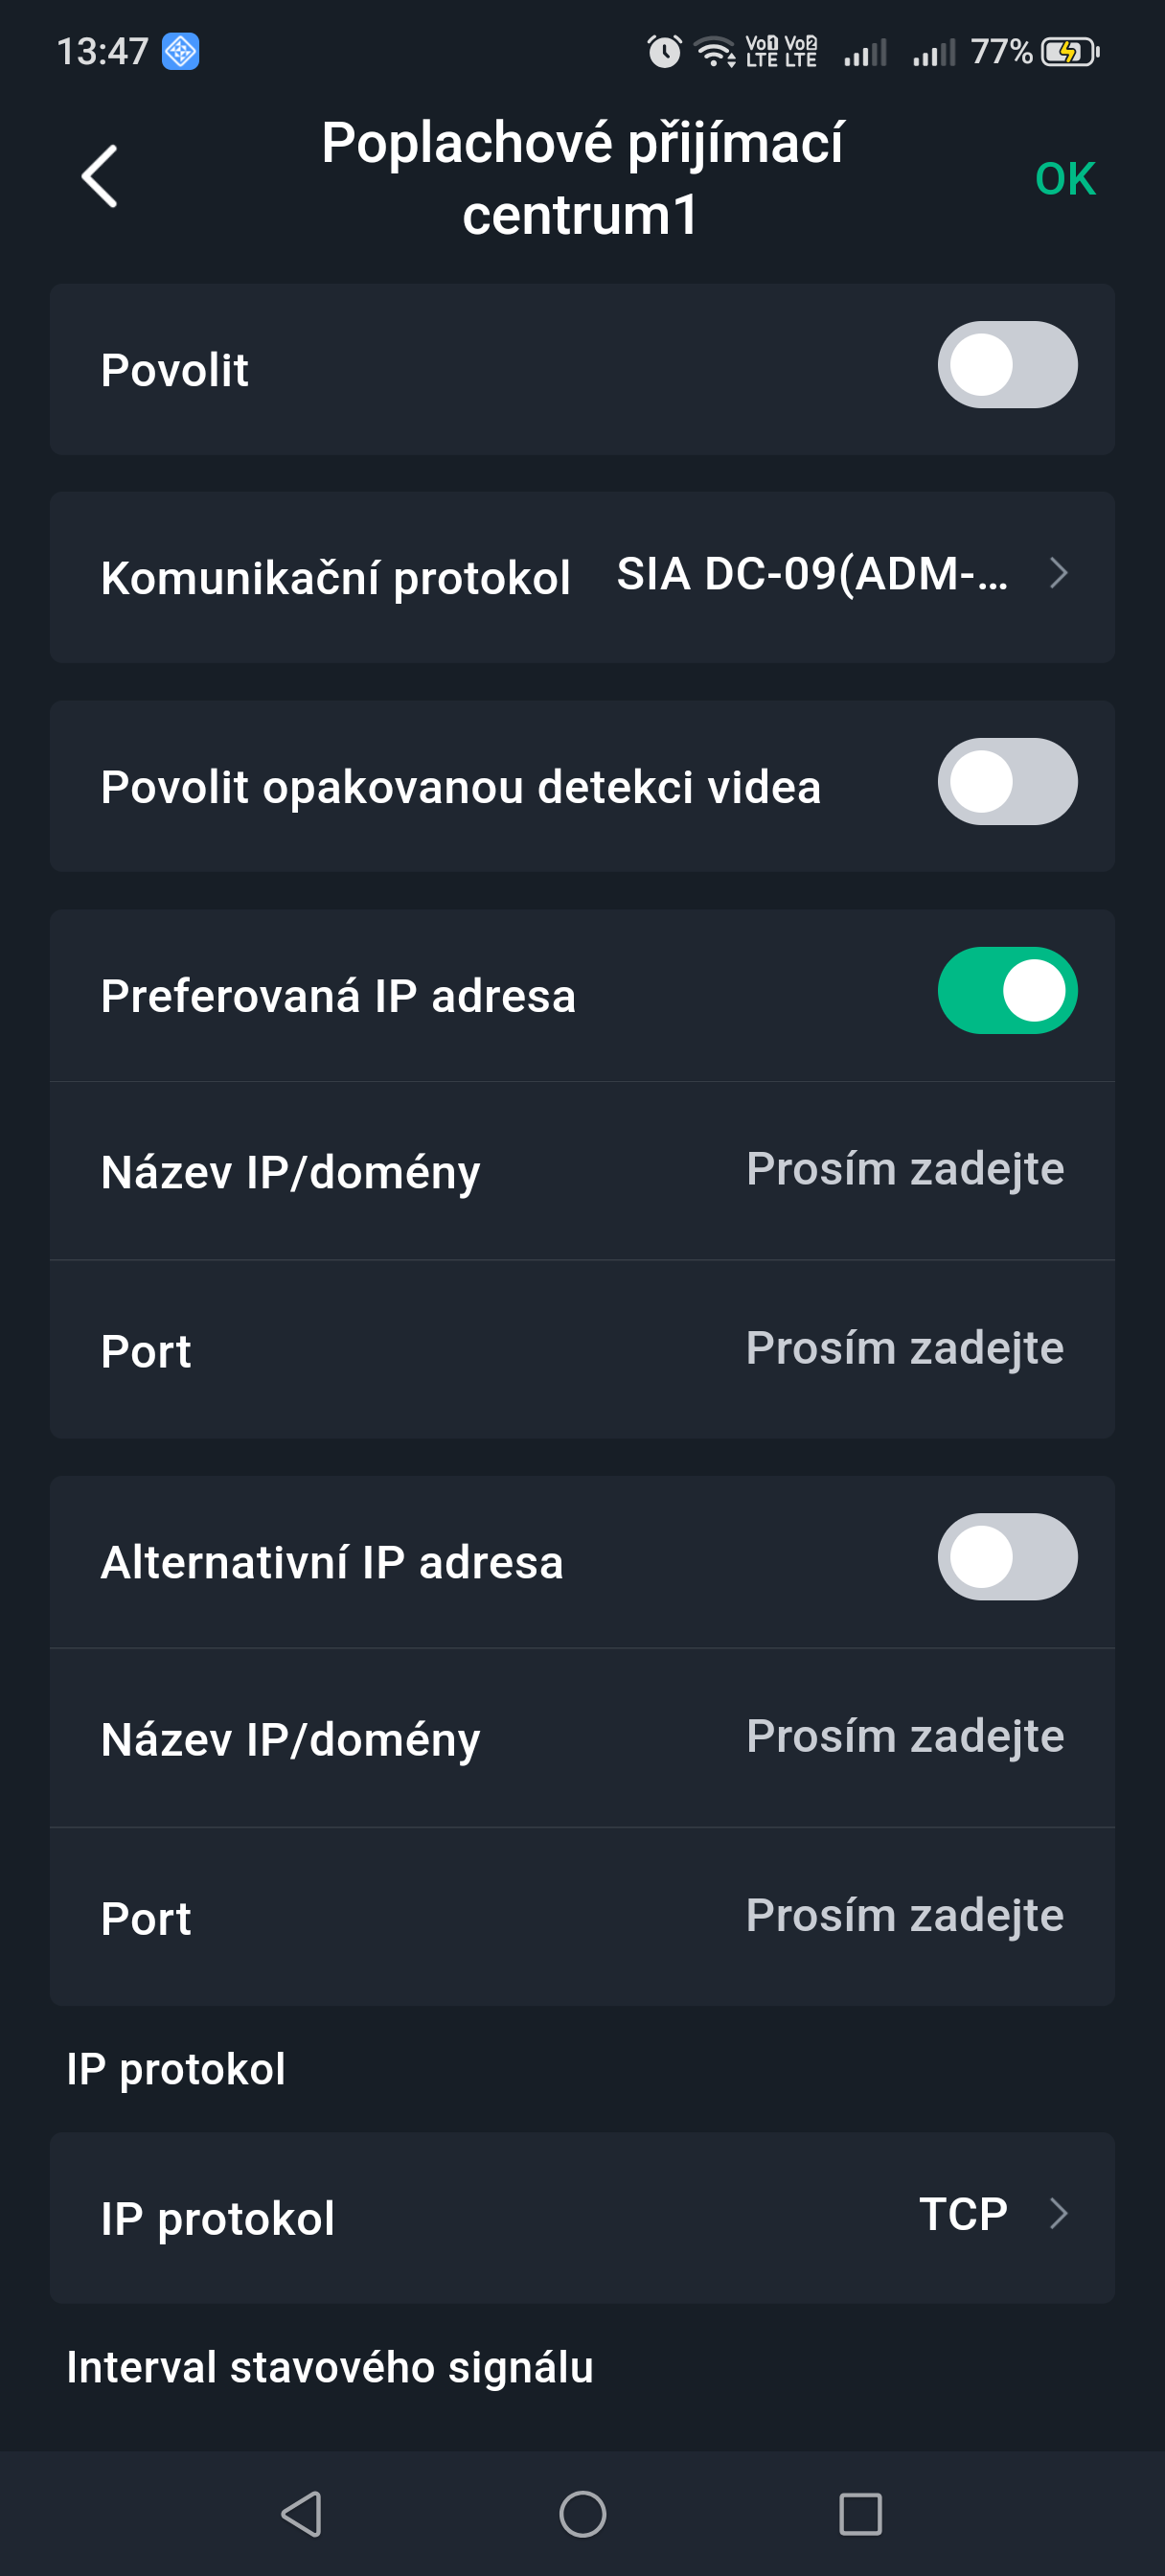
| Central monitoring station (DPPC) | Select DPPC 1 or DPPC 2 and go to the corresponding configuration screen. Turn on the function and set the parameters.
SP2: LAN/WIFI via CLOUD, ProSAFE app (default reporting time 150 s) or DPPC reporting time min. 25 h.
DP2: primarily LAN/WIFI via CLOUD, ProSAFE app (default reporting time 150 s) or DPPC reporting time min. 30 min, secondarily GPRS/4G via CLOUD, ProSAFE app (default reporting time 150 s) or DPPC reporting time min. 30 min. |
Network configuration
On the General Configuration screen in the device details, tap Network Configuration. You can then select the network type for the hub: wired network, Wi-Fi, or mobile network.
Ethernet network
- Select Network Settings > Ethernet network configuration.
- Set the parameters for the wired network connection.
| Parameter | Description |
|---|---|
| DHCP | If a DHCP server is available on the network, you can enable DHCP — the hub will then automatically obtain a dynamic IP address. |
| IP address, subnet mask, gateway, DNS, DNS 2, MAC address | Manual setup: manually set the IP address, subnet mask, default gateway, DNS and MAC address for the hub. |
Wi-Fi
- Select Network Settings > Wi-Fi network configuration.
- Select an available Wi-Fi network within range and enter the network password to connect.
Mobile network
- Select Network Settings > Mobile network.
- Set the mobile network parameters.
| Parameter | Description |
|---|---|
| Mobile network | Tap the switch next to Mobile Network to activate the mobile connection. |
| Priority | Tap the switch next to Priority to set the mobile network as the priority choice when selecting the network. |
| SIM 1 / SIM 2 | Two SIM cards are supported in single standby mode. The SIM cards allow the hub to use mobile data and send push notifications about alarms. |
| APN | Access Point Name (APN) is the name of the setting the device uses to create a connection (gateway) between the operator's mobile network and the public internet. |
| Authentication Mode (Auth Mode) | Authentication mode for the mobile connection. |
| Username / Password | Username and password for the mobile network. |
| Dial Number | The number the hub should connect to (dial). |
| Roaming data | Enable this function if you are traveling outside your home network coverage and need internet access. |
| Mobile data usage | View mobile data usage statistics. |
| Reset statistics | Resets the mobile data usage statistics and starts counting again from the beginning. |
| PIN | Allows you to enter the PIN code for SIM 1 and SIM 2 separately, if required for protection. |
Device management
The administrator (ProSAFE user) can add technicians by entrusting devices to them. Devices can be entrusted to a technician individually or in bulk.
Entrusting a device to a technician
Entrusting devices in bulk
You can entrust devices to the Smart-safe Care service (technician) in bulk.
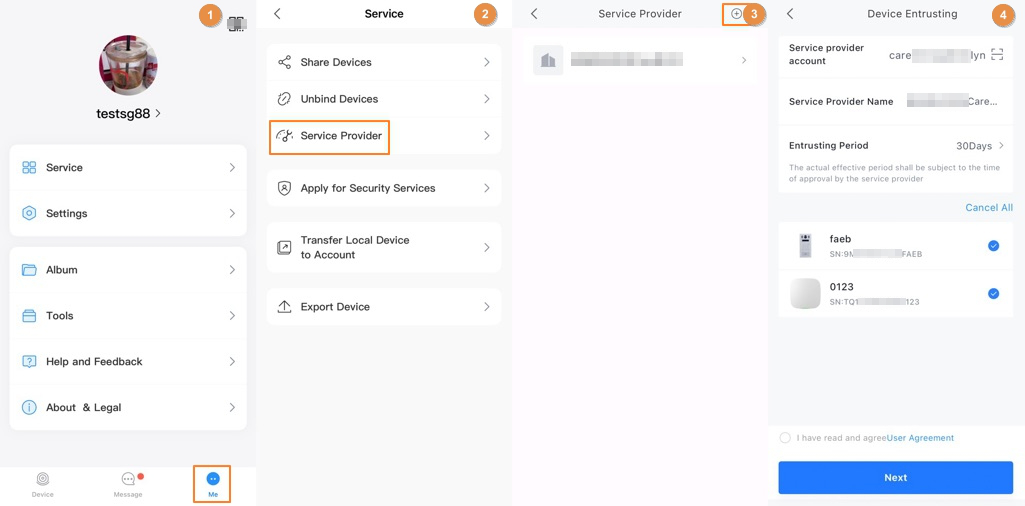
- On the Devices screen, select Me > Services > Service Provider and tap the corresponding icon.
- On the Entrust Device screen, confirm the details of the linked service provider, or tap the icon to scan the service provider's QR code.
- Select the devices you want to entrust and entrust them to the Smart-safe Care service. The procedure for entrusting multiple devices is the same as for entrusting a single device.
Entrusting a device individually
You can entrust a device to a technician (service provider user) individually and set the entrusting permissions at the same time.
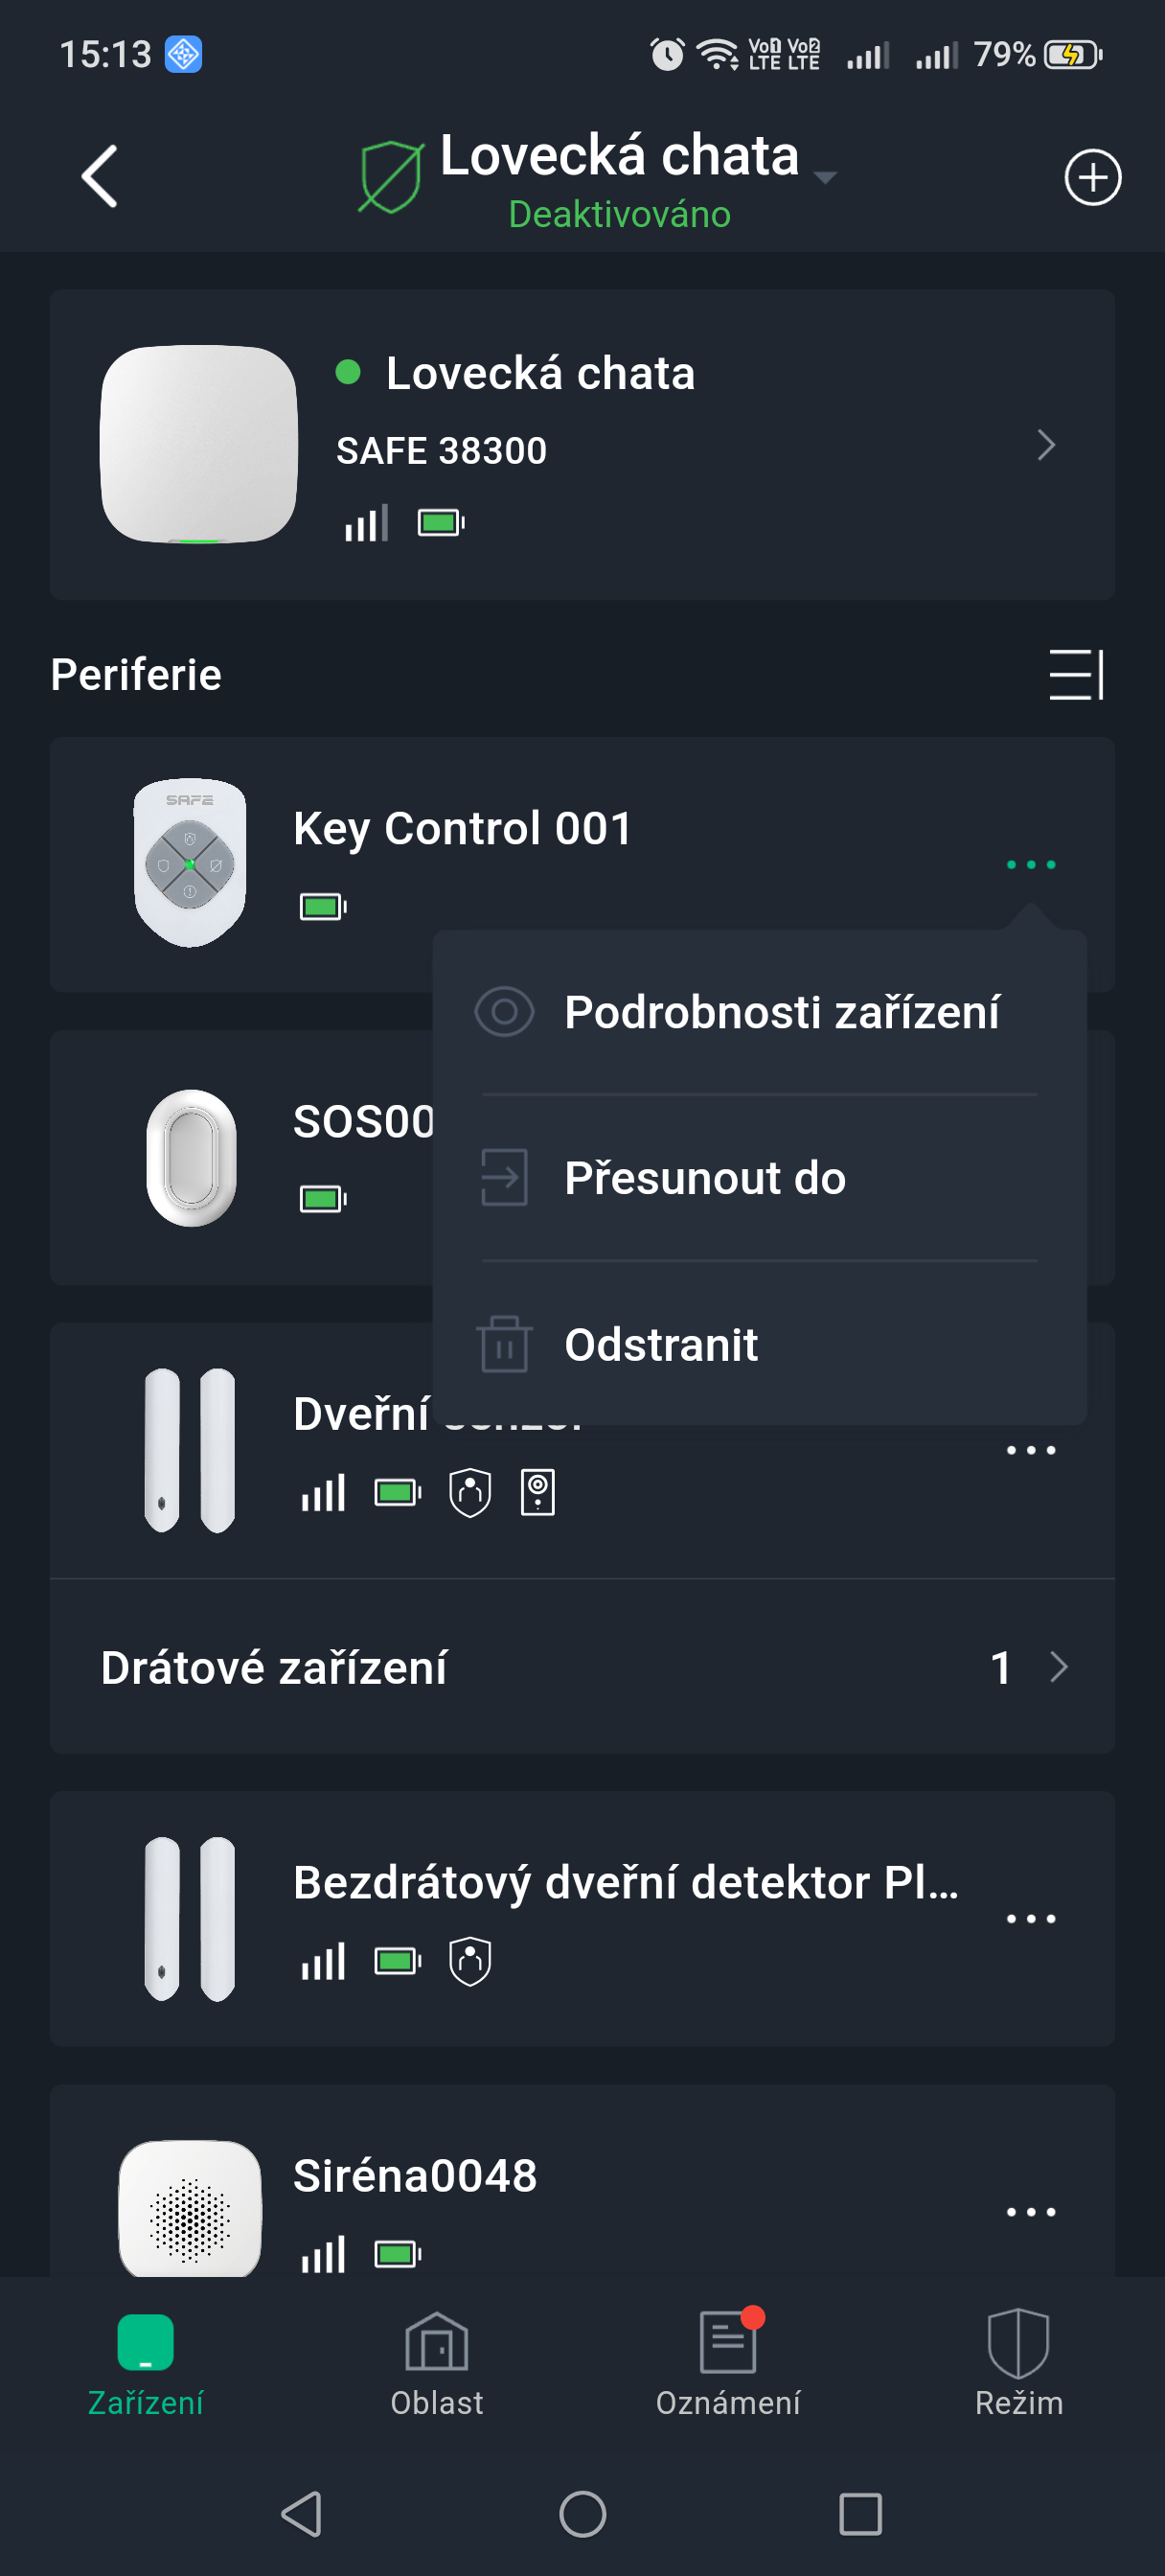
- On the Devices screen, tap the icon next to the given device and then tap Entrust Device.
- On the Entrust screen, confirm the details of the linked service provider, or tap the icon to scan the QR code of the given technician.
- Select the entrusting period and permissions, and tap OK.
| Permission | Description | Note |
|---|---|---|
| Health Management | Selected by default, cannot be deselected. Includes permissions for one-tap health check, fault reporting, fault repair, data statistics and health report. | — |
| Video devices | You can request permission for device configuration, live video and recording playback.
|
You can choose temporary permission, for example for 1 hour or 4 hours, or choose authorization for the entire duration of the entrusting period. For example, if the entrusting period is 30 days, you will have the given permission for the entire 30-day duration. |
| Alarm devices | You can request permission for device configuration and control.
|
|
| Video intercom devices | You can request permission for device configuration and control.
|
- Read and check the I have read and agree to the User Agreement option, then tap Next.
The entrusting status can be viewed on the device list screen. After successful entrusting, the device status changes from Under Reviewing through Entrusting to the name of the technician/service provider.
Related operations
- Change permission: go to the Entrusted to Company screen and tap Change Permission.
- Revoke entrusting: go to the Entrusted to Company screen and tap Revoke.
- Extend entrusting period: go to the Entrusted to Company screen and tap Extend.
Sharing a device
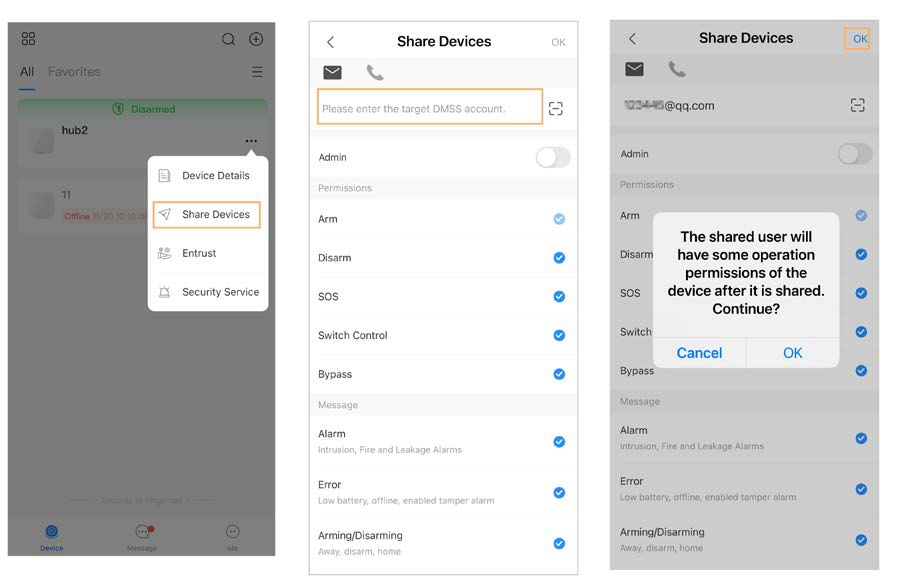
- On the Devices screen, tap the icon next to the given device and then tap Share Device.
- On the Share Device screen, share the device with a user by entering their ProSAFE account or scanning their QR code.
- Select the device permissions for the user according to actual need.
- Click OK.
The account with which the device was shared is displayed in the Shared Users section on the Share Device screen.
Disconnecting a device
If, when adding a device, you find that the device is already paired with another account, you can first cancel the pairing and then successfully add the device.
- Select Me > Services > Cancel Device Pairing.
- Scan the QR code or manually enter the device's serial number (SN). Two methods are available:
- Request to disconnect the device: the system displays an authorization code — follow the on-screen instructions to upload the required images. The system then verifies the submitted data; once verification is successful, the device pairing can be canceled.
- Disconnecting the device using the device password: if you know the device password, enter it to cancel the device pairing.
Area management
Adding an area
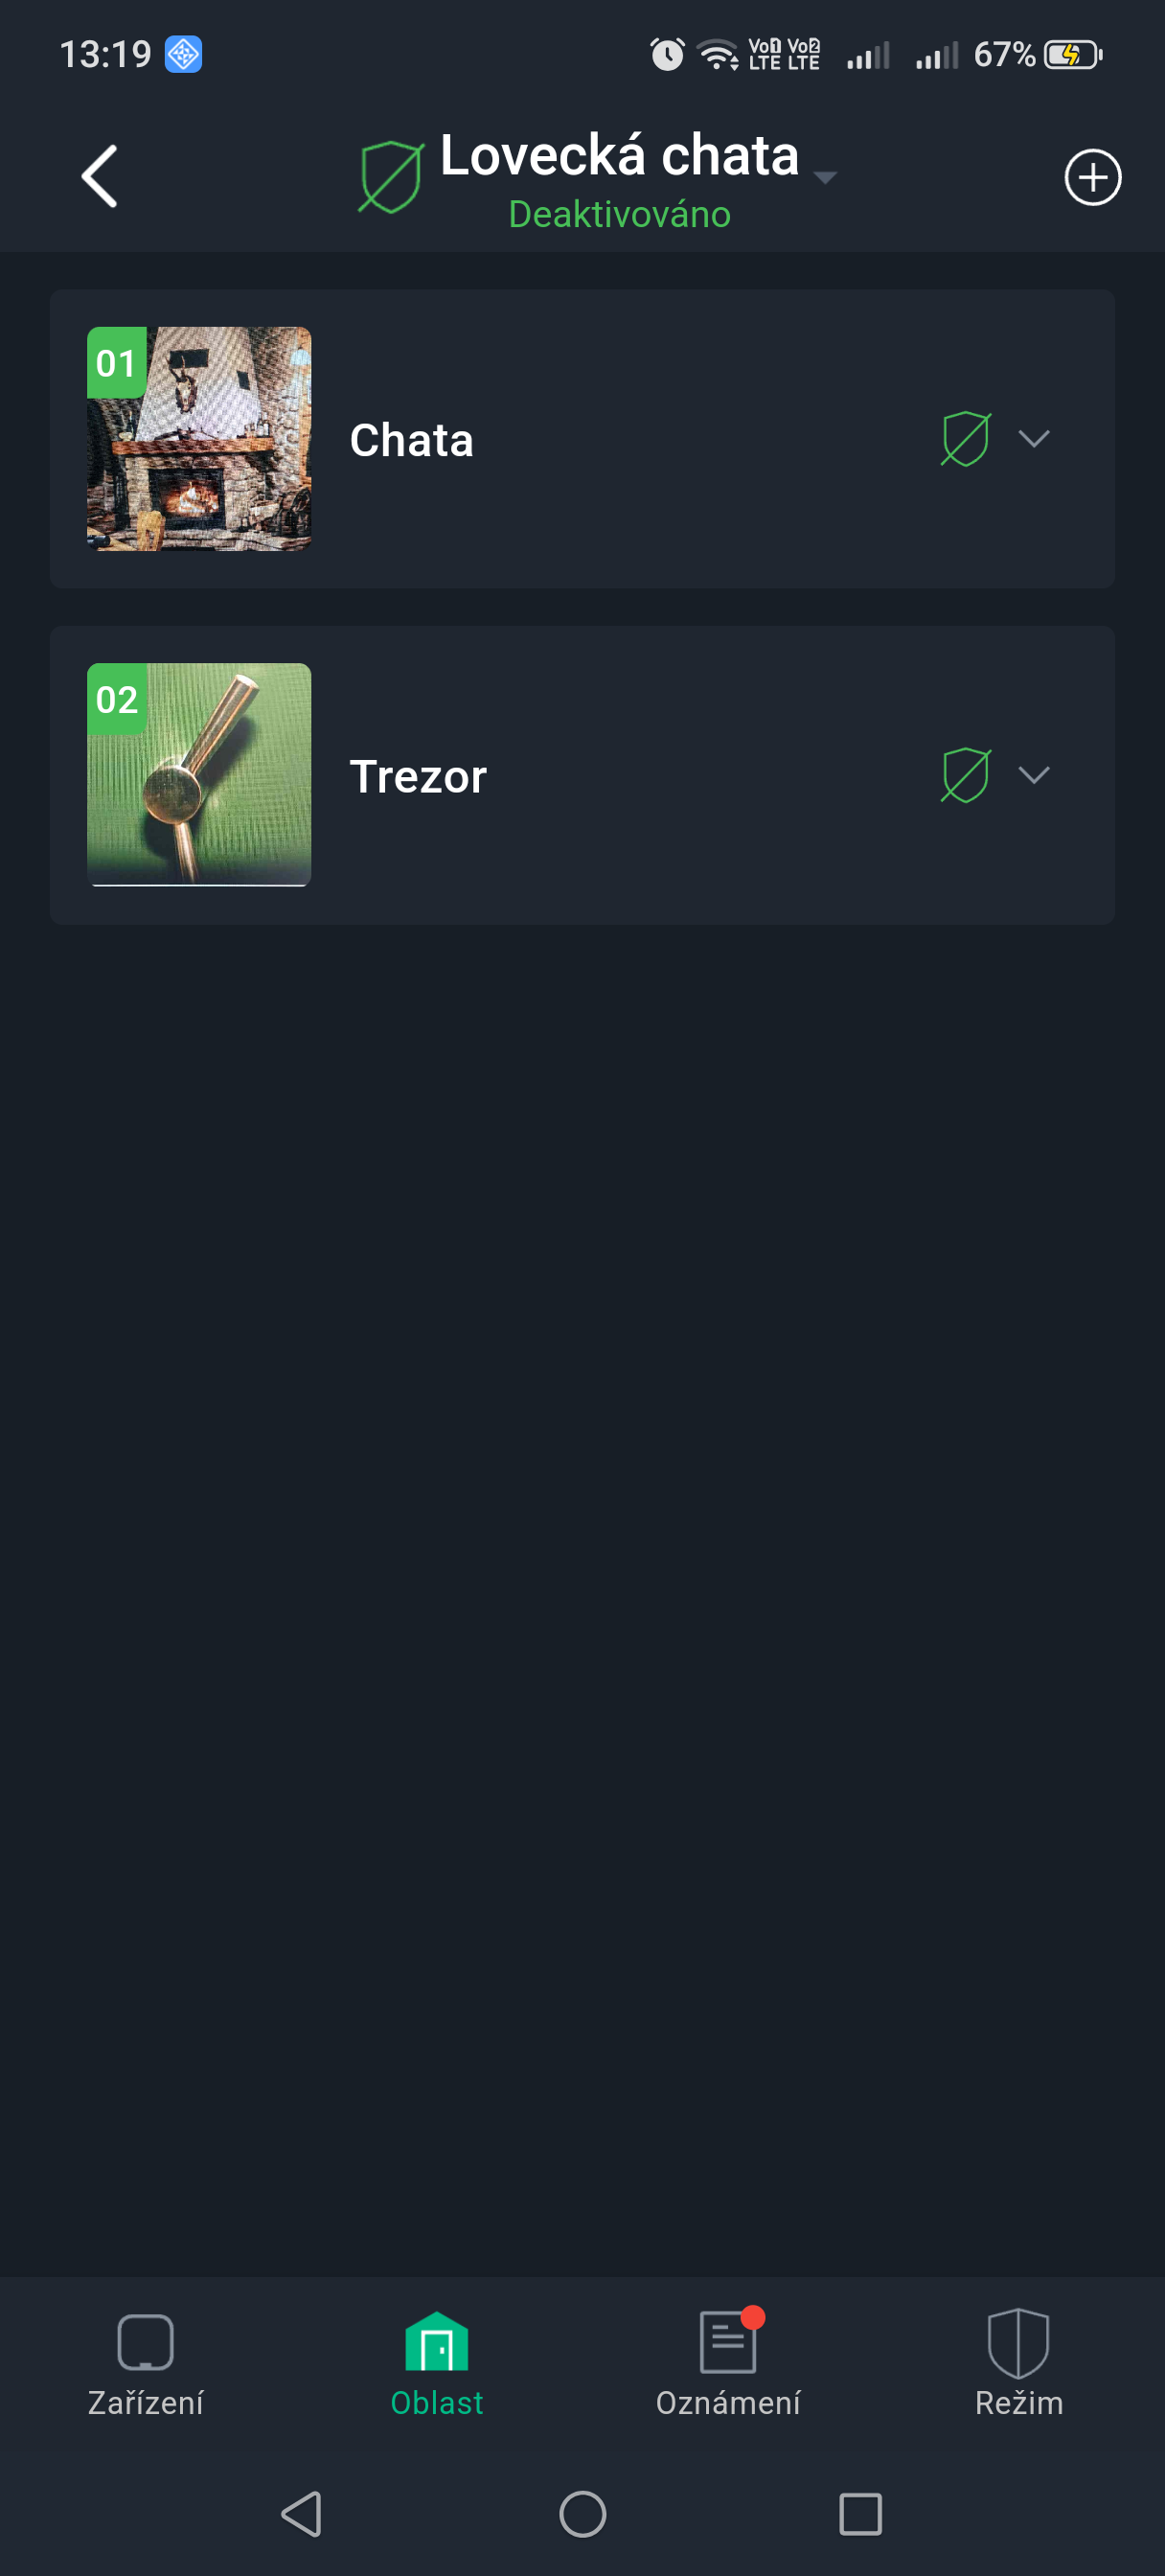
- On the Areas (Area) screen on the hub, tap the + icon in the top right corner to add an area.
- Configure the area, select an image for it, and then tap OK.
Public area
By setting an area as a public area, it can be linked with other areas.
- If all linked areas are armed, the public area will arm automatically.
- If any of the linked areas is disarmed, the public area will disarm automatically.
- On the Areas (Area) screen on the hub, select an area to go to its details screen.
- Tap ... in the top right corner and then tap Public Area.
- Turn on the Public Area function and then tap Save.
Maintenance mode
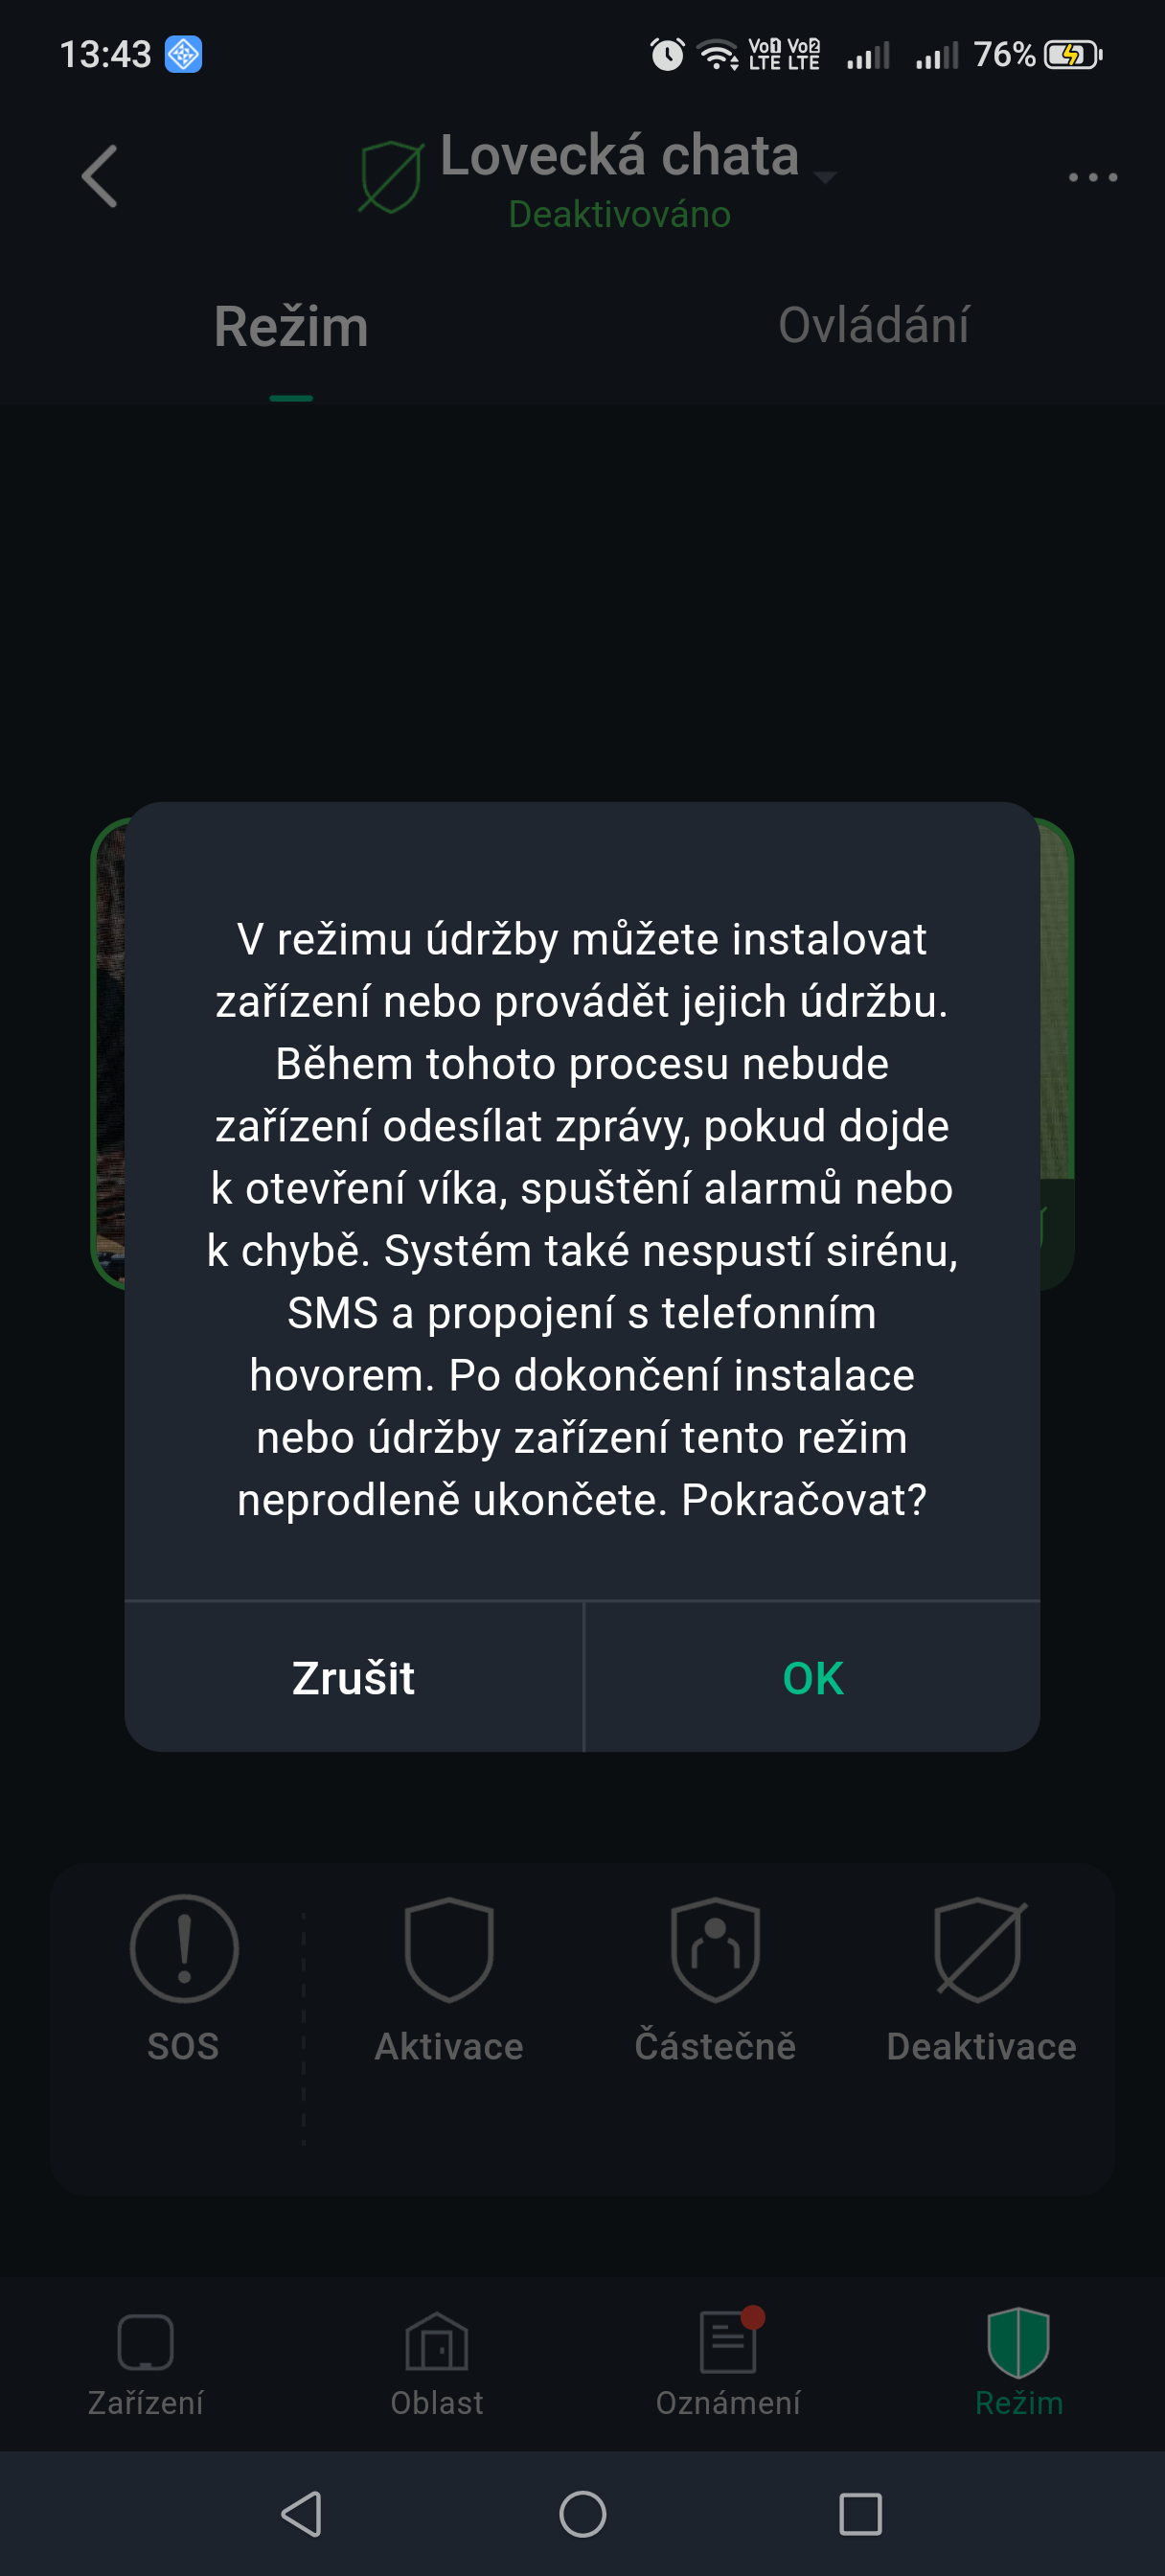
Maintenance mode is intended for servicing and updating devices. In maintenance mode, the system suspends all alarm and fault reporting for areas to prevent unnecessary notifications during servicing.
- On the Operation screen, tap ... in the top right corner and then tap Maintenance Mode.
Arming and disarming the system
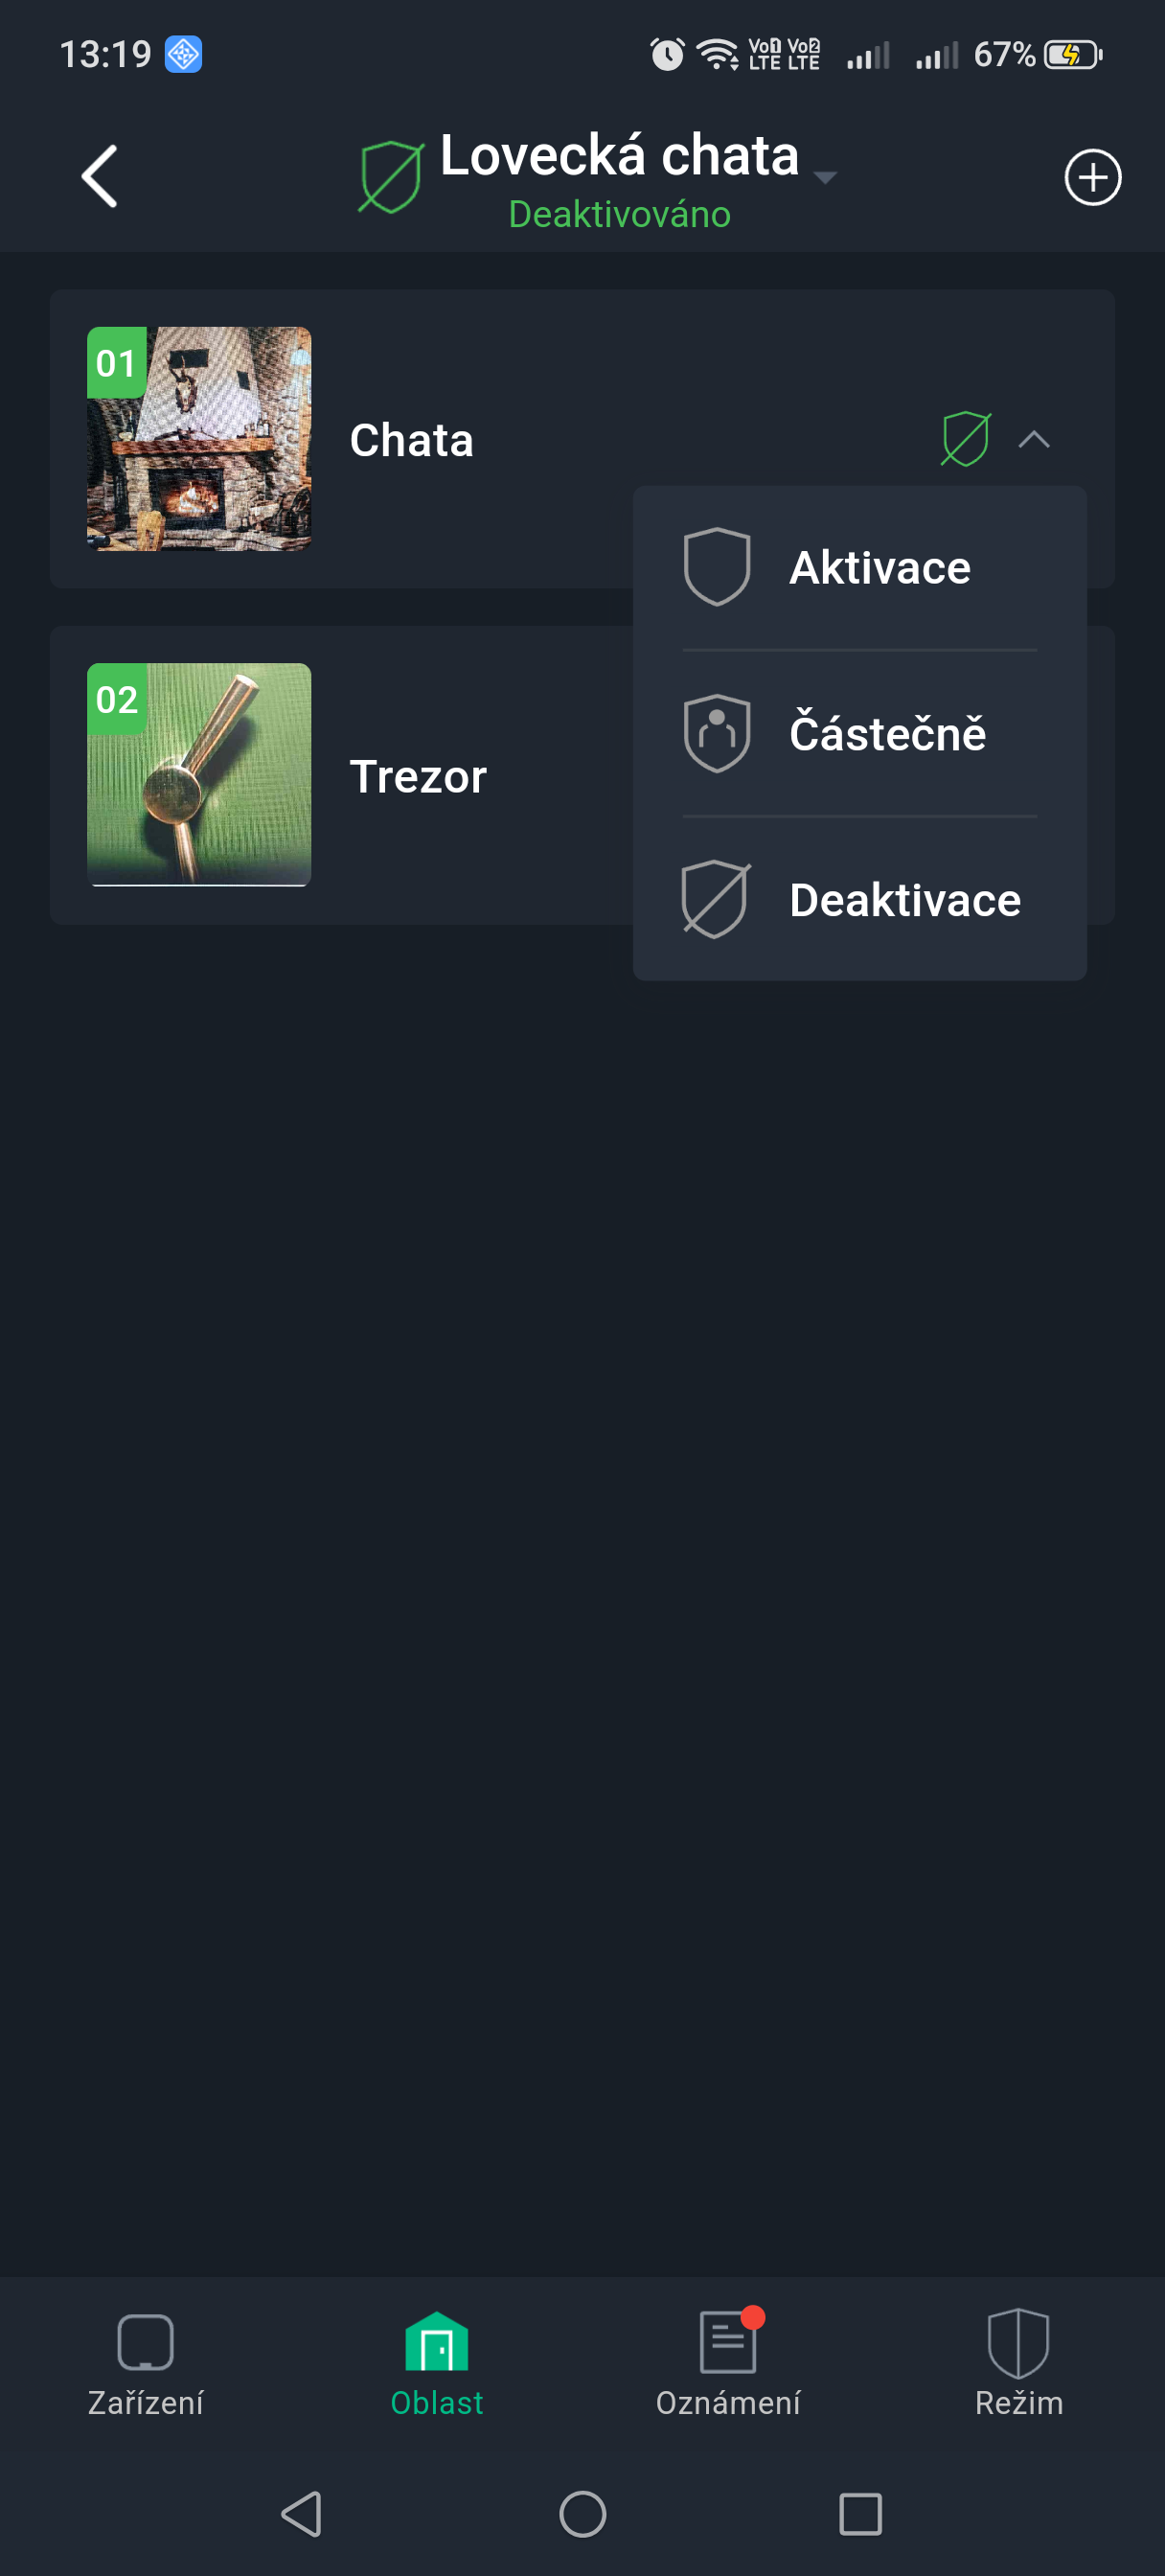
A level 2 or 3 user has permission to arm and disarm the system. This chapter uses control via the ProSAFE app as an example.
- Before performing the settings, make sure the hub has been added.
- Make sure the hub has a stable internet connection.
- Make sure the hub is disarmed.
You can manage the hub and devices and perform operations such as arming and disarming or configuring alarm devices.
- On the hub screen, tap Devices (Peripheral) to add a device. For details on adding a device, see the user manual for the given device.
- Arm and disarm detectors in one area or in all areas using manual or scheduled operations:
- Individual arming and disarming: arming and disarming detectors in one area.
- Global arming and disarming: arming and disarming detectors in all areas.
- Manual arming and disarming: arming the security system using the ProSAFE app, keypad or remote control.
- Scheduled arming and disarming: arming and disarming detectors according to a schedule.
Individual
Detectors can be armed and disarmed in one area.
- On the hub screen, tap Areas (Area).
- Tap the icon next to the given area and select one of the options Home Armed, Arm, Disarm:
- Home Armed (Home): arms the system while you are inside the alarm system area.
- Arm (Away): arms the system when you leave the alarm system area.
- Disarm (Disarm): turns off the security system. The opposite of arming.
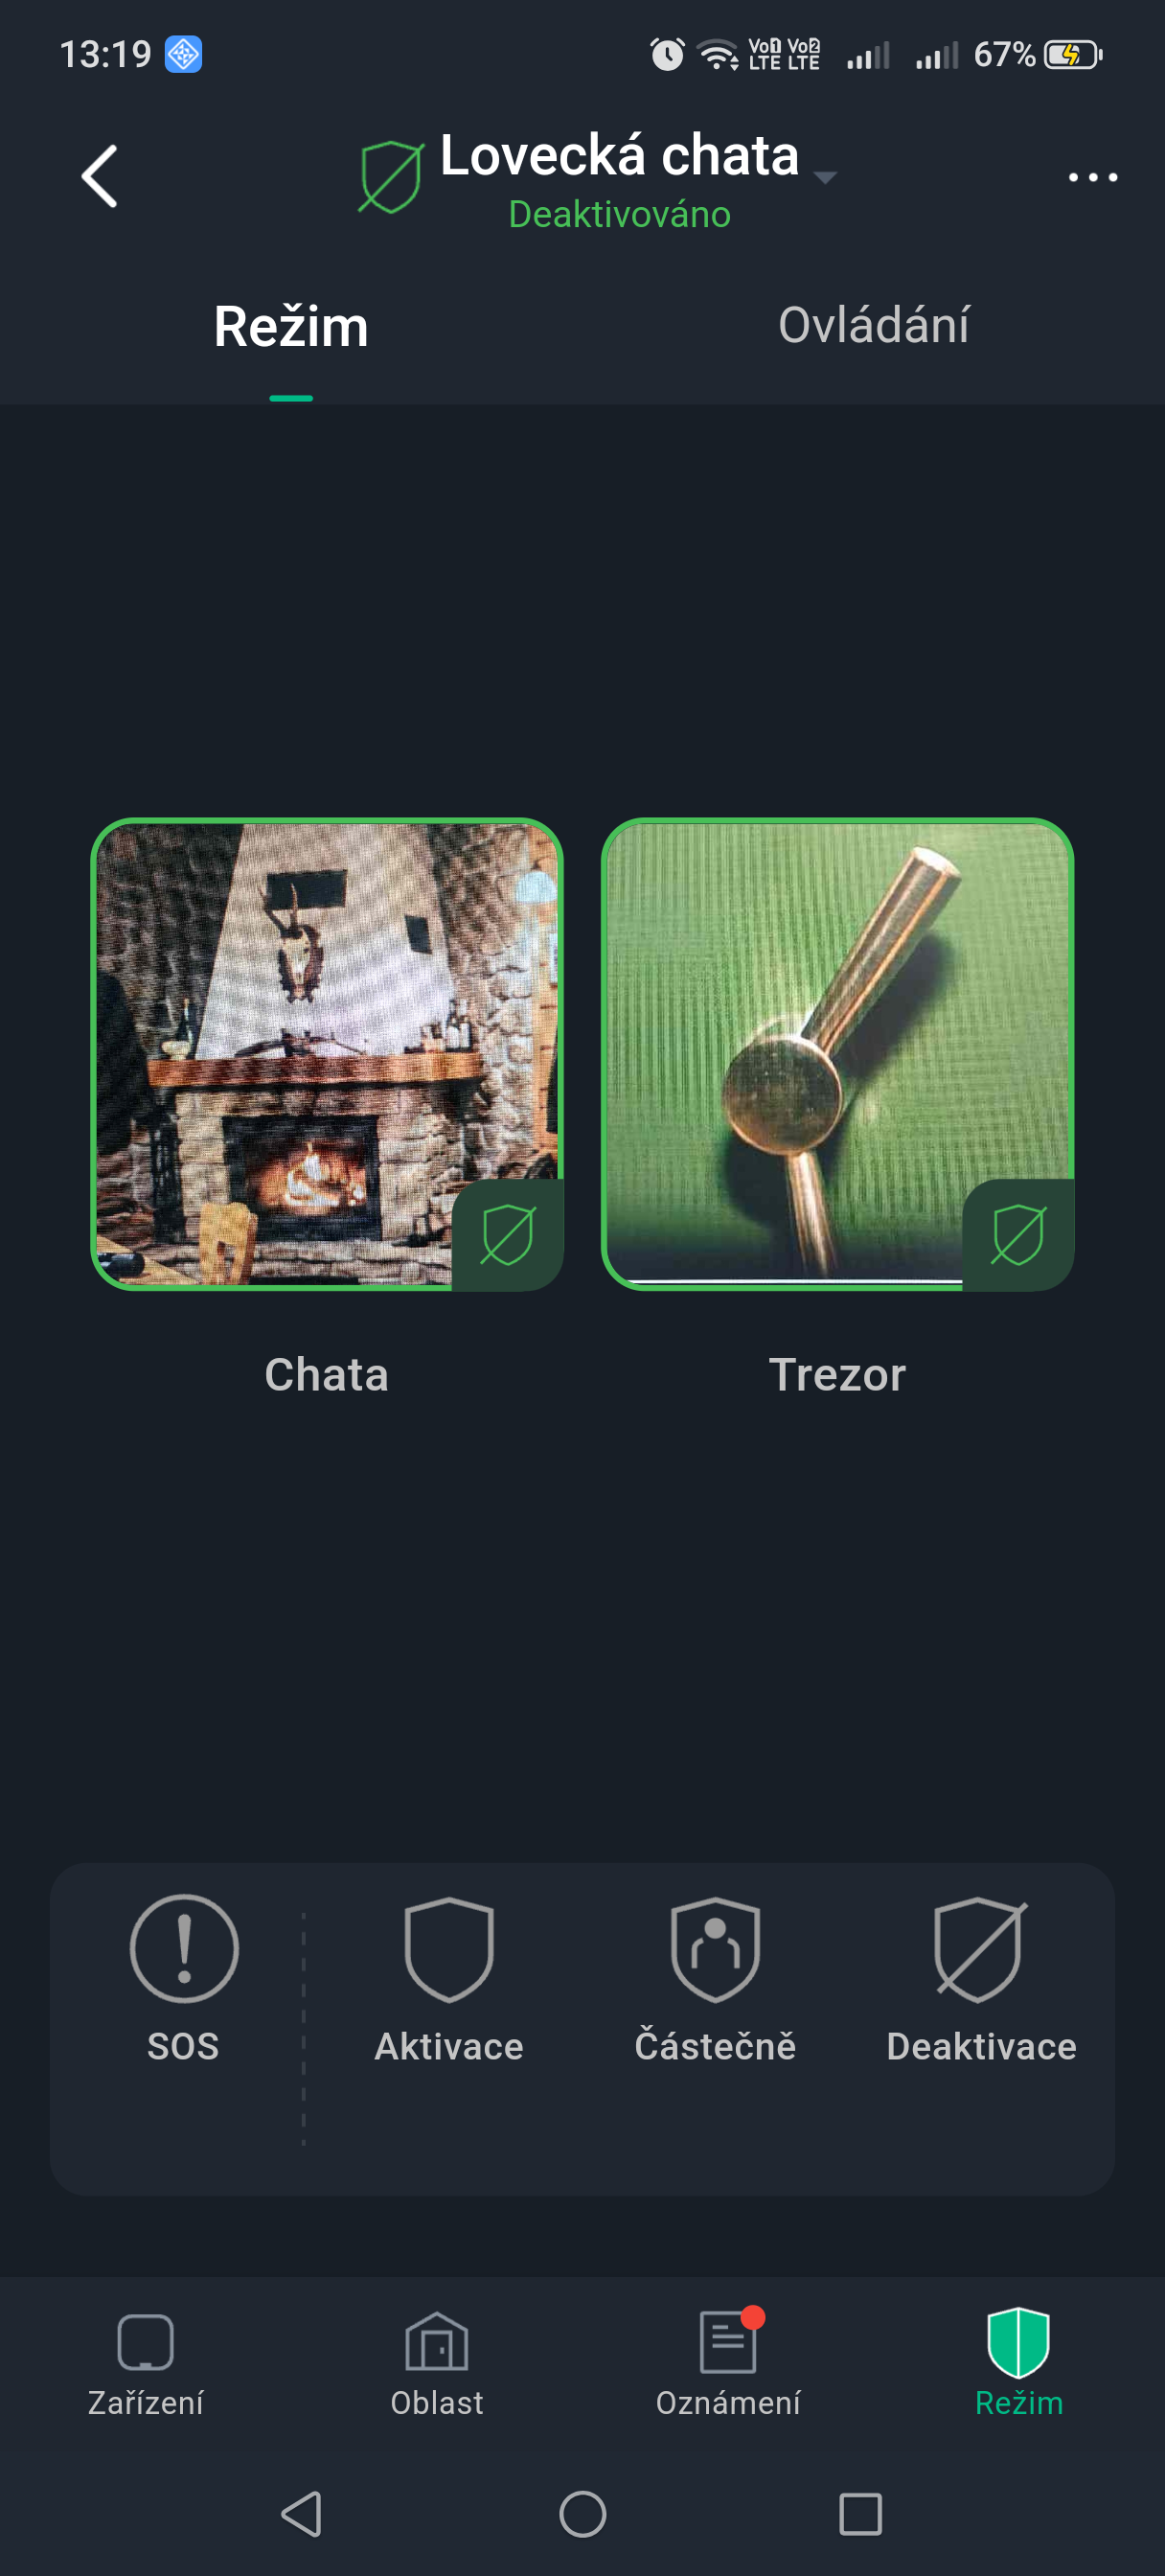
Global
Detectors can be armed and disarmed in all areas.
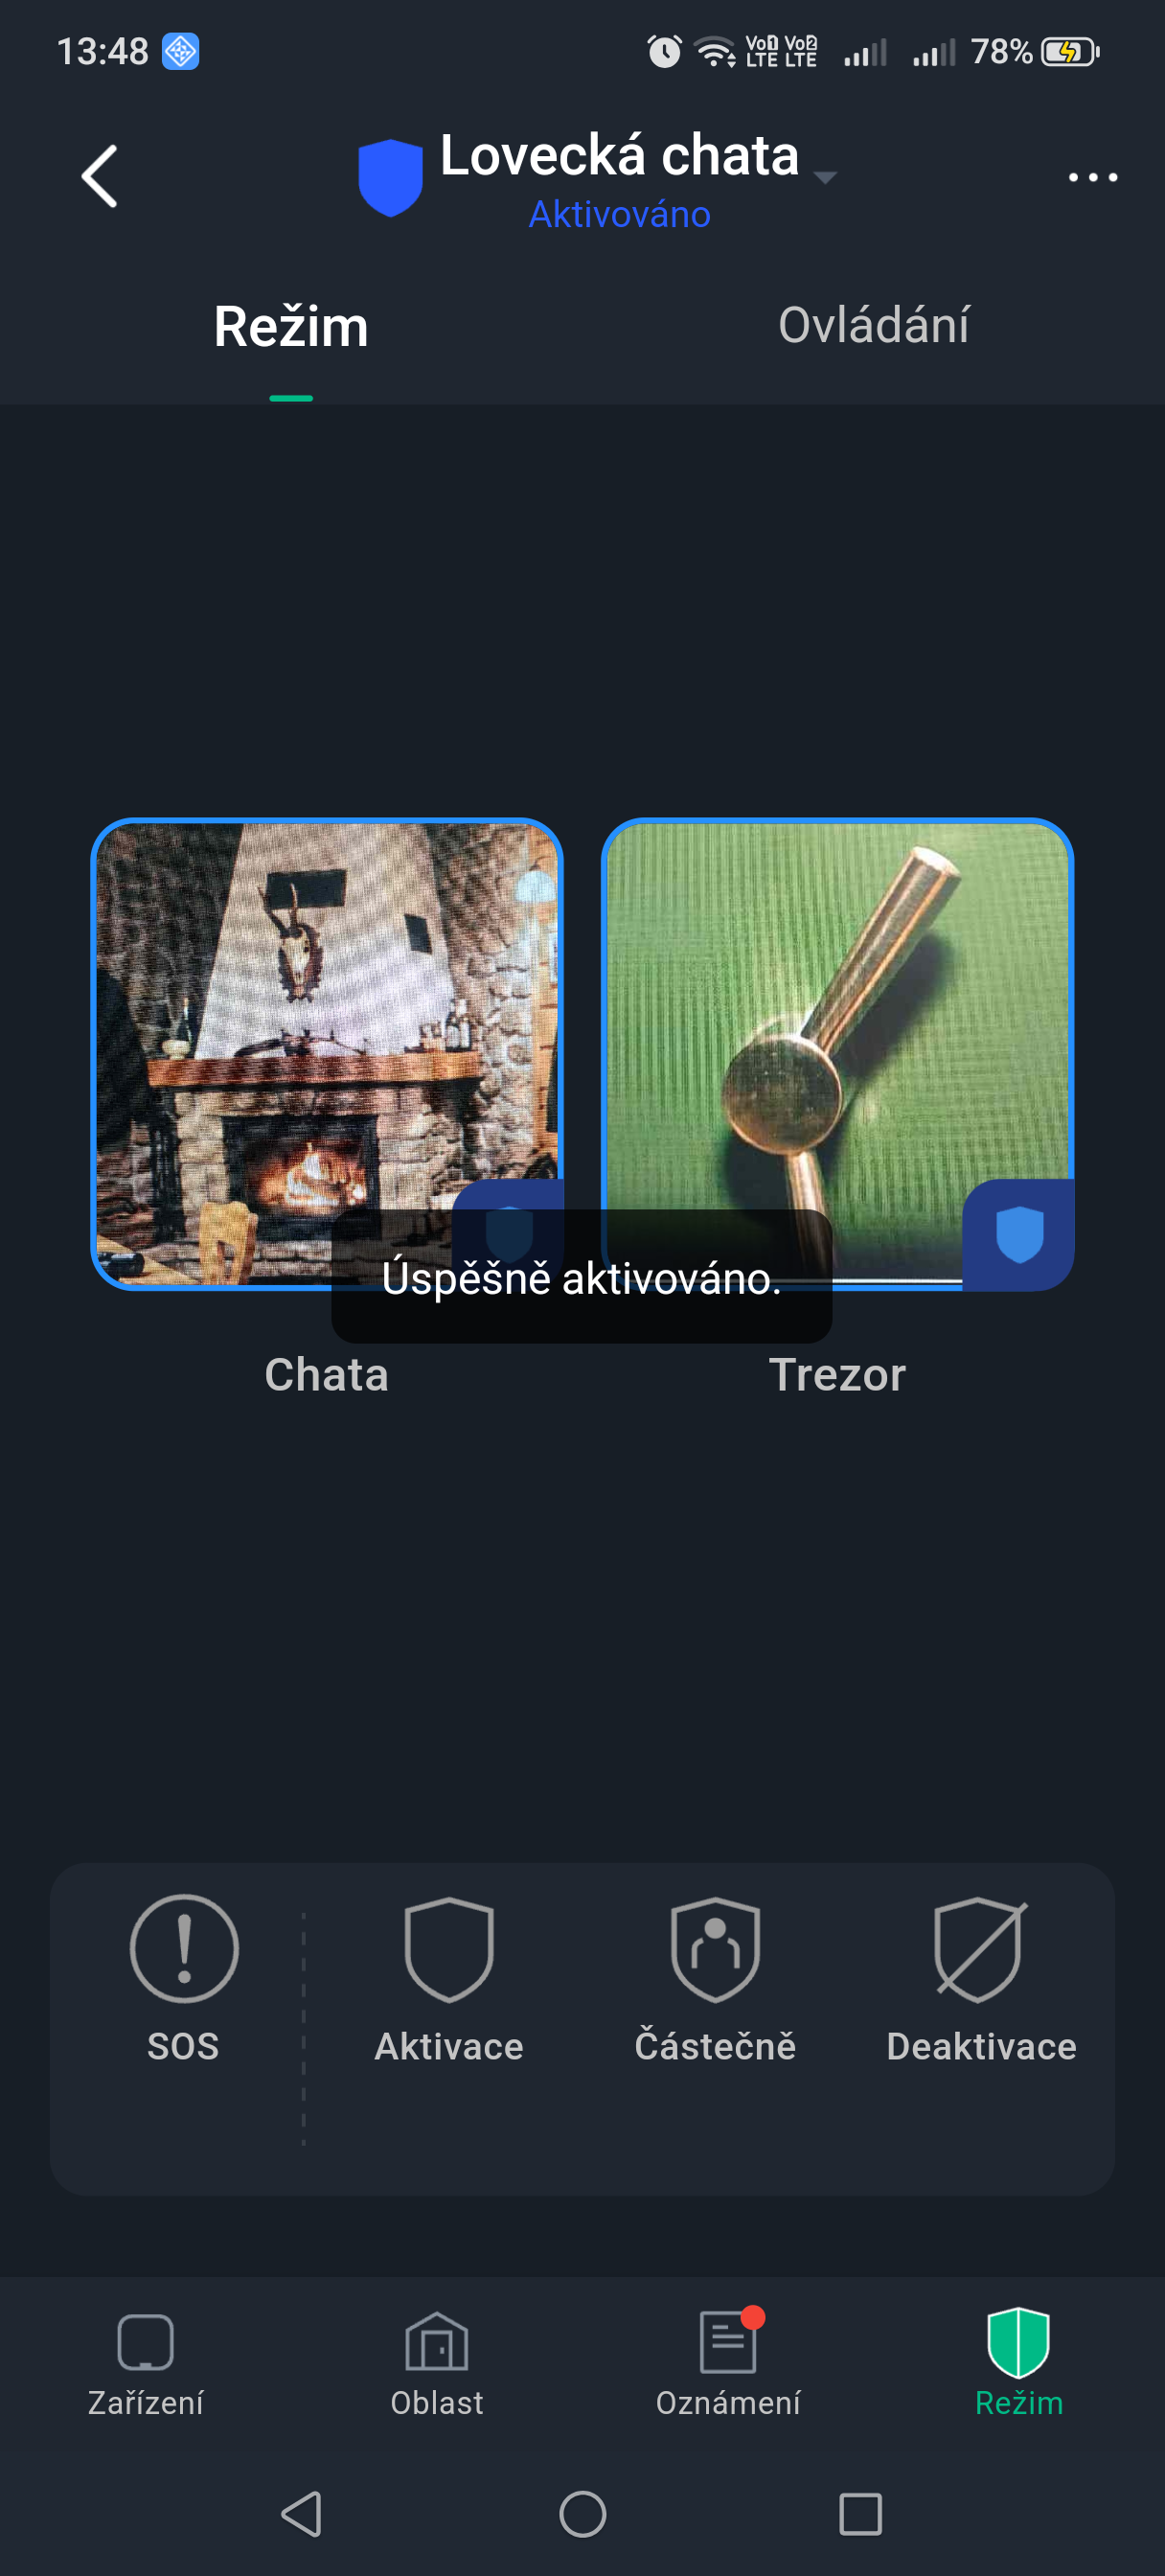
- On the Operation screen on the hub, select one of the options Home Armed or Arm to globally arm the detectors.
- Tap Disarm to globally disarm the detectors.
- Tap SOS to trigger the alarm.
Manual (keypad, remote control, card)
The security system can be armed using the ProSAFE app or the remote control (key fob).
- For the procedure for arming and disarming detectors in a single area or in all areas, see the Individual and Global Arming and Disarming chapters.
- To control the system using a remote control (key fob) and a keypad, you must first assign area control permissions to the remote control and keypad. For details, see the user manual of the respective remote control and keypad.
Scheduled
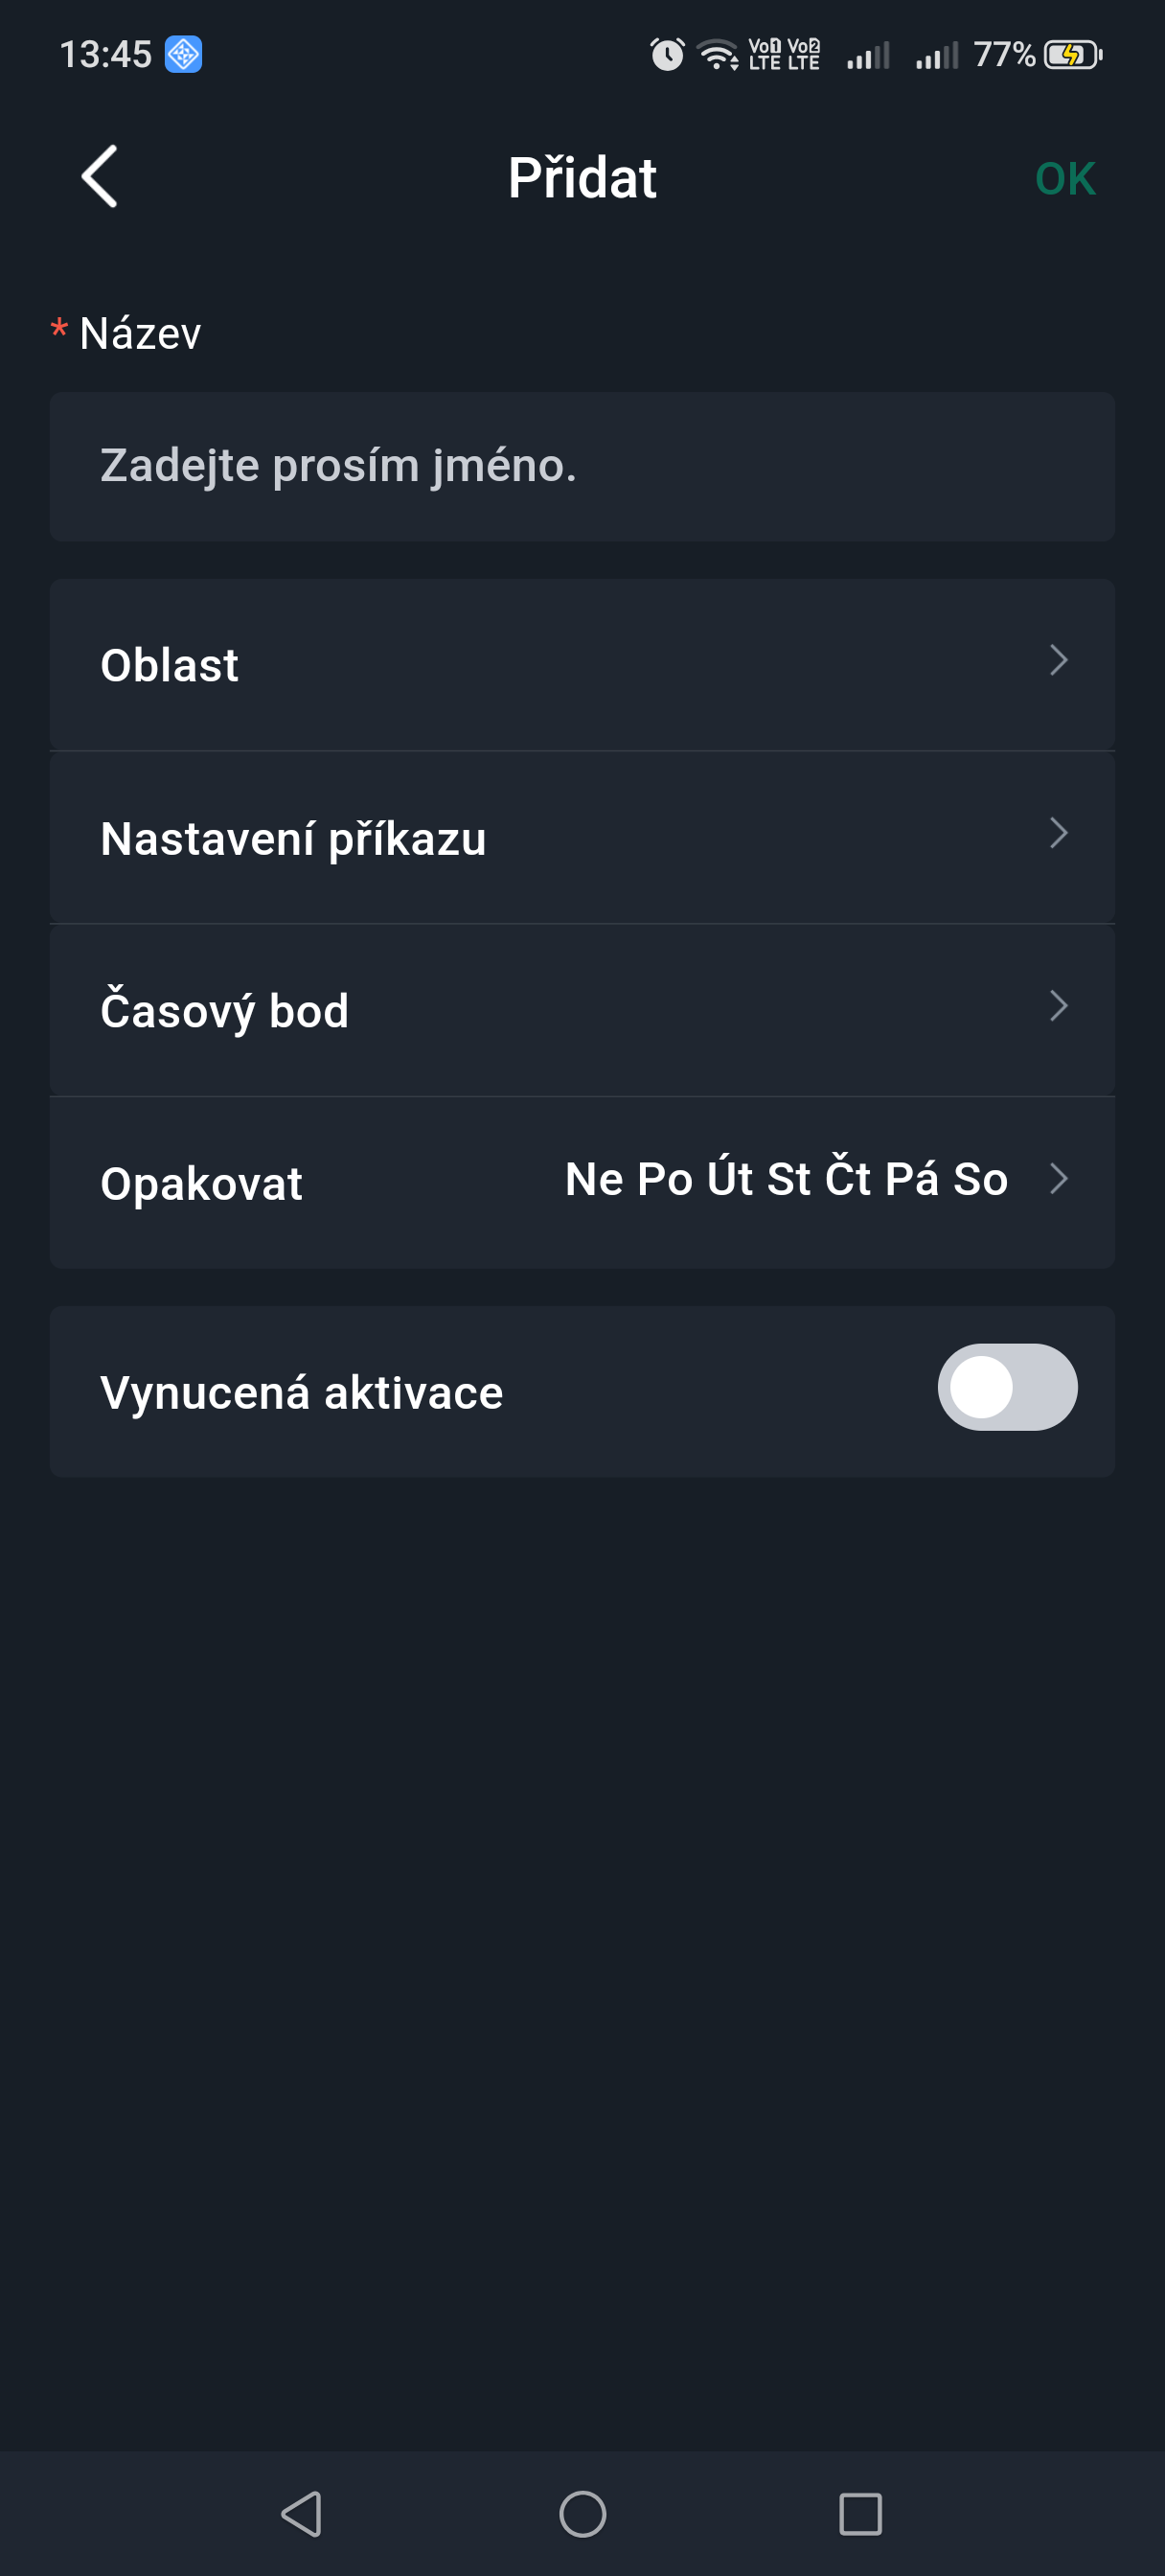
You can set a schedule for arming and disarming detectors. You can configure arming schedules, including the arming area, modes, and time periods.
- On the hub screen, select Device Details > Settings > Hub Setting.
- Select the Scheduled Arming/Disarming screen, click Add, and then configure the arming schedule:
- Name: a custom name for the arming schedule.
- Area: select one or more areas you want to arm.
- Command Setting: select from Home Armed, Arm, and Disarm.
- Time: set the arming time.
To apply the same arming time to other days as well, click Repeat and select the desired days.- Forced Arming: select as needed.
- Click OK.
Choosing the installation location
Place the hub inside the protected premises, ideally in its center relative to the layout of wireless devices, hidden from direct view (for example, in a utility room) and within reach of a power outlet and the router.
Where not to install the hub
- Outdoors.
- Near large metal objects — they shield the radio signal.
- In areas with a weak mobile network signal.
- Less than 1 m from the router and power cables — sources of radio interference.
- In locations with temperature or humidity outside the permitted range.
Hub installation
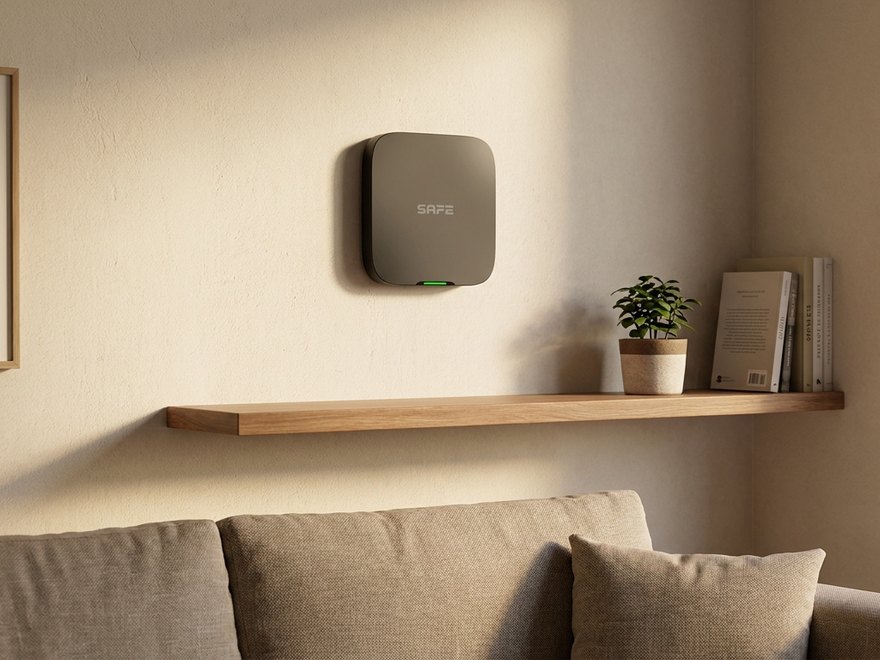
The hub can be wall-mounted or placed freely on a table or shelf. Before mounting, we recommend binding the hub with the app and checking the signal strength of all devices at the installation site.
- Remove the mounting panel from the back of the hub (unscrew the bottom screws and slide the panel in the direction of the arrow).
- Drill holes according to the mounting panel and insert the expansion wall plugs.
- Attach the panel to the wall using ST4×25 screws.
- Connect the cables (power, Ethernet) and fit the hub onto the panel from top to bottom.
- Secure the hub to the panel using M3×8 screws.
Power supply and backup battery
- Power supply 100–240 V AC, 50/60 Hz; consumption ≤ 12 W. Use only the power cable supplied in the package and a grounded outlet.
- Built-in backup lithium battery 3,7 V / 4750 mAh keeps the hub running for up to 12 hours after a power outage.
- The battery charges automatically at a temperature of 0 °C to +45 °C; operation without charging −10 °C to +55 °C.
- Battery status in percent can be viewed in the hub overview; a low battery is reported by both the ProSAFE app and DPPC.
- The battery is not user-replaceable — in case of a fault, contact service.
Maintenance
- Regularly update the firmware of the hub and devices (cloud update) and the ProSAFE app.
- Check the system status: network connection, battery status, tamper, and connection with the DPPC.
- Regularly review the event log and the list of logged-in users.
- Test device functionality using Test Mode and the connection with DPPC using a communication test.
- Clean the cover with a dry soft cloth, without solvents or aggressive cleaning agents.
Technical Specifications
| PORT | |
| Alarm input | Expandable, 64 channels |
| Alarm output | Expandable, 64 channels |
| WIRELESS DEVICES | |
| Device | 150 devices (wireless and wired), specifically: up to 64 wireless remote controls (key fobs); up to 8 wireless keypads; up to 6 wireless sirens (including 4 communicating/intercom sirens); up to 4 wireless signal repeaters; up to 64 wireless PIR-Cam detectors (indoor PIR cameras, outdoor PIR cameras, and dual/triple detectors); up to 16 multifunctional I/O transmitters; up to 16 RS-485 expanders (input and output expanders) |
| WIRED DEVICES | |
| Wired elements | 64 wired zones (integration of third-party manufacturer components is possible) |
| AREAS | |
| Number of areas (rooms) | 32 |
| NETWORK | |
| Network mode | Ethernet, Wi-Fi, and mobile network (supports installation of two SIM cards, only one can be active at a time) |
| Network port | 1× RJ-45, Ethernet port 10 Mbps/100 Mbps |
| RS-232 port | 1× RS-232 port for Serial Bridge SAFE 38181 |
| Backup battery | 1× built-in rechargeable lithium battery 4 750 mAh |
| VIDEO AND AUDIO | |
| Video input | Up to 8 integrated IP cameras |
| Audio output | 1 channel |
| Volume control | Yes |
| Voice announcements | By phone and via local speaker |
| FUNCTIONS | |
| Indicator (LED) | Indicates alarm status, arming and disarming, network connection, and device fault |
| Buttons | Reset button, power button, and AP switch |
| SMS | Yes (up to 5 phone numbers) |
| Phone call | Yes (up to 5 phone numbers) |
| Video Linkage | Yes |
| Offline cache | Stores up to 50 alarm messages |
| Arming and disarming method | App, keypad, remote control (key fob), card, SMS, scheduled arming and disarming |
| Remote update | Cloud update |
| Low battery detection | Yes |
| User management | 33 app users (31 regular users, 1 administrator, and 1 installer) and 32 keypad users |
| Records (logs) | Up to 5 000 entries |
| Transmission protocol | SIA, SoftGuard |
| WIRELESS COMMUNICATION | |
| Frequency band | 868.0–868.6 MHz |
| Transmit power (EIRP) | Max. 25 mW |
| Communication mechanism | Two-way communication |
| Communication range | Up to 2 000 m (6 561,68 ft) in open space |
| Encryption | AES128 |
| Frequency Hopping | Yes |
| GENERAL | |
| Language support | 17 languages: Arabic, Czech, Danish, Dutch, English, French, German, Italian, Portuguese (Europe), Russian, Spanish (Latin America), Spanish (Europe), Turkish, Slovak, Polish, Greek, Bulgarian. English is set as default. |
| Power supply | 100–240 V AC, 50/60 Hz |
| Standby time (backup) | A fully charged battery lasts up to 12 hours under the following conditions: the hub is connected to Wi-Fi, linked to DPPC, the status signal (heartbeat) interval is 1 800 s, and 8 devices and the cloud are connected. |
| Consumption | ≤ 12 W |
| Operating temperature | Without battery charging: −10 °C to +55 °C (+14 °F to +131 °F); with battery charging: 0 °C to +45 °C (+32 °F to +113 °F) |
| Operating humidity | 10–90 % RH |
| Product dimensions | 174,8 × 174,8 × 38,3 mm (6,88" × 6,88" × 1,51") (L × W × H) |
| Net weight | 510 g (1,12 lb) |
| Gross weight | 860 g (1,90 lb) |
| Installation | Supports wall mounting and free placement on a table |
| Housing material | PC + ABS |
| Storage temperature | −10 °C to +55 °C (+14 °F to +131 °F) |
| Storage humidity | 10–90 % RH |
| Package dimensions | 254 × 211 × 61 mm (10,00" × 8,31" × 2,40") (L × W × H) individually in the inner box; 524 × 508 × 442 mm (20,63" × 20,00" × 17,40") (L × W × H) in the shipping package |
| CERTIFICATION | |
| Certification | EN 50131-1:2006+A1:2009+A2:2017+A3:2020; EN 50131-3:2009; EN 50131-6:2017+A1:2021; EN 50131-5-3:2017; EN 50131-10:2014; EN 50136-2:2013+A1:2023; CE. Security grade 2, Environmental class II, ATS SP2/DP2. |
| Compatibility | ProSAFE app 1.99.700+; SAFEWatch / SAFEWatch Pro; Serial Bridge SAFE 38181; IO Expander Board SAFE 38182; IO Relay Board SAFE 38183 |
| Anti-corrosion protection level | Basic protection. The product is designed for general use and is also suitable for areas without special anti-corrosion protection requirements. |
| WARRANTY | |
| Warranty period | 36 months |
| WI-FI | |
| Wi-Fi standard | IEEE 802.11b/g/n |
| Wi-Fi frequency band | 2 400–2 483,5 MHz |
| Wi-Fi transmit power | ≤ 20 dBm @ 2 400–2 483,5 MHz |
| MOBILE NETWORK | |
| Mobile network frequency band (EU) | 4G: FDD-LTE B1/B3/B7/B8/B20/B28A; TDD-LTE B38/B40/B41; 3G: WCDMA B1/B8; 2G: GSM 1 800/900 MHz |
| Transmit power (EIRP) | 4G: power class 3: 23 dBm ±2 dB; 3G: power class 3: 24 dBm +1/−3 dB; 2G: power class 0: 30 dBm ±3 dB (GSM900), power class 5: 33 dBm ±3 dB (GSM1800) |
ATE category (EN 50136-1)
| Category | Reporting time | Protocols | PSTN | 2G/3G | IP | Communication equipment to be used |
|---|---|---|---|---|---|---|
| SP2 | 25 h | Standard | ✓ | Designated communication equipment | ||
| SP3 | 30 min | Standard | ✓ | ✓ | Only one of two designated communication devices | |
| SP4 | 3 min | Encrypted | ✓ | ✓ | Only one of two designated communication devices | |
| SP5 | 90 s | Encrypted | ✓ | ✓ | Only one of two designated communication devices | |
| DP1 | 25 h | Standard | ✓ | ✓ | ✓ | Only two of three designated communication devices |
| DP2 | 30 min | Standard | ✓ | ✓ | ✓ | Only two of three designated communication devices |
| DP3 | 3 min | Encrypted | ✓ | ✓ | Both designated communication devices | |
| DP4 | 90 s | Encrypted | ✓ | ✓ | Both designated communication devices |
ATE: Alarm Transmission Equipment.
SPx (Single Path): a value expressing the performance level achieved by a single communication device according to the EN 50136-1 standard.
DPx (Double Path): a value expressing the performance level achieved by a combination of two communication devices according to the EN 50136-1 standard.
Reporting time: the maximum time available to report a fault of the alarm transmission equipment. The device fulfills this requirement by regularly reporting its status via a specific test function.
Protocols: indicate the security level of the protocols used for fault reporting. Standard and voice protocols are encrypted. Highly secure protocols are encrypted with an AES 128 or AES 256-bit key.
Communication equipment: implemented communication devices.
Communication equipment to be used: indicates the number and type of communication devices to be used according to the ATE category.
SP2: LAN/Wi-Fi via the cloud, ProSAFE app (default reporting time 150 s), or DPPC (min. reporting time 25 h).
DP2: primarily LAN/Wi-Fi via the cloud, ProSAFE app (default reporting time 150 s), or DPPC (min. reporting time 30 min), and secondarily GPRS/4G via the cloud, ProSAFE app (default reporting time 150 s), or DPPC (min. reporting time 30 min).
Package Contents
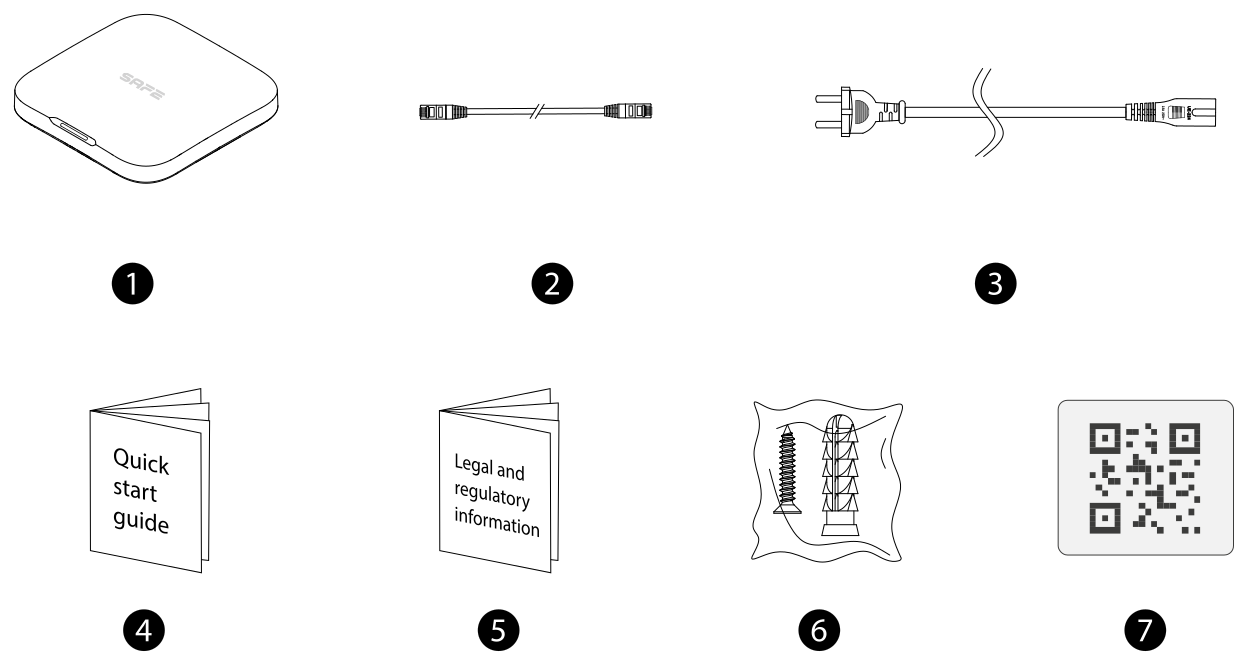
- Hub – 1 pc
- Cable – 1 pc
- Adapter – 1 pc
- Quick start guide – 1 pc
- Legal and regulatory information – 1 pc
- Screw set – 2 pcs
- QR code – 1 pc
Safety Notices
This manual describes the installation, functions, and operation of the alarm hub (hereinafter referred to as the "hub"). Before using the device, please read this manual carefully and keep it for future reference.
Signal words
The following signal words and symbols may appear in this manual.
- DANGER – Indicates a high potential hazard that, if not avoided, will result in death or serious injury.
- WARNING – Indicates a moderate or less severe potential hazard that, if not avoided, may result in minor or moderate injury.
- CAUTION – Indicates a potential risk that, if not avoided, may result in property damage, data loss, reduced performance, or unpredictable results.
- ESD symbol – Indicates devices sensitive to electrostatic discharge (Electrostatic Sensitive Devices).
- High voltage – Indicates dangerous high voltage. Take care not to come into contact with electricity.
- Laser radiation – Indicates the danger of laser radiation. Take care not to expose yourself to the laser beam.
- Tip – Offers a procedure for solving a problem or saving time (referred to in the text as a "tip" note).
- Note – Provides additional information supplementing the text.
In this document, tips and additional information are shown as note boxes (div class="note"), while safety-mandatory instructions are shown as warning boxes (div class="warn").
Personal Data Protection
As a device user or data controller, you may collect personal data of third parties, such as their image, audio recording, fingerprints, or vehicle registration plate. It is your responsibility to comply with local personal data protection laws in order to protect the legitimate interests of the data subjects. These measures include, among others: placing a clear and visible sign informing about the existence of the monitored area and providing the necessary contact information.
About This Manual
This manual is provided for informational purposes only – minor discrepancies may occur between the manual and the actual product, the manual may change in accordance with current legal regulations and technical modifications of the product, and all trademarks and company names mentioned in the manual are the property of their respective owners. In case of doubts or disputes, or if problems occur while using the device, contact the supplier or customer service; the manufacturer reserves the right to the final interpretation of the manual's content.
Operating Requirements
The device or remote control contains button cell batteries. Do not swallow the batteries – there is a risk of chemical burns.
Possible consequence: A swallowed button cell battery can cause severe internal burns and death within 2 hours.
Preventive measures (among others):
- Keep new and used batteries out of the reach of children.
- If the battery compartment is not securely closed, stop using the product immediately and keep it out of the reach of children.
- If you believe a battery has been swallowed or inserted into any part of the body, seek medical help immediately.
- Before use, make sure the device's power supply is working properly.
- Do not unplug the device's power cable while it is switched on.
- Use the device only within its rated power range.
- Transport, use, and store the device only within the permitted humidity and temperature range.
- Prevent liquids from splashing or dripping onto the device. Make sure there are no liquid-filled objects on the device to prevent liquid from entering it.
- Do not disassemble the device.
Installation Requirements
- Before turning on the device, first connect it to the power adapter.
- Strictly comply with local electrical safety standards and make sure that the voltage in the area is stable and meets the device's power requirements.
- Do not connect the device to more than one power source. Otherwise, the device may be damaged.
- When powering the device, comply with the following electrical requirements:
- Requirements for selecting the power adapter:
- The power supply must meet the requirements of the IEC 60950-1 and IEC 62368-1 standards.
- The voltage must comply with the SELV (Safety Extra Low Voltage) requirements and must not exceed the ES-1 standard.
- If the device's power does not exceed 100 W, the power supply must meet the LPS requirements and must not exceed level PS2.
- We recommend using the power adapter supplied with the device.
- When selecting a power adapter, follow the power requirements (such as rated voltage) indicated on the device label.
- Requirements for selecting the power adapter:
- When working at heights, follow all safety procedures and use the prescribed protective equipment.
- Do not expose the device to direct sunlight or heat sources.
- Do not install the device in damp, dusty, or smoky areas.
- Install the device in a well-ventilated location and do not cover its ventilation openings.
- Connect Class I electrical appliances to an outlet with protective grounding.
Appendix 1 — Events preventing arming
Device
| Event | Description |
|---|---|
| ModuleLoss (device offline) | The device was offline. |
| HeartError (missing heartbeat) | No heartbeat packets were sent for more than 18 minutes. |
| Alarm (24-hour zone) | Alarm (24-hour zone). |
| Open (rear cover opened) | The rear cover of the device was opened. |
| exOpen (external device cover opened) | The rear cover of the external device was opened. |
| Tamper | A tamper alarm of the device was activated. |
| LowBattery (low battery) | A low battery of the device was detected. |
| PriPowerLoss (main power failure) | A main power failure of the device was detected. |
| BatteryLoss (battery fault) | A battery fault was detected. |
| OverVoltage (overvoltage) | Overvoltage was detected. |
| OverCurrent (overcurrent) | Overcurrent was detected. |
| OverHeat (overheating) | Overheating was detected. |
| FireAlarm (fire alarm) | A fire alarm was activated. |
| MedicalAlarm (medical alarm) | A medical alarm was activated. |
| SOS Alarm | An SOS alarm was activated. |
| PanicAlarm (panic alarm) | A panic alarm was activated. |
| Gas Alarm (gas leak alarm) | A gas leak alarm was activated. |
| IntrusionAlarm (intrusion alarm) | An intrusion alarm was activated. |
| HoldUpAlarm (holdup alarm) | A holdup alarm was activated. |
Hub
| Event | Description |
|---|---|
| SOSAlert (SOS notification) | The panic alarm can be activated via the ProSAFE app. |
| Tamper | A tamper alarm of the hub was activated. |
| Server Connect Error (server connection error) | The hub was offline. |
| SIAServer Connect Error (SIA server connection error) | A connection error occurred between the hub and DPPC (SIA). |
| LowBattery (low battery) | A low battery was detected. |
| MainLoss (main power failure) | A main power failure was detected. |
| BatteryLoss (battery fault) | A battery fault was detected. |
| NoGSM (GSM module error) | A 2G/4G module error was detected. |
| ATS Fault (transmission system fault) | An alarm transmission system (ATS) fault was detected. |
| Cellular Network ATP Fault (alarm transmission path fault – mobile network) | An alarm transmission path fault (mobile network outage) was detected. |
| Wired Network/Wi-Fi ATP Fault (alarm transmission path fault – Ethernet/Wi-Fi network) | An alarm transmission path fault (Ethernet or Wi-Fi network outage) was detected. |
| AP Mode (access point mode) | An access point (AP) mode fault was detected. |
Appendix 2 — SIA Event Codes
| No. | Event | Code / SIA code | Description |
|---|---|---|---|
| 1 | Medical Alarm | 1100 / MA | The medical alarm button was pressed |
| 2 | Medical alarm ended | 3100 / MH | The medical alarm button was restored |
| 3 | Fire Alarm | 1110 / FA | Fire alarm |
| 4 | Fire alarm ended | 3110 / FH | Fire alarm ended |
| 5 | Duress Alarm | 1121 / HA | Duress alarm |
| 6 | Silent Panic Alarm | 1122 / HA | The panic alarm button / holdup button was pressed |
| 7 | Silent panic alarm ended | 3122 / HH | The panic alarm / holdup button was restored |
| 8 | Audible Panic Alarm | 1123 / PA | The panic alarm button / holdup button was pressed |
| 9 | Audible panic alarm ended | 3123 / PH | The panic alarm / holdup button was restored |
| 10 | Burglary Alarm | 1130 / BA | Motion detected; opening detected; external contact opened; burglary alarm; glass break detected; tilt detected; shock detected |
| 11 | Burglary alarm ended | 3130 / BR | Motion ended; closing detected; external contact closed; burglary alarm ended; glass break ended; tilt ended; shock ended |
| 12 | Perimeter Alarm | 1131 / BA | Tripwire alarm |
| 13 | Perimeter alarm ended | 3131 / BR | Tripwire alarm ended |
| 14 | 24 Hour Alarm | 1133 / BA | Motion detected; opening detected; external contact opened; glass break detected; tilt detected; shock detected |
| 15 | 24-hour alarm ended | 3133 / BR | Motion ended; closing detected; external contact closed; burglary alarm ended; glass break ended; tilt ended; shock ended |
| 16 | Entry Or Exit Alarm | 1134 / BA | Motion detected; opening detected; external contact opened; glass break detected; tilt detected; shock detected |
| 17 | Entry/exit zone alarm ended | 3134 / BR | Motion ended; closing detected; external contact closed; burglary alarm ended; glass break ended; tilt ended; shock ended |
| 18 | Lid Was Opened | 1137 / TA | Cover was opened; external cover was opened; device was moved |
| 19 | Lid Was Closed | 3137 / TR | Cover was closed; external cover was closed; device stopped being moved |
| 20 | Expansion Module Was Disconnected | 1143 / EM | Camera module was disconnected |
| 21 | Expansion Module Was Connected | 3143 / EN | Camera module is connected |
| 22 | Masking Alarm | 1149 / TA | Masking alarm |
| 23 | Masking alarm ended | 3149 / TR | Masking alarm ended |
| 24 | Gas Leakage | 1151 / GA | Gas leak detected |
| 25 | Gas leak ended | 3151 / GH | Gas leak ended |
| 26 | Water Leakage | 1154 / WA | Water leak detected |
| 27 | Water leak ended | 3154 / WH | Water leak ended |
| 28 | High Temperature | 1158 / KA | High temperature |
| 29 | Normal Temperature | 3158 / KH | Normal temperature |
| 30 | Low Temperature | 1159 / ZA | Low temperature |
| 31 | Normal Temperature | 3159 / ZH | Normal temperature |
| 32 | Main Power Failure | 1301 / AT | Main power failure |
| 33 | Main Power Restored | 3301 / AR | Main power restored |
| 34 | Low Battery | 1302 / YT | Low battery |
| 35 | Battery Level Restored | 3302 / YR | Battery level restored |
| 36 | Battery Fault | 1311 / YM | Battery fault |
| 37 | Battery Restored | 3311 / YR | Battery restored |
| 38 | Overcurrent Protection Triggered | 1312 / YI | Overcurrent protection activated |
| 39 | Overcurrent Protection Restored | 3312 / YJ | Overcurrent protection restored |
| 40 | Overheat Protection Triggered | 1318 / KA | Overheat protection activated |
| 41 | Overheat Protection Restored | 3318 / KH | Overheat protection restored |
| 42 | Overvoltage Protection Triggered | 1319 / YP | Overvoltage Protection Activated |
| 43 | Overvoltage Protection Restored (Overvoltage Protection Restored) | 3319 / YQ | Overvoltage Protection Restored |
| 44 | RF Jamming | 1344 / XQ | RF Jamming |
| 45 | ATS Fault (ATS Fault) | 1350 / NT | ATS Fault; Ethernet Network Fault; Wi-Fi Fault; Mobile Network Fault |
| 46 | ATS Restored (ATS Restored) | 3350 / NR | ATS Restored; Ethernet Network Restored; Wi-Fi Restored; Mobile Network Restored |
| 47 | Communication Failure (Communication Failure) | 1354 / YS | RF-HD Connection Failed |
| 48 | Communication Restored (Communication Restored) | 3354 / YK | RF-HD Connection Restored |
| 49 | Wireless Device Was Disconnected (Wireless Device Was Disconnected) | 1355 / XL | Connection Lost |
| 50 | Wireless Device Was Connected (Wireless Device Was Connected) | 3355 / XC | Connection Restored |
| 51 | Protection Loop Shorted (Protection Loop Shorted) | 1372 / QT | Protection Loop Shorted |
| 52 | Fixed The Shorted Protection Loop (Fixed The Shorted Protection Loop) | 3372 / QR | Fixed The Shorted Protection Loop |
| 53 | Sensor Fault (Sensor Fault) | 1380 / AS | Sensor Fault |
| 54 | Sensor Restored (Sensor Restored) | 3380 / AN | Sensor Fault Cleared |
| 55 | Disarmed By APP (Disarmed By APP) | 1400 / OQ | the Disarmed state |
| 56 | Armed By APP (Armed By APP) | 3400 / CQ | Armed |
| 57 | Disarmed By Keypad (Disarmed By Keypad) | 1401 / OP | the Disarmed state |
| 58 | Armed By Keypad (Armed By Keypad) | 3401 / CL | Armed |
| 59 | Disarmed By Schedule (Disarmed By Schedule) | 1403 / OA | the Disarmed state |
| 60 | Armed By Schedule (Armed By Schedule) | 3403 / CA | Armed |
| 61 | Cancel (Cancel) | 1406 / BC | Cancel |
| 62 | Disarmed By Keyfob (Disarmed By Keyfob) | 1407 / OS | the Disarmed state |
| 63 | Armed By Keyfob (Armed By Keyfob) | 3407 / CS | Armed |
| 64 | Quickly Armed (Quickly Armed) | 3408 / CS | Armed |
| 65 | Disarmed By KeySwitch (Disarmed By KeySwitch) | 1409 / OS | the Disarmed state |
| 66 | Armed By KeySwitch (Armed By KeySwitch) | 3409 / CS | Armed |
| 67 | Home Mode Activated (Home Mode Activated) | 3441 / NL | Home Mode Activated |
| 68 | Home Mode Activated By KeySwitch (Home Mode Activated By KeySwitch) | 3442 / NL | Home Mode Activated |
| 69 | Armed With Faults (Armed With Faults) | 3450 / CF | Armed With Faults |
| 70 | Unsuccessful Arming (Unsuccessful Arming) | 1454 / CI | Unsuccessful Arming |
| 71 | Unsuccessful Arming By Schedule (Unsuccessful Arming By Schedule) | 1455 / CD | Unsuccessful Arming |
| 72 | Exit Error (Exit Error) | 1457 / EA | Unsuccessful Arming |
| 73 | Device Locked (Device Locked) | 1501 / DK | Device Locked |
| 74 | Device Unlocked (Device Unlocked) | 3501 / DO | Device Unlocked |
| 75 | Deactivated Device (Deactivated Device) | 1502 / QB | Permanently Deactivated |
| 76 | Reactivated Device (Reactivated Device) | 3502 / QU | Device Has Been Reactivated |
| 77 | Disabled Tamper (Disabled Tamper) | 1503 / TB | Cover Permanently Deactivated |
| 78 | Enabled Tamper (Enabled Tamper) | 3503 / TU | Cover Enabled |
| 79 | Bypassed Device (Bypassed Device) | 1570 / QB | Bypassed |
| 80 | Device Bypass Restored (Device Bypass Restored) | 3570 / QU | Restored |
| 81 | Bypassed Tamper (Bypassed Tamper) | 1578 / TB | Tamper Signal Bypassed |
| 82 | Tamper Bypass Restored (Tamper Bypass Restored) | 3578 / TU | Tamper Signal Restored |
| 83 | Manual Trigger Test Report (Manual Trigger Test Report) | 1601 / RX | Test Report |
| 84 | Periodic Test Report (Periodic Test Report) | 1602 / RP | Periodic Test Report |
| — | Heartbeat | Null / Null | Heartbeat Reported by Device |
Appendix 3 — Cybersecurity
SAFE HOME places great importance on cybersecurity and privacy protection and continuously invests resources in raising the security awareness and capabilities of its employees and in ensuring an appropriate level of product security. SAFE HOME has established a dedicated security team that ensures security throughout the entire product life cycle – from design, development, and testing to manufacturing, delivery, and maintenance. The company follows the principles of minimizing data collection, minimizing the services provided, prohibiting the implementation of hidden access (backdoors), and removing unnecessary and unsecured services (e.g., Telnet). SAFE HOME products continue to introduce innovative security technologies and strive to raise the level of product security, providing users worldwide with security advisories and round-the-clock (24/7) response to security incidents in order to better protect their rights and interests. SAFE HOME also encourages users, partners, suppliers, government authorities, industry organizations, and independent researchers to report any potential risks or vulnerabilities found on SAFE HOME devices to the SAFE HOME PSIRT security team; specific reporting instructions can be found in the cybersecurity section of the manufacturer's official website.
Product security requires not only the manufacturer's ongoing attention and effort in development, manufacturing, and delivery, but also the active participation of users, who can help improve the environment and manner in which the product is used, thereby better ensuring its security after it is put into operation. For this reason, we recommend that users operate the device securely, including, among other things, the following measures:
Account Management
- Use strong passwords. When choosing a password, follow these recommendations:
- at least 8 characters long;
- contains at least two types of characters: uppercase and lowercase letters, digits, and symbols;
- does not contain the account name or its reversed order;
- does not contain consecutive characters, such as 123, abc, etc.;
- does not contain repeating characters, such as 111, aaa, etc.
- Change passwords regularly. It is recommended to change the device password regularly to reduce the risk of it being guessed or cracked.
- Assign accounts and permissions appropriately. Add users according to actual operational and administrative needs and grant them the minimum necessary permissions.
- Keep the account lockout function enabled. The account lockout function is enabled by default. We recommend keeping it active to protect the account — after repeated failed password attempts, the corresponding account and the source IP address will be locked.
- Set and update password recovery information in a timely manner. SAFE HOME devices support a password recovery function. To reduce the risk of this function being misused by an attacker, update this information whenever it changes. When setting up security questions, it is recommended not to use easily guessable answers.
Service Configuration
- Enable HTTPS. We recommend enabling HTTPS to access web services through a secure channel.
- Encrypted audio and video transmission. If the content of your audio/video data is important or sensitive, we recommend using the encrypted transmission function to reduce the risk of it being intercepted during transmission.
- Disable unnecessary services and use secure mode. If they are not needed, we recommend disabling certain services, such as SSH, SNMP, SMTP, UPnP, the access point (AP), etc., to reduce the potential attack surface. If necessary, we strongly recommend choosing secure modes for, among others, the following services:
- SNMP: choose SNMP v3 and set strong encryption and authentication passwords;
- SMTP: choose TLS to access the mail server;
- FTP: choose SFTP and set complex passwords;
- access point (AP): choose the WPA2-PSK encryption mode and set complex passwords.
- Change the default ports of HTTP and other services. We recommend changing the default port of HTTP and other services to any port within the range 1024–65535 to reduce the risk of it being guessed by an attacker.
Network configuration
- Enable the allowlist. We recommend enabling the allowlist function and allowing access to the device only to IP addresses on this list. Be sure to add the IP address of your computer and associated devices to the list.
- MAC address binding. We recommend binding the gateway IP address to the MAC address on the device to reduce the risk of ARP spoofing.
- Build a secure network environment. For better device security and to reduce potential cybersecurity risks, it is recommended to:
- disable the port mapping (port forwarding) function on the router to prevent direct access to devices on the internal network from the external network;
- segment the network according to actual needs: if communication between two subnets is not required, it is recommended to use VLANs, gateways, and other methods to separate networks and achieve their isolation;
- implement an 802.1x access authentication system to reduce the risk of unauthorized access by end devices to the private network.
Security Audit
- Check logged-in users. It is recommended to regularly check logged-in users to detect unauthorized users.
- Check the device log. By reviewing logs, you can identify the IP addresses from which someone is attempting to log in to the device, as well as key operations performed by logged-in users.
- Set up network logging. Due to the limited storage capacity of the device, the stored log is limited. If you need to retain the log for a long period, we recommend enabling the network logging function so that key records are synchronized to a network log server for later retrieval.
Software Security
- Update the firmware in a timely manner. In accordance with standard operating practices, device firmware should be updated to the latest version in a timely manner so that the device has the latest features and security. If the device is connected to a public network, we recommend enabling automatic online update detection so that information about firmware updates from the manufacturer is obtained promptly.
- Update the client software in a timely manner. We recommend downloading and using the latest version of the client software (the ProSAFE app).
Physical Protection
We recommend ensuring the physical protection of the device (especially storage devices) — for example, by placing the device in a dedicated room and cabinet and implementing access control and key management to prevent unauthorized persons from damaging the hardware and other peripheral devices (e.g., USB flash drive, serial port).
Warranty
A warranty is provided on the SAFE Hub 2 Plus LTE device 36 months from the date of sale. The warranty does not cover defects caused by failure to follow the instructions provided in this manual.
If you experience problems with the device, please contact technical support first — most situations can be resolved remotely.
Gallery
Need Help?
SAFE HOME europe technical support:
Email: info@safe-home.eu · Phone: (+420) 581 222 262
Website: www.smart-safe.eu